The #1 VPN Client for Mac, iPhone and iPad

The #1 VPN Client for Mac, iPhone and iPad

Overview
Features
Compatibility
For iPhone & iPad
Pricing
Teams
Support
VPN Tracker World Connect
Blog
Sign up
Login
 
FAQ
Manual
Download
Send us a message

There are a number of possible causes for such a behavior. This FAQ will help you to find out what is causing the problem in your specific situation. In this FAQ we will be using destination device as a generic term for the device you are trying to connect to. The destination device can be anything from a normal computer, to a server, to a network printer.


1. Are you trying to connect to the destination device using a host name?

If you are using a host name, please try once using its IP address instead. If that works, the problem has to do with DNS resolution. Please make sure DNS is enabled for the VPN connection and correctly configured. Note that using Bonjour or NETBIOS hostnames is generally not possible over VPN.


2. Is the IP address you are connecting to really part of the remote network?

For example, if your remote network is 192.168.13.0/24, you should be able to connect to IPs starting with 192.168.13.x, but connections to IPs starting with 192.168.14.x will not work as they are outside the address range of traffic tunneled through the VPN.


3. Is the local address in VPN Tracker part of the remote network?

Using a local address in VPN Tracker (Basic > Local Address) that is part of the remote network is not possible with most VPN gateways. Please use a local address that is outside all remote networks. For example, if your remote network is 192.168.13.0/24, do not use an address starting with 192.168.13. If you are using an automatic configuration method (e.g. Mode Config, EasyVPN, DHCP over VPN) you may be able to assign a local address to VPN Tracker that is part of the remote network. Refer to the configuration guide for your VPN gateway for more information.


4. Could multiple VPN users use the same local address?

If multiple VPN users exist, pleas make sure no two users are using the same local address (Basic > Local Address), otherwise one of them will not be able to use the tunnel anymore whenever both of them are connected. If that field is empty in your configuration, VPN Tracker will just use the IP address of your primary network interface as local address, and of course, this can also cause an address conflict with another user, that’s why we do not recommend to leave that field empty if there are multiple VPN users.


5. Can you ping the LAN address of the VPN gateway?

You can find a ping tool directly in VPN Tracker under Tools > Ping Host. The LAN address of the VPN gateway is special in the regard that this address doesn’t need to be routed at all. So if you can ping that address but no other remote address, it is most likely a routing issue at the remote end.


6. If you can't ping anything, try re-running the VPN Availability Test

The VPN Availability Test can be found in the menu: Tools > VPN Availability Test. Then try connecting the VPN again. The results of this test depend on the capabilities of your local Internet router/modem or the Internet connection itself and they influence how the VPN tunnel is established. VPN Tracker automatically runs the test for every new Internet connection it is able to detect but even if a connection has been tested before, there are various reasons why the behavior of that connection may have changed in the meantime.


7. Is your VPN gateway the default gateway (router) of its network?

If the VPN gateway is not the default gateway, you will in many cases need a suitable routing setup in order for responses to reach you. Whenever a device doesn’t know how to reach an IP address directly, it forwards its reply to its default gateway and if that isn’t the VPN gateway, it won’t know what to do with that reply data. In that case its important to configure the default gateway to forward replies to VPN users to the VPN gateway.


8. Is your VPN gateway the default gateway (router) of its network?

For more details, we would like to direct you to the following FAQ entry.

The Pre-Shared Key (sometimes called shared secret) is basically a form of password for your VPN gateway which is set up on your device.

Configuring the Pre-Shared Key for a new VPN connection


VPN Tracker provides setup guides for all major gateway manufacturers. In these setup guides, you will also find information on how to set up a secure Pre-Shared Key for your specific device.

You can access all guides on this page.

I have lost my Pre-Shared Key - how can I get it back?


Here are a few tips for you to try and restore your Pre-Shared Key:
  1. Check if you have stored the affected connection in your Personal Safe. If so, you may be able to download the connection again.
  2. Check the Keychain (Applications > Utilities > Keychain Access). The Pre-Shared Key is usually saved here. Enter "Shared Secret" into the search bar to view a list of all your saved PSKs.
  3. Are you using Time Machine Backup? You could try restoring an older connection with the Pre-Shared-Key.
  4. Check your firewall or ask the relevant VPN Administrator. Refer to your device handbook to find out where to obtain this information on your specific firewall.

After upgrading to macOS 15 Sequoia, you might notice that your Mac constantly changes its MAC address, affecting your ability to connect to your VPN. This behavior is due to macOS 15’s new privacy features, which can assign randomized MAC addresses for network connections. However, you can configure your network settings to always use a fixed MAC address, which can resolve issues with VPN connectivity, such as DHCP reservations failing due to MAC address changes.

How to Set a Fixed MAC Address in macOS 15 (Sequoia):

  1. Open System Settings:
    • Click the Apple logo in the top-left corner of your screen.
    • Select System Settings from the dropdown menu.
  2. Go to Wi-Fi Settings:
    • In the left sidebar, click Wi-Fi.
    • Select the Wi-Fi network you usually connect to for VPN access and click on "Details...".
  3. Configure the MAC Address:
    • Look for the option labeled Private Wi-Fi Address.
    • Change this option to "Fixed" to use a fixed MAC address instead of a randomized one.
    • In some cases, the Fixed Setting may still cause issues. If this is the case, change the setting to "Off"
      {S_1478}
    • Your network will now always connect using the same MAC address, helping maintain your VPN connection stability.
  4. Re-establish VPN Tracker Connection:
    • Once you've set a fixed MAC address, ensure that your VPN’s DHCP reservation or configuration aligns with this MAC address.

This process will restore the VPN Tracker’s ability to connect reliably using a consistent MAC address, resolving issues caused by macOS 15 Sequoia’s default MAC address randomization feature.

There are two types of IP addresses:
  • Private IP Addresses, and
  • Public IP Addresses

Private IP addresses can be used by any person or organisation for their private network.

The two most commonly used private network ranges (range of IP Addresses) are:
  • 192.168.0.x, and
  • 192.168.1.x

When for example your home network and your company network both use the same Private IP Range, there will be problems because you will see multiple devices with the same IP Adress and your computer will get confused.

Your Company Network:
When setting up a company network, most companies try to avoid the above listed IP ranges, which is also recommended by us, in order to not cause conflicts with people connecting over VPN. However, there are still some companies that use one of these popular network ranges.

Your Home Network:
A lot of popular home routers like Netgear, Asus, Google, D-Link, TP-Link, Linksys, Trendnet, AVM all use an IP Range of 192.168.0.x.

If your company Network uses the same IP Range as your home network you are going to run into problems.
{S_1182}

Here are two possible solutions:
  1. Change your local network to a different range (Preferred)


    Possible Ranges are:
    • 10.250.250.x
    • 172.30.30.x
    • 192.168.250.x

    Advantage: Once you have made this change on your home network, you will never have conflicts in this network.
    Disadvantage: You will need to change the settings on your private network router once, this requires access and can take some time.
    What to do:
    • Login to your home router
    • Find the setup section with “DHCP” settings.
    • Change your router to a different IP adress (for example an address from one of the ranges listed above, for example 172.30.30.1)
    • Change the DHCP Server Settings to the same range of your router (If your router IP is 172.30.30.1, your range could be 172.30.30.10 to 172.30.30.253){S_1183}

    After you have made these changes, there will be no more conflicts between your home and company network.{S_1184}
  2. Force Traffic over VPN


    There may be situations where it's not possible to use the first option (for example if you're in a coffee shop or hotel) In this case you have the option to force the traffic over your VPN Network, this means your VPN Network (company network) will always win.
    Advantage: This setting is global, meaning no matter what network you are in you will always be able to connect.
    Disadvantage: Once you are connected to your company’s VPN, you can not access local service, like home router, local storages or printers.
    What to do:
    • Configure your VPN Tracker connection
    • Select the "Advanced" Tab at the top
    • In the "Traffic control" section, activate the Checkbox "Force traffic over the VPN if remote networks conflict with local networks"{S_1189}


Download VPN Tracker free

Disclaimer: Please be aware that resetting your Personal Safe will delete all of your VPN connections and passwords. You will need to start from scratch, building up your connections.

If you do not have your Personal Safe recovery key or can't retrieve your old equinux ID password, follow the recovery steps in VPN Tracker instead.

  1. If you have connections or Shortcuts on your Mac that are stored in your Personal Safe, deactivate Personal Safe in preferences and create a local copy of your connections
  2. Go to your Personal Safe webpage and delete your user keys: https://my.vpntracker.com/user/sync/keys
  3. Sign out from your VPN Tracker account on your Mac, open Keychain Access, and delete the entry "Connection Safe Master Key."
  4. Then sign back in and add a connection to your safe.
  5. Don't forget to write down the new recovery key and keep it in a safe place. This will enable you to log in if you ever lose your login details.

Setting up VPN on your Mac

VPN Tracker is the leading VPN client for macOS and works seamlessly on all the latest macOS operating systems.
You can download and test VPN Tracker here free.

Launching VPN Tracker for Mac

The first time you launch VPN Tracker on your Mac, you may need to grant it permission to create VPN connections for you.

First please make sure VPN Tracker is in your Applications folder and complete these steps locally on the Mac (e.g. not over Screen Sharing, Remote Desktop or other remote access tool).

IMPORTANT: macOS notices when you run remote desktop systems like TeamViewer, Apple Remote Desktop, VNC or similar. and hides these buttons. You MUST be local to the Mac.

Then do this:
‣Open System Preferences
‣Go to Security
‣Click "Allow"
{S_685}
Now you'll be able to set up VPN Tracker.

Troubleshooting VPN Setup on macOS

If the "Allow" button can not be clicked, please make sure you are not using a 3rd party mouse or tablet input device, as these can look like remote desktop software to your Mac. If you are using e.g. a Wacom input tablet or mouse utility tool, try disabling those, reboot your Mac and then try clicking the button again.

In case the button doesn't even appear in the dialog, please note that if your Mac has a MDM profile installed, the MDM profile can forbid users to approve their own System Extensions. In that case the profile itself has to approve our extension. Please see technical notes below.

Technical note for Enterprise Rollouts:
VPN Tracker for Mac uses a System Extension to create a secure VPN tunnel and manage network traffic. macOS High Sierra and newer macOS versions now require users to manually approve all System Extensions. For Enterprise rollouts via MDM, you can also pre-approve the VPN Tracker Kernel Extension using a special profile. Our Team IDs are CPXNXN488S and MJMRT6WJ8S.
Please see Apple's Support Document for more details.

Not using an MDM managed Mac?
If your Mac is not MDM managed, please try rebooting, as macOS occasionally can get tripped up with System Extensions. After the reboot, VPN Tracker should work fine.
To access volumes and files hosted on a file server, one of several available distributed file system protocols must be used. As of 2018, the most common protocols are SMB/CIFS (default for Windows and macOS 10.9 or newer), AFP (default for macOS prior to 10.9), NFS (default for Linux and most UNIX operating system), WebDAV (based on HTTP, vendor neutral). All these protocols, except for WebDAV, have originally been designed to access files hosted on a file server located in the same network as the client accessing it. This can often lead to issues when using these protocols over a VPN connection.

A VPN connection typically runs over the Internet and the Internet has quite different network characteristics than a company or home network. Local networks typically offer a high amount of symmetric (upload equals download) bandwidth, very low and stable latency, very litte packet loss, almost no data corruption and a rather high and always constant maximum transmission unit size (MTU). Contrary to that, Internet connections offer a lot less bandwidth, usually asymmetric (much more download than upload) and the Internet has a rather high, very fluctuating latency, typically at leas some packet loss, data corruption can happen as well and the maximum transmission unit size can be much lower and is subject to change at any time even during an active transmission. Some of the protocols above can cope better with these conditions than others.

Issues to expect: Slow to very slow directory browsing (because of the large latency), copying a file from remote is slow (limited by the upload of the other side), copying a file to remote is slow (limited by the upload of the local side), directly opening a file directly is even slower (caused by limited upload bandwidth but also large latency and small packet sizes can play a role), and file access failures are possible (caused by packet loss and/or data corruptions). Please note that none of these is the fault of the VPN itself, even when running these protocols over the same Internet line without any VPN, the results would only be marginally better or not better at all.

Unfortunately there is little that can be done about these problems. There is nothing users can do to improve latency. Improving upload bandwidth will always help if such an option does exist as if bandwidth is the problem, it's almost always upload and not download bandwidth. Switching the protocol may help, as especially SMB/CIFS doesn't work very well over Internet lines with bigger latency and if it has to fall back to an older protocol version (one older than SMB 3.0), it will be a catastrophe (up to not working at all anymore). A problem is that SMB and WebDAV are the only protocols that Windows supports natively, whereas macOS supports all the protocols named above natively, thus it's required to resort to third party products to teach Windows alternative protocols. In a pinch one can try to use WebDAV, but WebDAV has a rather poor performance even when used in local networks. Dedicated NAS devices usually support NFS when enabled, which could yield a better performance than SMB.

  • If you haven't already, you can download VPN Tracker using this link.
  • After the download has completed, launch the app and click the "Login" button in the top left-hand corner of the app home page.
  • Enter your equinux ID and password in the space provided. Hint: This is the login you first created when purchasing VPN Tracker in our online store.

Are you a World Connect User?

You will need to download VPN tracker World Connect. You can do so using this link. VPN Tracker World Connect must be installed using the App Store. Once you've installed the app on your device, sign in with your equinux ID and password.

Unable to save your AnyConnect VPN password in the Cisco VPN client?

Here's the fix:


That's it! VPN Tracker will store your login details securely via end-to-end encryption so you can get connected faster – for the best VPN experience on Mac and iOS.

VPN Tracker automatically stores a backup of all your VPN connections on your Mac. If you have inadvertently deleted a connection, or wish to revert to an earlier copy of a connection, you can manually restore the backup copy.

1. Turn off Personal Safe syncing

You need to deactivate Personal Safe for the connections you're trying to restore from your backup, to prevent unwanted changes being synced:

  • Open VPN Tracker 365
  • From the menu bar, choose: VPN Tracker 365 > Preferences > Personal Safe
  • Uncheck the connections you want to restore from your backup
  • Quit VPN Tracker 365

2. Restore from your Backup

  • Open Finder and choose "Go" > "Go to Folder…" from the menu bar
  • Enter this path and press Return:
    /Library/Application Support/VPN Tracker 365
  • Rename your "etc" folder to "etc-backup" – for safekeeping
  • Go into the "backup" folder

Here you'll see a number of backup folders, all organized and named by date.

  • Move the "etc-date" folder you want to restore up one level into the main "VPN Tracker 365" folder
  • Rename the folder your just moved to just "etc" (deleting the date)
  • Open VPN Tracker 365

All of your connections will now be restored to their backed-up state.

3. Re-activate Personal Safe

  • Choose: VPN Tracker 365 > Preferences > Personal Safe from the menu bar
  • Check your connections, to add them to Personal Safe

Download VPN Tracker free

There are multiple passwords that VPN Tracker may require: Your admin password for installation, passwords needed for connecting to your VPN or accessing your Keychain, etc.

This guide shows all password prompts you may encounter in VPN Tracker, explains why they are needed and lets you know which password should be entered.

Administrator password prompts

VPN Tracker will occasionally require you to enter an administrator password - for example during the macOS installation process in order to approve the System Extension needed to allow VPN Tracker to work effectively.

Account + licensing

To log in to VPN Tracker on Mac or iOS, or to log in to your account on my.vpntracker.com, you will need to enter your equinux ID and password. This password gives you access to your VPN Tracker account where your plan, team data, connections and device information is stored.

{S_1327}

Pre-Shared Key

Many VPN connections are secured using a Pre-Shared Key (PSK) or Shared Secret which is set on the VPN gateway during the configuration process. You need to enter the PSK in VPN Tracker in order to connect to your VPN.

{S_1328}

If you are not the administrator of your VPN gateway, contact the admin for assistance. Tip: Admins can share pre-configured VPN connections using TeamCloud to avoid PSK confusion at enduser level.

Extended Authentication (XAUTH)

Most VPNs have a list of permitted VPN users - e.g. members of staff. Each VPN user has their own unique username and password which they need to enter in order to connect to the VPN. These are often the same credentials you use to sign in at the office. If you're not sure, get in touch with your admin who can advise you further.

{S_1329}

Such a setup is called “Host to Everywhere” in VPN Tracker. All non-local traffic will be sent through the VPN. For this setup to work, it must be properly configured in VPN Tracker and on the VPN gateway:

  1. The Network Topology must be set to “Host to Everywhere” in VPN Tracker
  2. The VPN gateway must accept an incoming VPN connection with a 0.0.0.0/0 (= everywhere) endpoint

Once these are configured, it should already be possible to establish the VPN connection. However, it is very likely that Internet access will not yet work. For Internet access to work, several more things need to be configured on the VPN gateway:

  1. The VPN gateway must route VPN traffic not destined for its local networks out on the Internet
  2. This traffic must be subject to Network Address Translation (NAT) in order for replies to reach the VPN gateway
  3. In many cases, a suitable remote DNS setup is necessary for DNS resolution to continue to work

Note that not alll VPN gateways can be configured for Host to Everywhere connections. Most devices designed for small office or home networks (e.g. devices by NETGEAR or Linksys) are not capable of dealing with Host to Everywhere connections.

IPsec VPN uses a different protocol (ESP) for the actual data transfer than for establishing the connection (IKE). Since the ESP protocol does not use network ports, NAT (Network Address Translation) routers may have difficulties handling it correctly. Only NAT routers that support "IPSec Passthrough" (sometimes also named "VPN Passthrough" or "ESP Passtrhough") and where this option is also enabled, can handle ESP data packets.

To work around this problem, two alternative tunneling methods exist:

  • NAT-Traversal (old, RFC draft version)
  • NAT-Traversal (new, RFC standard version)

Which of these methods will work with your connection depends on two properties:

  1. Which of these methods allows traffic to pass through your local Internet router.
  2. Which of these methods are supported by your VPN remote gateway.

To test for the first property, VPN Tracker will automatically establish three VPN test connections to a VPN gateway hosted by us whenever it detects a new router that has not been tested before. One connection uses plain ESP, the other two either NAT-T method mentioned above. It will remember the test results for this router and take them into account whenever you start a connection from the network location. The reason we are testing with our own gateway is simply that the test requires a gateway supporting all three methods, with a known configuration and a simply way to verify if traffic did arrive at that gateway.

The second property is not tested in advance, VPN Tracker will become aware of that information when it actually tries to connect to your VPN gateway. VPN Tracker will compare the methods your gateway supports with the stored test results. If there is a match, a method that your gateway supports and that was also working during the test, this method will be used. If there is no match, VPN Tracker will immediately stop and show an appropriate error in the log, explaining the situation.

If you suspect a NAT-Traversal issue or you think the previous test results may be wrong or outdated, simply re-run the test:

‣ Make sure NAT-Traversal (Advanced tab) is set to Automatic
‣ Go to "Tools" > "Test VPN Availability"
‣ Click "Test Again"
‣ Wait until the test has completed, then connect to your VPN

The test dialog also allows you to tell VPN Tracker to not test the current location and forget any previously created test results. This is rarely needed and also not recommended but there might be situation where the test results are wrong because access to our VPN gateway is not possible (e.g. it is blocked) and thus the test result are just bogus and say nothing about the true capabilities of your VPN gateway.

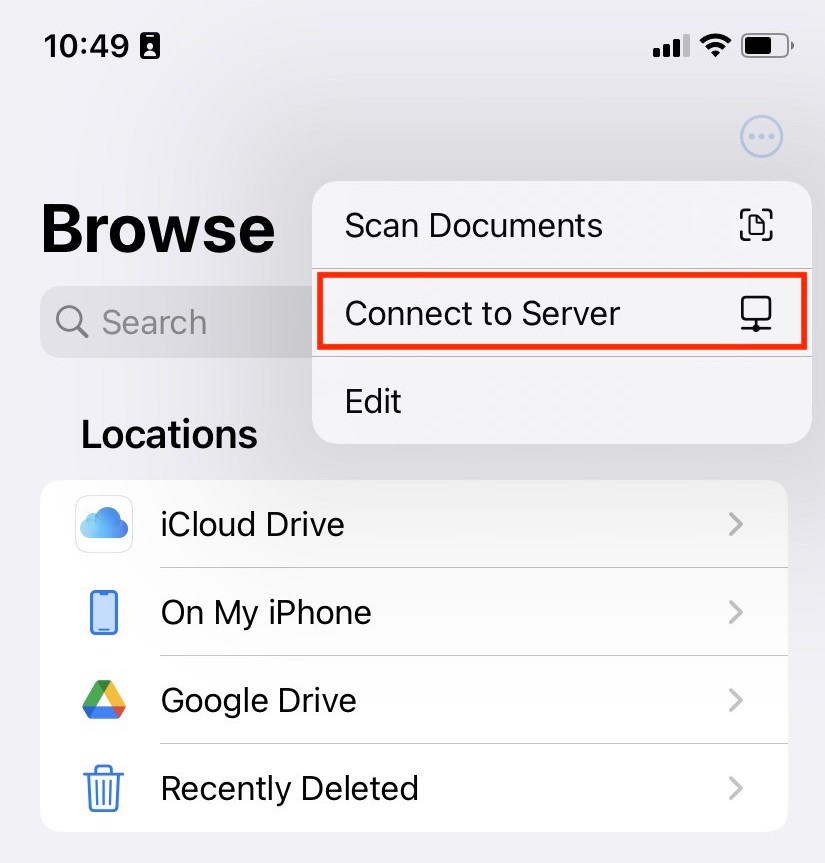
Opening files over VPN on your Mac is easy with VPN Tracker:
  1. Start your VPN connection in VPN Tracker
  2. Go to the Finder > Go To >Connect to Server
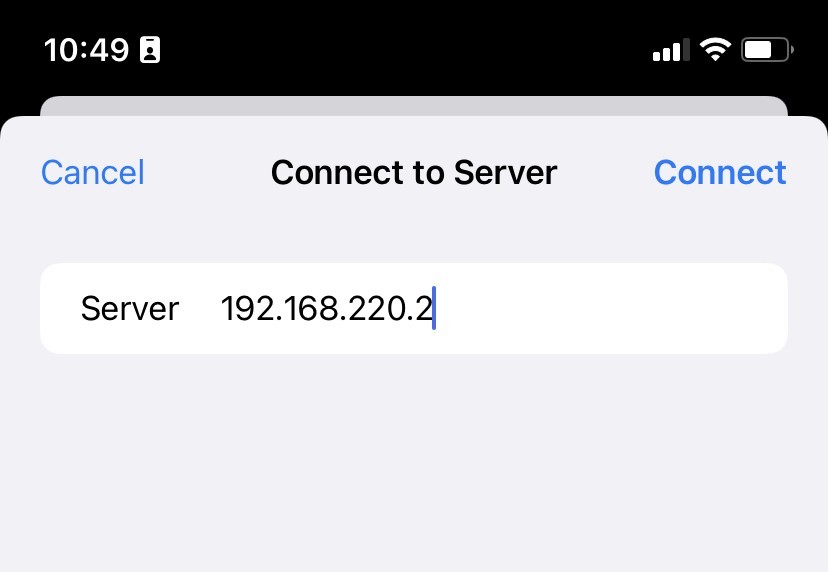
  3. In the Server Address field, enter the name or IP address of the server you want to connect to
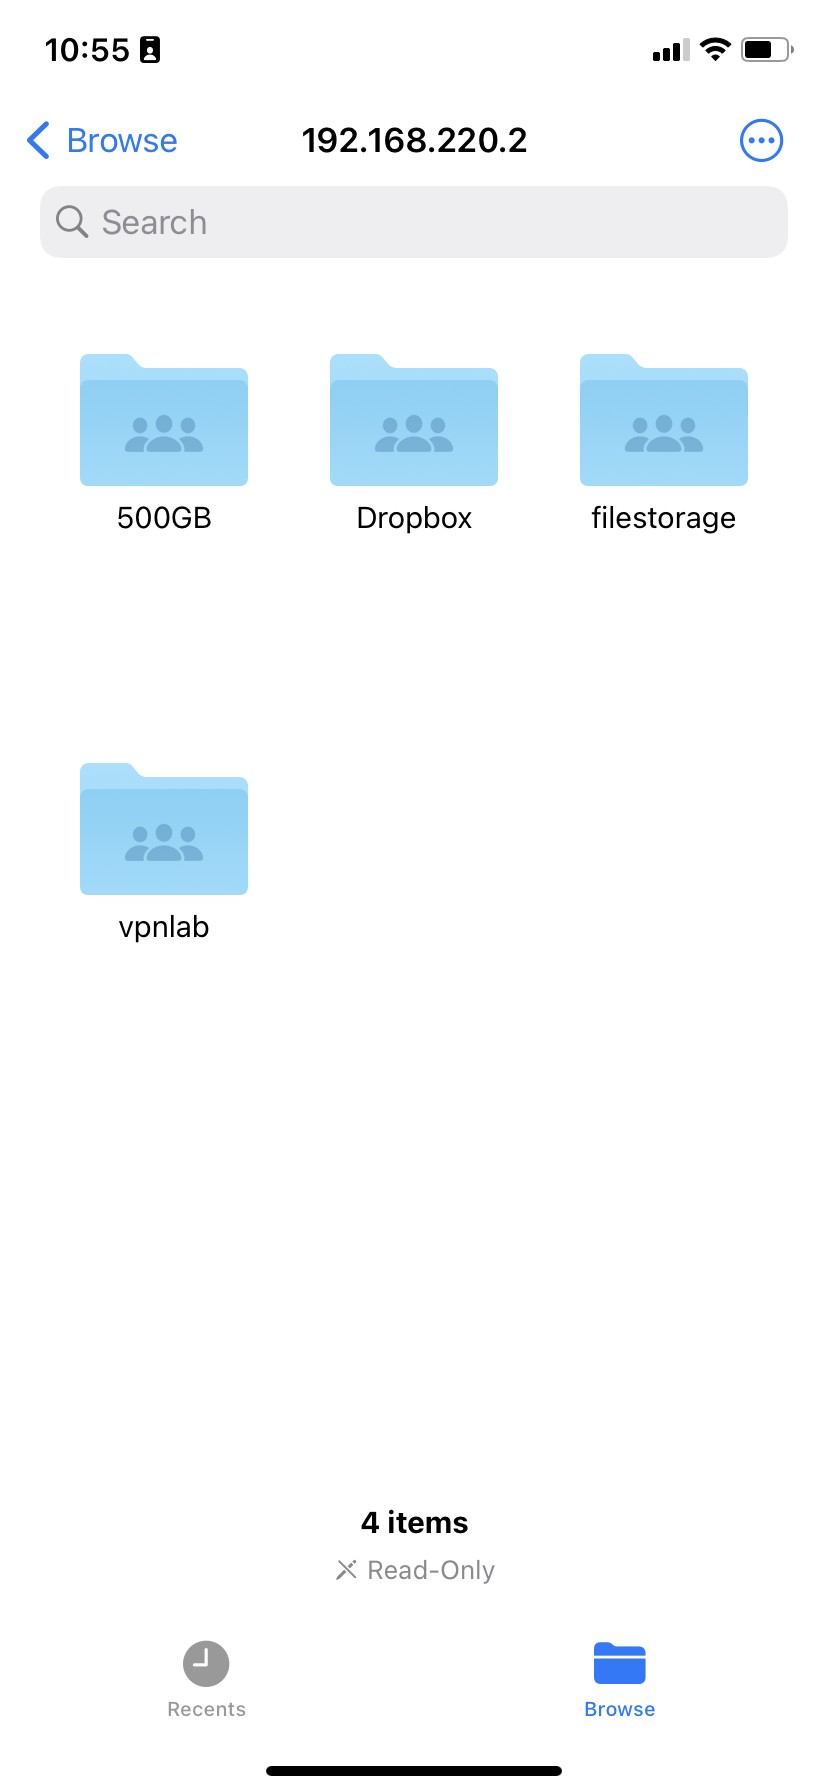
  4. Click on the Connect button.

Create a VPN Shortcut:


VPN Tracker offers convenient shortcut options for frequently used connections. You only have to set up the shortcut once. Afterwards you will be able to connect to your VPN and open your files with just one button click.
Find out more: {FQ1859}
Setting up a VPN connection to your Sophos XG Firewall is easy with VPN Tracker. The Sophos XG has its own unique device profile in the app with many of the required settings already in place; making configuration super straightforward. Use the Sophos XG configuration guide as a step-by-step walkthrough on how to set up a VPN on your device.

In some circumstances, VPN Tracker may not be able to store your account login credentials in your Keychain.

To fix this issue, please try the following:

  • Quit VPN Tracker
  • Open Keychain Access from Applications > Utilities
  • Select your login keychain
  • Choose File > Lock Keychain “login”
  • Then choose File > Unlock Keychain “login”

On newer macOS releases, you may not see the option to lock/unlock your Keychain. In that case, please enter the following command via the Terminal:

security lock-keychain ~/Library/Keychains/login.keychain
Once it has been locked, you can then unlock your Keychain again:
security lock-keychain ~/Library/Keychains/login.keychain
(You will need to enter your macOS login password to confirm).

Now re-open VPN Tracker and try signing in again.

If the problem still pops up, try this:

  • Quit VPN Tracker
  • Go back to Keychain Access
  • In the search box enter “VPN Tracker User Auth”
  • Delete the VPN Tracker User Auth Token entry

Now re-open VPN Tracker and try signing in again.

Last resort: Reset your keychain

If none of the tips above work, macOS has an option to reset your Keychain. Note that this should only be tried as a last resort, as it completely resets your login Keychain:

  • Open Keychain Access
  • Go to Keychain > Preferences
  • Choose "Reset Default Keychains…"
Afterwards, open VPN Tracker 365 and try signing in again.

If there are any further issues, please contact our support team and include the application logs from this location:
/Library/Application Support/VPN Tracker 365/var/log.

Sonicwall has been experiencing various issues with its iOS and Mac VPN client ("„Sonicwall Mobile Connect") recently.

An error message appears during setup:
'Your Sonicwall' is either currently unreachable or is not a valid SonicWall appliance. Would you like to save this connection anyway?

When starting the connection, the following appears:
Connection Error
'Your Sonicwall' is not a SonicWall SSL VPN server.

In such cases, we recommend switching to VPN Tracker. VPN Tracker is available for both Mac and iOS. An added advantage is that once a connection is set up, it’s immediately available on both devices, as VPN Tracker securely syncs the settings through the Personal Safe.

Update September 2024: SonicWall has introduced another update with SonicOS 6.5.4.15-116n, which has rendered SSL VPN functionality non-operational for many SonicWall devices.

Update November 2024: This issue seems to be addressed by the SonicOS 6.5.4.15-117n update. For more information, please visit:
https://www.sonicwall.com/support/knowledge-base/mobile-connect-breaks-after-upgrade-to-sonicos-6-5-4-15/240903132324983
The option "comp-lzo no" is considered depricated and will not be supported by future OpenVPN clientsor servers. Don't use this option on your server.
The recommendation of the OpenVPN developers is to best not use this option at all anymore. It is better toeither activate compression ("comp-lzo yes"), or to not use any compression at all (in this case the option "comp-lzo" should not even appearin the configuration).
The Optiome "comp-lzo no" doesn't mean "no compression", it means "compression only if the server requests it." Because of this the "comp-lzo" option is being replaced by the new option "compress", which partially shows a different behavior and thus is not backward compatible.
If you have a TP-Link router for your local internet access and are having trouble connecting to a VPN with a connection that works at other locations, please try the following.
Sign in to your TP-Link router admin webpage
Find the VPN passthrough settings
Uncheck and then re-check all the VPN passthrough options
Apply the settings

This should reset an internal parameter and allow your connection to work as expected.
If you are trying to establish a VPN connection in VPN Tracker and you are getting a "Hash Mismatch" error, here is what you need to know:

Hash Mismatch usually means that the Pre-Shared Key (PSK) being used is wrong. When you get the "Hash Mismatch" error, the Hash algorithm is being rejected. However, this is not due to choosing an incorrect "Hashing" algorithm for Phase 1. If the Hashing algorithm chosen is actually wrong, then you would receive an error that would say "No Proposal Chosen" rather than a "Hash Mismatch" error. This would suggest that the client and gateway could not agree on common crypto settings. On the other hand, Hash Mismatch actually means that the hash your gateway calculated doesn't match the hash that VPN Tracker calculated (the two hashes are simply not matching). This hash is calculated out of values exchanged between the client and the gateway and the Pre-Shared Key. As all other values have just been exchanged and have been verified by both sides to be correct (so these cannot cause a different hash, not unless either side has a terrible bug). The only value that isn't exchanged and cannot be checked in advanced is the Pre-Shared Key (PSK).

By default, traffic to the remote network cannot be sent through the VPN tunnel if it is using the same network as the local network.

Resolving a Network Conflict using Traffic Control

You can use Traffic Control and VPN Tracker will send non-essential local network traffic over the VPN.

Activate Traffic Control:
> Go to Advanced > Traffic Control
> Check "Force traffic over the VPN if remote networks conflict with local networks"

Note that you will never be able to reach the following addresses over VPN: The IP address of your local router, your DHCP server, and your DNS server(s). If you need to reach those IPs over VPN, you will have to resolve the network conflict instead of using Traffic Control. The same applies for any IPs that you need to reach locally and over VPN.

Resolving a Network Conflict Manually

You have two basic options for resolving a conflict:

  1. Change the local network to use a different network address. In most situations, this will entail changing the LAN settings on the local router (including DHCP settings if DHCP is used).
  2. Change the remote network to use a different network address. With most setups, this entails changing the LAN on the VPN gateway (including DHCP settings if DHCP is used), and changing the IPs used by devices on the VPN gateway's LAN (or triggering a DHCP refresh, if DHCP is used). If the LAN is used in the VPN settings (such as for policies or firewall rules), these will need to be changed as well. Finally, change the remote network in VPN Tracker to match the new settings

If you decide to change the remote network, it makes sense to choose a private network that less commonly used. According to our informal statistics, conflicts are least likely using these networks:

  • Subnets of 172.16.0.0/12
  • Subnets of 192.168.0.0/16, excluding 192.168.0.0/24, 192.168.1.0/24 and 192.168.168.0/24

If these are not an option, use a subnet of 10.0.0.0/8, excluding 10.0.0.0/24, 10.0.1.0/24, 10.1.0.0/24, 10.1.1.0/24. However, since wireless network operators sometimes choose to use the entire 10.0.0.0/8 network, the first two options are preferred.

If you have a more sophisticated VPN gateway, in particular a SonicWALL, you may be able to set up an alternative remote network on the VPN gateway that is mapped 1:1 through Network Address Translation (NAT) onto the actual network. Users can then connect to this network instead if they have a conflict of networks. We have a guide available that describes this approach for SonicWALL devices.

If the conflict is caused by virtual network interfaces (e.g. Parallels, VMware), see here for more information.

To establish a VPN connection to a certain location (such as your office), you will need a VPN gateway at that location. This gateway could be a hardware VPN gateway device (see our compatibility page for compatible devices and setup guides).

The VPN gateway needs to be connected to the Internet (e.g. to a DSL modem or similar), preferably with a static IP address or it should be capable of using a service like DynDNS.org to map its dynamic IP to a hostname. Configuration is easiest if the VPN gateway is also the router (default gateway) of its network. If the VPN gateway is not the router of its network, a suitable routing setup may be necessary for traffic over the VPN to be routed correctly.

Configuration details can be found in the configuration guides for specific devices.

VPN Tracker for Mac fully supports all the latest macOS versions, including macOS Sequoia

Starting from macOS 11, Apple have made some key changes to the macOS security architecture. VPN Tracker for Mac offers full support for all the latest macOS versions. This includes support for: IPsec VPN, IKEv2 (Beta), OpenVPN, L2TP VPN, PPTP VPN, SonicWall SSL VPN, Fortinet SSL VPN, Windows SSTP VPN, Cisco AnyConnect VPN and WireGuard® VPN.

Tip: Sign up for VPN Tracker Insider Updates to get Beta releases as soon as they are available.

WireGuard® is a registered trademark of Jason A. Donenefeld.

There is a known bug in the Watchguard firmware that is causing a lot of trouble. Currently, we still do not know why VPN Tracker is triggering this bug, as the Windows client seems to not trigger it. We talked with Watchguard, but even they could not tell us what we are doing wrong. Basically the tunnel dies internally in the Watchguard (it's still shown as open and established, but traffic arriving over this tunnel is rejected as if the tunnel was closed).

If you are using a Branch Office VPN at the moment, try switching to a MUVPN if possible. MUVPN works with VPN Tracker as well and usually yields for better results.

Please refer to the following description.

For a certificate to be available in the "Local Certificate" list, it must be present in the Mac OS X Keychain with its corresponding private key.

You can easily check this in the Keychain Access application: If a certificate is listed under "My Certificates" (and not just "Certificates"), its private key is available and you will be able to select it in VPN Tracker as the "Local Certificate".

Important note for CheckPoint VPN users:

The Mac OS X Keychain Access application currently does not understand how to read private keys from some CheckPoint generated certificates.

To properly import the certificate into the Mac OS X Keychain, first convert it using the openssl command line tool:

  1. Open a Terminal ("Applications" > "Utilities" > "Terminal")

  2. Convert the certificate to PEM format:
      openssl pkcs12 -in /Users/joe/Desktop/MyCheckPointCert.p12 -out /tmp/out.pem
    

    Replace /Users/joe/Desktop/MyCheckPointCert.p12 with the path to the actual certificate that you want to convert.

    You will first be asked for the password that the certificate is encrypted with. If you do not know it, please ask the administrator who has created your certificate for you. You will then be asked twice for the password that will be used to protect the exported PEM file. You can use the same password that the original certificte was encrypted with. Note that no characters will appear on screen while you type in your passwords. Simply type the password and press the return key.

  3. Convert the PEM file back to PKCS#12 (.p12) format:
      openssl pkcs12 -in /tmp/out.pem -export -out ~/Desktop/MyFixedCheckPointCert.p12
    

    Replace /Users/joe/Desktop/MyFixedCheckPointCert.p12 with the path where you want the fixed certificate to be stored.

    You will first be asked for the password that you have just used for exporting to the PEM file, and then for a password to protect the fixed .p12 file with. You can again use the same password for everything.

Now double-click your fixed certificate file to import it into the Mac OS X keychain.

Since 2019, Firefox have been rolling out DNS over HTTPS (DoH) by default in several countries, including the USA, Canada, Russia and Ukraine.

What does this mean?


When DoH is enabled, it bypasses your DNS server and instead, domains you enter into your browser are sent via a DoH-compatible DNS server using an encrypted HTTPS connection.

This is intended as a security measure to prevent others (e.g. your ISP) from seeing the websites you are trying to access. However, if you're using a DNS server provided by your VPN gateway, it allows DNS queries to run outside the VPN tunnel. Moreover, if the VPN specifies a DNS server that resolves internal host names, these are either not resolved at all or resolved incorrectly when DoH is enabled.

How to disable DNS over HTTPS in Firefox


To ensure all your DNS queries run via your VPN's DNS, you will need to disable DoH in Firefox. To do so, open your Firefox browser, go to Firefox > Preferences > Network Settings and deselect the checkbox by "Enable DNS over HTTPS":
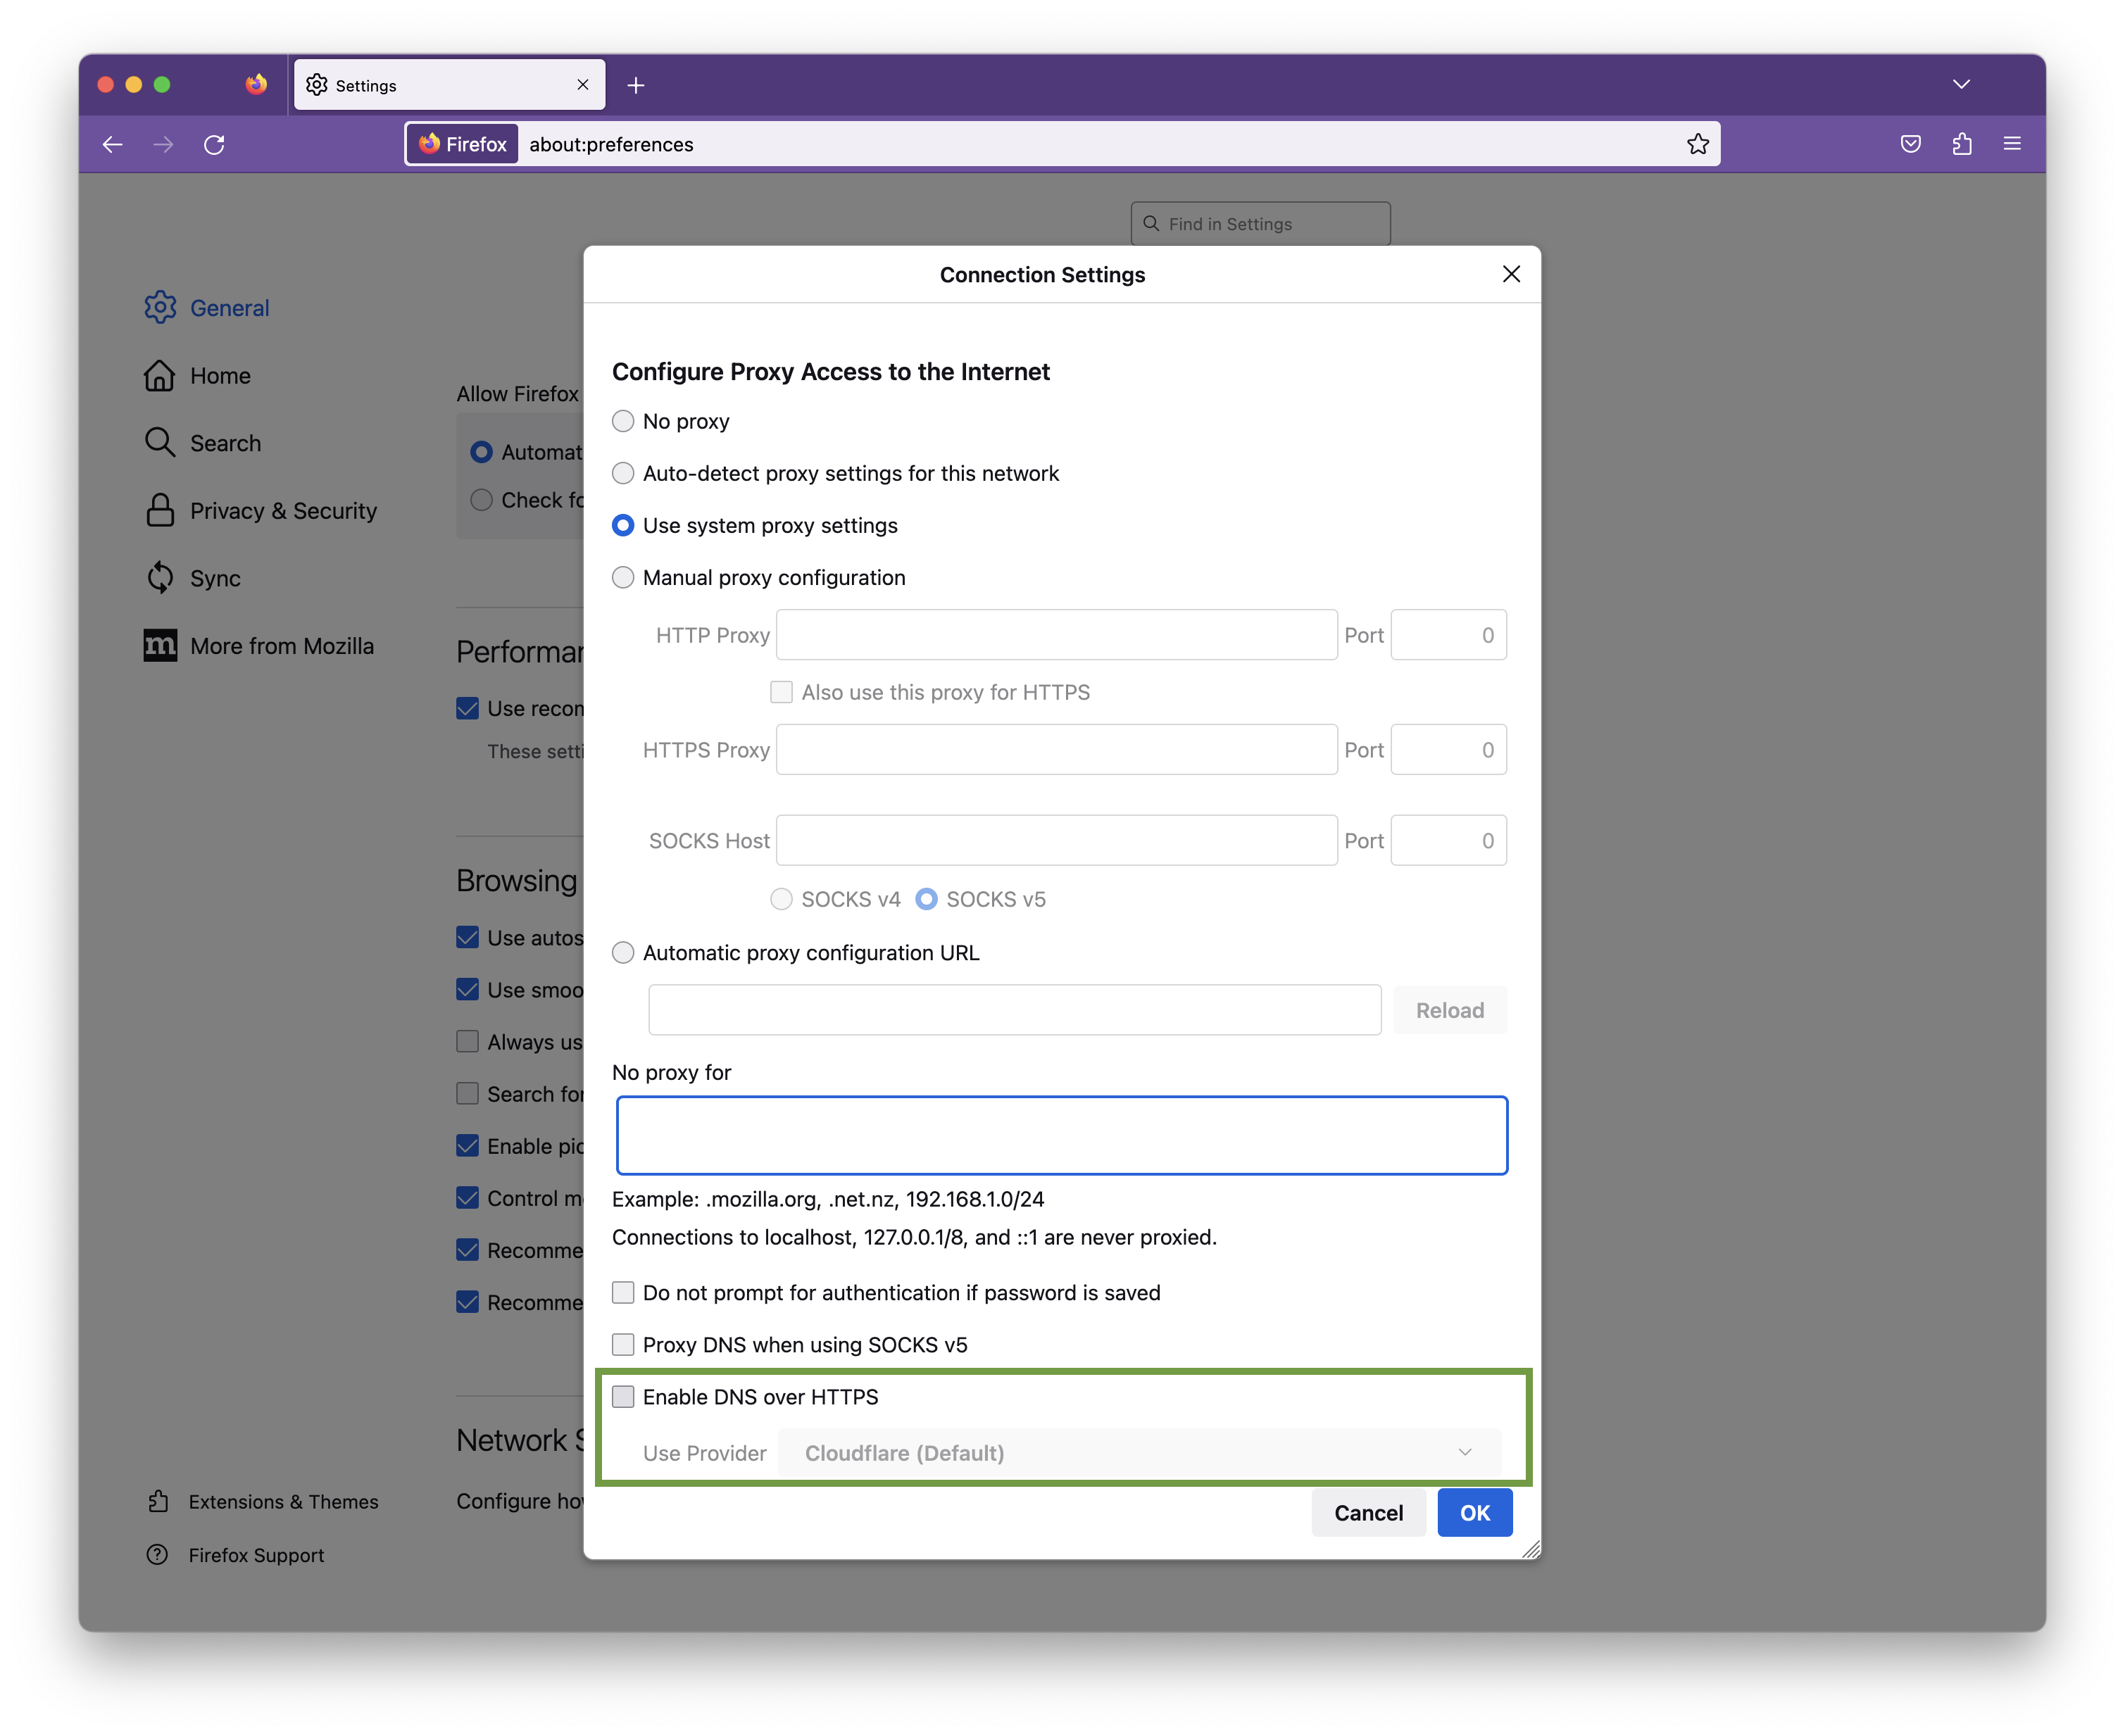
{S_1331}

Click OK to save your changes.

Some kinds of software may cause issues with VPN Tracker:

  1. Personal Firewalls / Desktop Firewalls
  2. Protection Software (e.g Virus Scanners, Malware Protection)
  3. Other VPN Clients / VPN Software (for example NCP Client)

Personal Firewalls usually ask the user, if an app should be allowed to send network traffic. It’s important to grant VPN Tracker full network access. If you have already added rules for VPN Tracker, please whitelist VPN Tracker.

Protection Software often sees VPN traffic as a potential source of threat, as it isn’t able to analyze that traffic because of its very strong encryption. Please ensure VPN Tracker is ignored by any protection software running on your Mac and allow VPN traffic to pass through.

Other VPN clients should not be a problem, if they are designed to co-exist with othe VPN apps. Unfortunately, not all other clients are and some capture all VPN traffic as soon as they are installed, even if the app is not running.
In these situations, you may need to uninstall the VPN client - we also suggest asking the vendor to improve its “cooperation” with other VPN apps.

Here are some common examples of the types of apps mentioned above. If you are uncertain whether any of these applications may be installed on your system, try the following:

  • Open the app “Terminal”
  • Copy and paste the following command: kextstat | grep -v com.apple

You’ll get a list of all kernel extensions that are not from Apple. Just compare that list with the identifiers in parenthesis below:

  • Little Snitch
    (at.obdev.nke.LittleSnitch)
     
  • TripMode
    (ch.tripmode.TripModeNKE)
     
  • Sophos Anti Virus
    (com.sophos.kext.oas, com.sophos.nke.swi)
     
  • Symantec Endpoint Protection / Norton AntiVirus
    (com.symantec.kext.SymAPComm, com.symantec.kext.internetSecurity, com.symantec.kext.ips, com.symantec.kext.ndcengine, com.symantec.SymXIPS)
     
  • Kaspersky Internet/Total Security
    (com.kaspersky.nke ,com.kaspersky.kext.kimul, com.kaspersky.kext.klif, com.kaspersky.kext.mark)
     
  • Intego Mac Internet Security
    (com.intego.netbarrier.kext.network, com.intego.virusbarrier.kext.realtime, com.intego.netbarrier.kext.process, com.intego.netbarrier.kext.monitor)
     
  • Fortinet FortiClient
    (com.fortinet.fct.kext.avkern2, com.fortinet.fct.kext.fctapnke)
     
  • Cisco Advanced Malware Protection (AMP)
    (com.cisco.amp.nke, com.cisco.amp.fileop)
     
  • TUN/TAP based VPN Clients
    (net.sf.tuntaposx.tap, net.sf.tuntaposx.tun)
     
  • eset Security Products
    (com.eset.kext.esets-kac, com.eset.kext.esets-mac und com.eset.kext.esets-pfw)
     

You can retrieve your equinux ID or password using this form.

If you don’t receive the email* containing your information, please note that the email may have mistakenly been marked as spam or junk mail, so be sure to check your email filters.

If you are unable to retrieve your username and password using the retrieval form, please contact the support team for assistance. When contacting us, please provide your old and new email adresses.

* Please note that the email will be sent to the address active on account. If your email address has since changed and you no longer have access to the previous account, you will need to contact the support team for assistance.

If you're running FortiOS 3, please make sure you are running at least MR6 patch 2. Previous firmware releases have an issue that will cause the device to respond incorrectly to VPN Tracker's attempts to use XAUTH in combination with an Aggressive Mode based connection.

With both SMB (Windows File Sharing) and AFP (Apple File Sharing), low latency connections are key to achieving good performance. This is of course assuming that you already have a connection with reasonable bandwidth in between the two VPN endpoints (this can be easily verified by transferring a larger file through HTTP or FTP).

Using SSL VPN? Switch to IPSec

In comparison to SSL VPN, IPSec is able to offer much faster connection speeds as it runs on the network layer – level 3 of the OSI – meaning it’s much closer to the physical hardware. This will give you a faster VPN performance.

Learn more in this blog post.

Finder Settings

If you are using the Finder and the issue is mostly with listing folders (but not so much when actually copying files), try turning off icons/icon previews in the Finder's View Options (Cmd-J).

Reducing Latency

If you experience performance issues both when listing folders and when transferring files, your aim should be to reduce latency. Some ways to reduce latency include:

  • Avoid high-latency Internet uplinks (e.g. satellite, some types of wireless providers, line aggregation, ...).
  • When using a DSL line, see with your ISP if you can get "fast path" enabled (= interleaving turned off). ISPs sometimes market this as an option for online gaming, but it's also very helpful for AFP/SMB or connecting to some types of database backends.
  • Make sure VPN traffic is appropriately prioritized in order not to be slowed down by someone else using the same Internet connection.

To measure latency between the two endpoints of the VPN, use ping to a host on the other end of the connection (or, when pinging from the client end, ping the VPN gateway). For your convenience, VPN Tracker has a ping utility built right in, it can be found in the Tools menu.

To measure latency of each endpoint's individual uplink, it's often helpful to do a ping the local router (to make sure there are no unnecessary latencies introduced in the local network) and the ISP's first router (to get an idea if enabling fast path or switching ISPs may be a suitable measure to decrease latency).

If you cannot reduce latency any further:

If you are in a situation where you cannot reduce latency any further (or where the base latency from the distance between the two endpoints itself is so large local measures won't make much difference), consider switching to a file transfer protocol that is less vulnerable to latency, e.g. WebDAV or FTP, or use measures such as reducing the number of files and folders in a hierarchy to increase performance.

If you see this error: "LCP timeout" or "LCP: timeout sending Config-Requests", here are two things to check:
1. To use PPTP behind a NAT router, your router must support "PPTP Passthrough" and this option also needs to be enabled.

Please ensure that your router supports "PPTP Passthrough" and please ensure it is also enabled. Check your router's manual. If your router has no support for it, you may have to replace it if you require to use PPTP.

2. Please also check if your ISP is running "DS Lite" connection to you. With "DS Lite", users only get private IP addresses that are network address translated at the provider and this is usually incompatible with PPTP. You require a public IPv4 address or switch to a different VPN protocol. Call your ISP and ask for "a public IPv4 address".

Symptom

As soon as you connect your VPN tunnel, Skype is not able to make calls any longer, however calls started prior to connecting the VPN continue to work.

Solution

Make sure the field Local Address is not empty. If it is, fill in a private IP address. A private IP address has the following form:

  • 192.168.x.x
  • 10.x.x.x
  • 172.y.x.x

x: A number of the range 0 to 255.
y: A number of the range 16 to 31.

Only rule: It must not be an IP address from a remote network on the other side of the VPN tunnel (must not partially match an entry of the field "Remote Networks"), as choosing such an address will make the tunnel stop working (it will connect, but you cannot really reach anything over it).

Alternate Solutions

If the solution above does not fix your issues, make sure that

  • DNS resolution still works once the VPN tunnel is up.
     
  • Public Internet servers are still reachable once the VPN tunnel is up.
     
  • In case of a Host to Everywhere connection, make sure the VPN gateway does not block any network traffic that is crucial for Skype to work.
     

Explanation

VPN Tracker creates a virtual tunnel interface for every VPN tunnel. Like any network interface, this virtual tunnel interface requires an IP address to be functional as an IP network interface. If your VPN gateway assigns you an IP address, the assigned address is applied to the tunnel interface. If not, the address you put into Local Address will be used. If you leave local address empty, the IP address of your primary network interface will be used.

In the last case, your system ends up with two interfaces with identical IP addresses. This is allowed and usually not a problem, unless a software does “stupid things”, like querying the network interface for a given IP address and then ignoring the order of precedence of the returned results.


Importing your Windows SSTP connection into VPN Tracker 365 to use on your Mac? VPN Tracker 365 supports all the custom configuration options you need to use your VPN flexibly.

Don't want to run all your traffic through the VPN? You can configure the connection to "Host to Network" to only send network-relevant traffic through the VPN.

Once you have selected "Host to network", you can connect and VPN Tracker 365 will automatically set a route to just send data for the network behind your VPN and route all other traffic (i.e. personal traffic) separately through your normal internet connection.

{S_1279}

Note, this will give you the same behaviour as unchecking the "use default gateway on remote network" option on Windows.
In order to get OpenVPN connections from Ubiquiti Unifi to work correctly with VPN Tracker, the following change must be made to the config file before importing it into VPN Tracker:

- Download the OpenVPN configuration file from the Unifi console.
- Open the configuration file with a text editor.
- Identify this line:
Cipher AES-256-CBC
- Change the line to:
AES-256-GCM
- Save the file.
- Import the file into VPN Tracker
Setting up Shortcuts to your most important services in VPN Tracker 365 is easy and will drastically improve your workflow.

To get started, go to "File" > "New" > "VPN Shortcuts"

Open the Shortcuts Dock by clicking on the arrow to reveal all available Shortcuts in VPN Tracker 365. Then, drag out the icon for the application or service you would like to configure (e.g. internal website).

{S_1208}

Now configure your Shortcut by filling in all the requested information as prompted by VPN Tracker 365. If you are unsure of any details, your network admin or a member of our support team will be able to help you get set up.

{S_1209}

Continue this process until you have built up a collection of Shortcuts for all your most-used external services. Then, exit the editing mode by clicking again on the arrow at the bottom of the window to close the Shortcuts Dock:

{S_1210}

To test your Shortcut, simply click on the icon. This should launch your VPN connection and instantly start up your service.

Want to see Shortcuts in action? This 2 minute video tutorial shows you how to set up VPN Shortcuts in VPN Tracker 365:


To connect to a WireGuard® VPN server - e.g. in order to remotely connect to your home network -, you need a VPN client app. VPN Tracker supports WireGuard® VPN connections on Mac, iPhone and iPad!

To get connected, follow these 3 steps:
  1. Open VPN Tracker and add a new WireGuard® connection
  2. Upload your WireGuard® configuration file or scan your QR code
  3. Save your connection to your account using secure end-to-end encryption

{S_1317}

You can now connect to your WireGuard® VPN server on Mac, iPhone or iPad.

→ More information on connecting to WireGuard® VPN in VPN Tracker

WireGuard® is a registered trademark of Jason A. Donenfeld.
Importing a pre-existing VPN connection from your Mac to use in VPN Tracker 365 is straightforward.

Open the VPN Tracker 365 app, then go to File > Import > System VPN Connections.

{S_1201}

VPN Tracker will then search your Mac for compatible VPN connections which you can use in VPN Tracker 365.

Don't worry – it happens to all of us!

Just head on over to our login retrieval page, enter your equinux ID or email address and we'll send you your details.

Recently changed your e-mail address? Send us a message!

This depends on your settings. The most common setup is “Host to Network“, in which case only traffic to the specified remote network(s) will go through the VPN tunnel.

With a “Host to Everywhere” setup, all traffic – except traffic to the local network(s) – goes through the VPN. A Host to Everywhere connection requires a suitable setup on the VPN gateway.

If you need to force quit your software for any reason (e.g. your screen has frozen or the app is not responding) please do one of the following:
  • If the app you want to quit is in your dock, hold the "Option" (⌥) key and right-click on the app icon, then, select "Force Quit" from the menu.
  • You can also hold down "Option" (⌥) + "Cmd" (⌘) + "Esc" which will trigger a window with a list of apps you have running. To force quit one or more of these apps, simply select it from the list and click the "Force Quit" button.
The main reason why the lifetime of IPSec tunnels is limited is security. The longer a tunnel is alive, the more time an attacker has for an attack and the more data is encrypted with the same session key, which reduces the effort for attackers to find the key.

The IKE Phase 1 tunnel is only used to ensure a secure connection between VPN client and VPN gateway, comparable to a TLS connection (i.e. HTTPS instead of HTTP). Only IKE messages are exchanged via the Phase 1 tunnel, which are used to keep the Phase 1 connection alive and to negotiate Phase 2 tunnels if necessary. The Phase 1 tunnel has no influence on the VPN speed, only on the initial connection setup, so there is never any reason why you should not always work with the strongest protection in Phase 1, that both sides can support. Since very little data is ever sent through the Phase 1 tunnel, there is no reason not to choose a very long lifetime.

The Phase 2 tunnels are used to encrypt the actual data traffic, so the settings here directly influence the overhead, latency and speed of the VPN connection and must be weighed against the security. Also, large amounts of data are encrypted via the Phase 2 tunnels, so you should not set their lifetime too high. If possible, it is always recommended to use Perfect Forward Secrecy (PFS) in Phase 2, which slows down the Phase 2 connection setup a bit, but completely decouples Phase 2 cryptographically from Phase 1, since an independent session key is negotiated and not derived from the session key of Phase 1.

The lifetimes of the two phases are basically independent of each other. A Phase 2 tunnel may continue to exist, even if the Phase 1 tunnel over that it was negotiated no longer exists. Thus, Phase 1 may have a shorter lifetime than Phase 2. VPN Tracker always negotiates new tunnels in time before the lifetime expires, so that the connection is normally never interrupted. With Phase 2, the tunnels are seamlessly connected, meaning that not a single data packet is lost during the exchange. This is why even with a very short lifetime of just a few minutes, the impression of an uninterrupted connection is created. Frequent changes of Phase 2 tunnels only lead to a little more data traffic and a little more computing work on both sides of the connection.

Important Notes


The lifetime of the tunnels is explicitly not negotiated. The standard allows that a tunnel has different lifetimes on both sides of the connection. The side, where the lifetime expires first, determines the further procedure. Only if VPN Tracker is that side, it can determine what happens next, otherwise VPN Tracker can only react passively. The latter will always result in a short interruption or even a complete loss of the connection in case of Phase 1. For Phase 2, it depends on whether the other side wants to actively negotiate new Phase 2 tunnels or only deletes the existing ones; the latter also leads to a short-term connection loss.

It's always best to set VPN Tracker to the same lifetime as the other side, because VPN Tracker will always try to intervene in time to avoid a connection loss.

Since there are also IKE/IPSec implementations that delete all Phase 2 tunnels as soon as the corresponding Phase 1 tunnel is deleted, it's always a good idea to select Phase 1 on devices to match the maximum VPN session time expected.

When connecting via SonicWall SCP or SonicWall IKEv1 with DHCP, VPN Tracker 365 for Mac requests an IP address from the SonicWall gateway using the DHCP protocol. For this request, VPN Tracker 365 modifies the MAC address slightly, making it different from the actual MAC address of your device. This allows administrators to assign a fixed IP address when your Mac is connected via LAN or WiFi and a different IP when it’s connected through VPN.

This modification sets a specific bit in the MAC address, marking it as a self-assigned address rather than a factory-assigned one.

Example:
Original MAC address: 00:1B:63:B7:42:23
VPN Tracker MAC address: 02:1B:63:B7:42:23

Starting with macOS 15 Sequoia, Apple defaults to using a rotating MAC address for WiFi connections, labeled as a “Private Wi-Fi Address” in System Settings. To prevent connectivity issues related to this feature, VPN Tracker 365 reports the actual hardware address (with the minor modification described above) instead of the one used in “Rotating” or “Fixed” modes.

On iOS, VPN Tracker cannot retrieve a MAC address directly. Instead, it generates a random value once and stores it for future use. VPN Tracker for iOS then uses this stored value as the MAC address.

A couple of years ago, a team of security experts released a paper describing an attack that can break an IKEv1 Aggressive Mode Pre-Shared Key connection using an attack that would not equally have been possible with an IKEv1 Main Mode Pre-Shared Key connection, leading to the incorrect assumption that Aggressive Mode is inherently insecure. This claim, however, is not backed up by objective facts. What most people don't know, part of that attack was the ability to guess the Pre-Shared Key (PSK) using a brute force attack and such a brute force attack can only be successful if the PSK is weak. A PSK is also just a password and as with every password, choosing a weak password always leads to poor security. As long as your PSK is at least 14 characters long (the longer the better), consists out of lower case letters, upper case letters and digits, and was randomly generated, so it's impossible to somehow guess it, and as long as your Phase 1 hash algorithm is at least SHA1 (or better, we recommend SHA-256 if possible), there's absolutely no reason to consider IKEv1 Aggressive Mode with Pre-Shared Key as less secure than IKEv1 Main Mode with Pre-Shared Key. If you want to be even more secure, switch to certificate based authentication instead of PSK if possible as then the attack is not possible at all.

Technical background:

The Pre-Shared Key (PSK) is not a password used for encryption of any data, it's used for authentication, just when you log in to a website using a username and a password. During Phase 1, both sides must prove to each other to know the PSK. This cannot be done by just sending it to the other side, as if the other side didn't know it before, it will know it after receiving it. Instead both sides calculate a number (a hash digest) out of data they exchanged so far (data that will be different every time you start a new connection, which ensures the calculated value will be as well) and the PSK. Only this digest is send to other side. The other side can now verify that digest by performing the same calculations and comparing the result with the digest received. If both are equal, the sender must have used the same PSK in the calculation, which proves knowledge of the PSK. Then the receiver also calculates such a digest, using a slightly different formula as before, leading to an entirely different result, and sends it back in reply to also prove its knowledge.

The differences between Main Mode and Aggressive Mode is simply that in Main Mode the digest is exchanged encrypted because the session key exchange already negotiated a session encryption key when the digest is exchanged, whereas in Aggressive Mode it is exchanged unencrypted as part of the key exchange that will lead to a session key. By snooping the connection establishment of an Aggressive Mode connection, the attackers were able to get the digest as well as all values required to calculate that digest, except for the PSK itself. Please note that this alone doesn't mean the connection is broken already, it only means that the attackers now have enough data to start guessing the PSK using a brute force or dictionary attack. Only if the PSK is too weak to withstand those attacks and the attackers are able to correctly guess it, the connection will be broken. That's why a good, secure PSK is essential.

The same attack is in fact also possible with a Main Mode PSK connection, it just requires some extra work. For a Main Mode connection it's not enough to just snoop the traffic, the attackers would need to perform a so called Man-in-the-Middle (MitM) attack, allowing them to capture and manipulate all traffic exchanged. By performing a MitM attack, attackers can break the key exchange and thus will be able to decrypt all the exchanged packets. Doing so will not make it possible to break into your VPN, they still need to know the PSK for that, otherwise they cannot successfully authenticate to the other side and then Phase 1 will never complete, but that way they can get all the information required to start guessing on the PSK, just as in case of a an Aggressive Mode connection. And if an attacker is already able to snoop on your VPN traffic (which is required to attack Aggressive Mode), it's very likely that attacker is equally possible to perform a MitM attack and in that case using Main Mode will not offer you any additional protection.

A PSK out of 11 random alphanumeric characters offers an entropy of approx. 64 bits, that's 2^64 possible values. Modern high end graphics adapter (as of 2015) can calculate in the order of 1 billion SHA-256 hashes a second. On average one has to try 50% of all possible values to find a match, wich would be about 292 years. Yet if the attackers have an array of 100 such graphics adapters, it would "only" be around 3 years. If the PSK is 14 characters, the entropy is about 80 bits and you are already at 19,154,798 years. Now even having 10,000 graphics adapters would help a lot. Also one must consider the costs of such an attack, which is not so much the cost of buying all these graphics adapters, rather their power consumption when all these graphics adapters run at maximum current 24 hours a day and that for years, decades, or even centuries. The power costs will be billions of dollar and all that to just break one single PSK connection in the entire world. And whenever you change the PSK, an attacker must start all over, so if you change the PSK regularly, let's say once a year, an attacker has at most one year to find it; that's very ambitious, even for a weak PSK.

Beta versions are soon to be released versions of VPN Tracker 365. We like to release beta versions to allow users to give us feedback on new features we've been developing before we roll them out to the general public.

If you would like to become part of our beta testing program, you will need to activate access to early release versions in the app.
  1. Open the VPN Tracker 365 app and go to "VPN Tracker 365" > "Preferences"
  2. Next to "Update", check the box "Get early access to Pre-Release versions"
  3. From the drop down menu, select "Beta versions"

{S_1174}

Tip: Next to "Update" you can also check "Automatically check for updates". This way, VPN Tracker 365 will inform you whenever a new beta version is available for testing.

Are you an experienced IT admin wanting to take things one step further? Check out our Nightly builds...

If you run into issues on a beta version and want to get back to an older build, you can always find our latest official release on the version history page. Please also note that you can deactivate beta testing at any time by unchecking the box in your app preferences.
Setting up an OpenVPN connection to your NETGEAR Nighthawk device on Mac, iPhone or iPad is easy with VPN Tracker. VPN Tracker has a device profile specifically set up to work with the NETGEAR Nighthawk range, which means configuration is super straightforward.

With the help of this configuration guide, you'll be up and running with your NETGEAR Nighthawk in no time.
The XAUTH password is generally your company login. It is NOT your equinux ID. Your XAUTH is stored on your VPN gateway or on some remote server your VPN gateway asks for authentication (LDAP server, RADIUS server, Active Directory Server, etc.). If you do not know it, or need to reset it, ask your System Admin for help on this.

VPN Tracker or equinux have nothing to do with this password. Your VPN gateway just tells VPN Tracker "Ask the user for a username and a password and tell me what the user has entered" and that is what VPN Tracker does and in respond to the information the gateway replies "Sorry, but that is not valid username-password-combination, I can't let you in, bye".
In VPN Tracker you can just click on the blue label next to the XAUTH setting and the XAUTH dialog will appear; just overwrite the existing values with new values.
See page 16 in our manual

Current Firmware (Fireware XTM)

WatchGuard Firebox X Edge e-Series devices with Fireware XTM (Fireware 11) are fully supported in current versions of VPN Tracker. For details please see our configuration guide.

Older Firmware

Devices running an older firmware may often work using the following setup. Please note however that we can't guarantee that this setup will work in all cases.

Start by creating a new user on the Firebox Edge and then configure MUVPN support for this user.

In VPN Tracker, use a "Custom Connection" device profile as the basis for your new connection.

Map the WatchGuard settings to your VPN Tracker configuration as shown in the table below:

WatchguardVPN Tracker
Account NameLocal Identifier
Shared KeyPreshared Key
Virtual IP AddressLocal Address
Authentication AlgorithmPhase 1 and Phase 2 Hash/Authentication Algorithms
Encryption AlgorithmPhase 1 and Phase 2 Encryption Algorithms
Key expiration in hoursPhase 1 and Phase 2 Lifetime

The following settings are independent of your specific MUVPN configuration:

  • Local Identifier Type: Email (even if it is a name and not an email address)
  • Exchange Mode: Aggressive
  • Phase 1 Diffie-Hellman Group: Group 2 (1024 bit)
  • Perfect Forward Secrecy (PFS): off

Finally make sure the that VPN Tracker's "Network" setting is set to "Host to Network", and the correct Remote Network (i.e. the network that you want connect to through the VPN) is used (e.g. 192.168.1.0/255.255.255.0).

By itself, the IPsec protocol does not support usernames. If you were given a username from your network administrator for connecting to your corporate VPN solution, there are generally two possibilities:

  • Your corporate VPN solution uses the term "username" for "identifiers". Please try to use your username as the "Local Identifier" in VPN Tracker.
  • Your corporate VPN solution is using Extended Authentication (XAUTH). You can enable XAUTH in VPN Tracker. The software will then prompt for your username and password when the connection is being established.
Activation codes are only used for older products like VPN Tracker 8 or lower or for retail products during the first activation. For current products, the software is exclusively activated using your equinux ID.

Please refer to the following FAQ for more information on how to activate without an activationcode:
  • {FQ317}


Migrating an existing Windows PPTP VPN connection to a Mac may sound daunting, but with VPN Tracker 365 the process is quick and easy. By the end, you will be able to connect your Mac to your PPTP VPN connection and continue working as normal.

Here's how it works:
  1. Find your PPTP VPN connection settings in the Control Panel of your Windows PC
  2. Start VPN Tracker 365 on your Mac and click the "+" to create a new PPTP connection
  3. Copy the connection settings from the first step into the configuration window
  4. Finally, start up your PPTP connection to test

{S_1177}
You can now use your Windows PPTP VPN connection on your Mac, thanks to VPN Tracker 365. If you require a more detailed walkthrough, please check out this step-by-step PDF guide: Migrating a Windows PPTP VPN Configuration

Find out more about PPTP VPN under macOS Big Sur
If you use a dynamic DNS service (e.g. DynDNS, NoIP, DynU, FreeDNS) and your VPN gateway is not responding, please check that your DynDNS service has updated with your current IP address.

If it is not up-to-date, please check the dynamic DNS configuration on your VPN gateway.
Two-factor authentication (also known as 2FA or Multi-Factor authentication or MFA) is a way to increase login security.

Once 2FA has been enabled on the VPN gateway, VPN Tracker will automatically respond to the request when connecting:
Most VPN connections will automatically prompt you to enter your 2FA code in a separate step after the username and password have been verified.

In some cases, you may need to add your 2FA code directly after your regular password. There's an option under Configure > Advanced to tell VPN Tracker to always prompt you for the XAUTH username and password dialog, instead of attempting to automatically sign in with your saved credentials.
If your OpenVPN connection drops after a while, it may be due to the rekeying period. Test whether extending the period can solve the problem.

Proceed as follows:
> Edit your OpenVPN connection in VPN Tracker
> Navigate to "Advanced Settings > Phase 2"
> Change the Lifetime value to 28800 (which corresponds to a period of 8 hours)

If you continue to have problems with your VPN connection, please send us a TSR report.
If you are working from home and need to connect to VPN, your admin will send you a connection file which you can import into the VPN Tracker 365 app.

{S_1169}

This is the pre-configured VPN connection that you need in order to connect your Mac to your office network and access your internal services.

Here's how it works:

  • Double click the connection file to import into VPN Tracker 365.
  • Enter the import password - your network admin will give this to you.
  • Now, click the toggle switch to connect to your VPN. Note: If you are asked to enter user credentials, your admin will tell you which login you need to use.


This video tutorial shows you how to get started with your company VPN:


VPN Tracker is the #1 VPN software client for Macs. It’ll allow you to connect securely to your home or office network over the internet.

VPN Tracker supports industry standard OpenVPN, IPsec (IKEv1 + IKEv2), L2TP, PPTP, SSL, SSTP, and WireGuard® protocols. This means that it will work with almost all devices supporting these types of VPN connections.

A list of tested devices is available on our website

What if my device is not on this list?

There are hundreds of VPN devices available on the market, and we'd love to offer device profiles for all of them. Unfortunately, it is impossible to test all devices. If your gateway is not in the list, it will probably still work with VPN Tracker.

Tip: Try out one of our custom protocol profiles to test your VPN connection free in VPN Tracker on Mac, iPhone or iPad.

Configuration guides for configuring VPN Tracker with Cisco devices are available here.

Configuration guides for Cisco Small Business (Linksys) devices are available here.


Import of Cisco IPsec VPN Client Configuration Files (.pcf)

Cisco VPN Client configuration files that use group password authentication can be imported into VPN Tracker:

‣ "File" > "Import 3rd Party Configuration" > "Cisco .pcf"
{S_118}
An established VPN connection causes your system to obtain a new virtual network interface. All traffic sent over this network interface arrives at the other side of the VPN tunnel and all traffic sent back arrives at that interface. Like any interface, this interface needs an IP address to be functional. Either the VPN gateway assigns you an IP address using a client provisioning method or you need to assign one to yourself. In the later case, the IP address of the field "Local Address" is used as IP address for the virtual interface or, in case that field is left blank, the IP address of your primary network interface is used, since it is allowed to assign the same IP address to more than one interface.

Basically you are free to assign yourself any IP address you like, albeit it should usually be a private IP address and you need to make sure it does not conflict with the IP address other VPN users are using. There is just one exception to that rule: Usually you cannot assign yourself an IP address that lies within the remote network itself, as if you do, the connection may come up but it cannot be used productively.

The reason for that is very simple. If you assign yourself an IP address from within the remote network, servers and hosts at the remote side will think you are also a local host whenever they see a packet from you. So they will try to contact you directly over the local network but that cannot work, as in fact, you are not a local host. The only way to contact you is by going over the VPN gateway and remote hosts won't try to do that for hosts they consider local.

To make such a configuration possible, the VPN gateway must support ARP Proxying and most gateways will only support that, if they themselves have assigned the IP address to the client. If you assign IP addresses using a form of client provisioning, then some gateways will allow you to assign IP addresses that lie within one of the remote networks and the connection will wok normally.

Parallels

Go to "Preferences" > "Network" in Parallels and change the DHCP ranges for Shared and/or Host-Only Networking so they no longer conflict with your VPN's remote network.

VMware Fusion

A PDF with instructions can be downloaded from the VMware community forums:

Please don't go! :-(

If you're sure that your time with us is at an end then we've made it nice and easy to remove all your info from our database so that you don't need to wait for us to do it.

Just log in at your License Manager, click 'Edit your Account' on the left hand navigation panel and, after a tearful farewell, click 'Delete Account'.

If you do leave then we'd like to say thank you, bye and come back soon!

Recently, root certificates for "Let's Encrypt" expired. Apple has decided not to update root certificates for OS X versions older than macOS 10.12. This means that when apps or Safari on your Mac access websites using Let's Encrypt root certificates, they will not load correctly.

Note: this is a general OS X issue that you will want to address to ensure you can access all websites and services.

This issue also affects the secure communication between VPN Tracker and the my.vpntracker.com account service.

How to fix this issue
  1. Download the latest VPN Tracker version for your system:
  2. Install the root certificate fix

  3. Re-launch VPN Tracker and sign in again

If you are still experiencing the same problem, please try this:

  • Open Safari
  • Go to Preferences > Privacy > Manage website data
  • Search for 'equinux' and 'vpntracker' and choose 'Remove all'
VPN Tracker 9 & VPN Tracker 10

Older VPN Tracker versions may also have issues due to certifcates as described above. As these versions are end-of-life, we can no longer offer support for them. The steps above should also apply to these versions. For support and to use VPN Tracker on the latest macOS versions, please switch to a new VPN Tracker plan.

A Technical Support Report contains your VPN Tracker settings and relevant network and system settings that our technical support team needs to be able to assist you quickly. Confidential data (e.g passwords, pre-shared keys, private keys) are not included in a Technical Support Report (TSR).

How to create a Technical Support Report on a Mac:

‣ Click on your VPN connection in VPN Tracker 365.
‣ In the bottom right corner under the "Status" tab, you will see the TSR button.
‣ Click the button to generate the report and follow the instructions to send to our support team.
{S_1180} How to create a Technical Support Report on an iPhone/iPad:
‣ Tap on the connection. The connection card appears.
‣ Tap on “Feedback”
‣ Provide a short description of the connection problem
‣ Tap on Send

If you have an issue connecting to the VPN in the first place, please make a connection attempt right before creating the Technical Support Report, then create the Technical Support Report as soon as the connection attempt has failed.

If you can connect to the VPN, but something is not working right after the connection has been established, please establish the VPN connection, then create the Technical Support Report while the VPN is connected.

You can either email the report directly to our support team from VPN Tracker 365, or save it to email later or from a different computer, or to upload it using the contact form on our website:
{S_1181}

Whenever possible, also include screenshots of the VPN setup on your VPN gateway.


VPN Tracker Pro is a great asset if you are a consultant, a system or network administrator, or are working with multiple VPN connections:

  • Export VPN connections for yourself and other users.
  • Scan the remote network for services or to assist users.
  • Connect to multiple VPNs at the same time.
  • Manage a large number of VPNs using search, a condensed layout, and connection groups.
  • Configure your Mac as a router to provide the entire network with a VPN tunnel using Network to Network connections.
For security reasons, VPN Tracker only permits you to log in to the software via a direct connection between your computer and our server.

This error message advises you that another program is blocking communication between your computer and our server. Here are some examples of programs which could cause this:

  • Security software (e.g. virus scanners, Malware blockers)
  • Malware or Adware

If you need to add the domains used by VPN Tracker to your security solution, please add vpntracker.com (plus its subdomains) and equinux.com (plus its subdomains).

Following this, you should be able to log in to VPN Tracker with no problems at all.

Tip: A known cause for this error is:
  • Kaspersky
In some versions of macOS (10.14 and 10.15), Apple’s support for SMB network shares may send packets over a VPN tunnel interface that can trigger this warning. These packets have the same source and destination address which is what triggers the LAND attack warning.

These messages can be ignored, or, if you have the option, you can disable the NetBIOS daemon that is sending out these packets on the Mac using the following command:
launchctl unload -w /System/Library/LaunchDaemons/com.apple.netbiosd.plist

Please note that disabling the NetBIOS daemon may affect your network file shares.

SonicWALL Simple Client Provisioning with VPN Tracker is available with all SonicWALLs running SonicOS 4.0 or newer and all editions of VPN Tracker.

If you are still using VPN Tracker 6 or earlier, Professional or Player Edition is required.

If you need internet on your Mac while traveling, you can activate the personal hotspot feature on your iPhone or Android smartphone in order to share a 4G/LTE/5G mobile connection with your Mac.

In general, this will work fine for the majority of VPN connections. However, there are a few points to be aware of:

  • PPTP VPN connections are not supported, as iOS and Android do not support PPTP passthrough
  • For IPsec VPN connections, it's possible you may have to adjust your settings for NAT-T.

Yes, VPN Tracker supports IPsec (IKEv1 + IKEv2), L2TP (Mac only), PPTP (Mac only), OpenVPN, SonicWALL SSL VPN, Cisco AnyConnect SSL VPN, Fortinet SSL VPN, SSTP VPN, and WireGuard® VPN (Beta - learn more). Additional protocols are on our roadmap.

WireGuard is a registered trademark of Jason A. Donenfeld.

If you keep getting a dialog “VPN Tracker can't verify the identity of the VPN gateway [your host]”, the certificate of the gateway is probably not set up correctly. Since it's important for your privacy and security, VPN Tracker does not connect to VPN gateways with invalid certificates by default.

There are two ways to ignore certificate verification:

1. Trust the certificate in VPN Tracker manually

You can make VPN Tracker always accept the certificate if you know that the certificate belongs to your device and are willing to accept the risk: in the warning dialog, click on “Show certificate” and verify that the certificate is the one you expect. Then check the “Alway trust …” checkbox and press “Continue”. Subsequent connection attempts should then skip this dialog.

{S_1455}
{S_1456}

2. Turn off the certificate warning in the connection settings

If you are rolling out a connection to a team and you want to avoid each user having to trust the certificate manually, you can deactivate the verification in the connection settings.

To do this, edit the connection, navigate to the “Advanced Options” section, expand the “Certificates” section and uncheck “Verify Remote Certificate”. Then save the connection and restart it.

We ask for your email address in order to track the flow of our downloads and, if selected, send you news and updates about the product you've downloaded.

All information collected by equinux is used internally and will never be shared with any third parties without your permission. For more information about equinux's stance on privacy and security, please refer to the equinux Privacy Policy.

If you do not want to receive our newsletter, just unsubscribe using the link at the bottom of every newsletter you receive.

Nightly builds are exclusive early preview versions of cutting edge, new features that the development team has been working on. We release these to give experienced IT admins the chance to work alongside us and test our latest work even before the beta release.

If you would like access to Nightly builds, you need to activate access to early release versions in the app.
  1. Open the VPN Tracker 365 app and go to "VPN Tracker 365" > "Preferences"
  2. Next to "Update", check the box "Get early access to Pre-Release versions"
  3. From the drop down menu, select "Nightly Builds"

{S_1175}

Tip: Next to "Update" you can also check "Automatically check for updates". This way, VPN Tracker 365 will inform you whenever a new Nightly build is available for testing.

Not sure you're up for Nightly testing? If you want to test a more ready-to-launch version of VPN Tracker before it goes live, our beta testing program is another great alternative.

If you run into issues on a Nightly version and want to get back to an older build, you can always find our latest official release on the version history page. Please also note that you can deactivate Nightly testing at any time by unchecking the box in your app preferences.
This message in VPN Tracker means that the VPN gateway isn't willing to accept any of the proposals that VPN Tracker has offered.

As the proposals have not changed since the last successful connect (VPN Tracker always keeps record of the last successful settings, so we were able to compare your current settings to them), somebody must have changed the settings on the gateway side and now your client settings don't match any longer.

No proposal chosen means that your VPN gateway could not agree to any of the Phase 1 proposals that VPN Tracker sent to it. Phase 1 proposals include:
- Exchange mode (main/aggressive)
- Encryption (3DES, AES-128, etc.)
- Hashing (SHA-1, SHA-256, etc.)
- Diffie-Hellman Group (Group 2, Group 5, etc.)

Please double check which values are currently set on the VPN gateway. You need to offer at least the same values in VPN Tracker for Phase 1.

Also please double check your local identifier in VPN Tracker. If a VPN gateway supports multiple VPN tunnels and your client settings are correct for tunnel A, however the gateway thinks you want to connect to tunnel B, then this can also explain a configuration mismatch. With aggressive mode connection, the local identifier in VPN Tracker is used to select a remote tunnel, so in case there are multiple remote tunnels, please ensure you are targeting the correct one at the moment. The local identifier in VPN Tracker must match the tunnel name or remote identifier on the VPN gateway (remote as local and remote swap roles on the gateway side - for the gateway you are remote).
Please note that you cannot use nslookup to test if VPN Tracker has set DNS correctly, as nslookup talks directly to DNS servers and doesn’t use the standard system APIs.

To verify your VPN is pushing DNS settings correctly, run "scutil --dns" in the Terminal once your VPN connection is up. The first resolver in the list (#1) is the primary resolver your system will usually query first; only if it receives no reply, the other resolvers are queried in order, unless there is a resolver specific to the domain you want to resolve (e.g. to resolve test.example.net the resolver with the domain example.net would be queried first).
A certificate is like an identity document; you send it to the other party to identify yourself as authorized or to confirm your identity. However, since anyone can create a certificate with any content on their computer, it is important that a trustworthy CA confirms the information in the certificate by signing the certificate. This also prevents the certificate from being changed later. The CA certificate is only needed to be able to later check the validity of this signature and to see which CA is responsible for this information, so that I can decide whether I want to trust this CA.

Each certificate has a private key. This serves as proof that you are the owner of the certificate or are authorized to identify yourself with this certificate, since only authorized people are ever allowed to have access to the private key, while the certificate can and often is accessible to everyone. So I can easily get the certificate of any web server or OpenVPN gateway, because both send me the certificate when I try to connect to them, but without a private key I cannot identify myself with the certificate .

If an attacker wants to pretend to be a specific OpenVPN gateway, e.g. to get passwords from users, then he has to set up his own OpenVPN gateway and redirect his victim's data traffic there, both of which are quite possible. But then he has a problem: he also has to identify himself as the correct gateway. However, if the client does not check whether the gateway address is in the certificate, it can simply use a user certificate from a VPN user, because this is also signed with the same CA as the gateway certificate.

It is much easier to get a user certificate and its private key than the gateway certificate.

To get the gateway certificate, you have to hack into the gateway directly, but if I have unrestricted access to the gateway, then I no longer need the certificate because then I can intercept passwords directly at the gateway and have full access immediately to all private networks behind it.

Gateways are of course designed to be as difficult to attack as possible, in contrast to users' work computers, which can be much more easily foisted with a Trojan. And it's even easier if a VPN user wants to act as a hacker himself, because he has regular access to a valid user certificate including a matching private key and can thus get other users' passwords, which may grant him extensive access rights Passwords are often managed centrally and the same password is also used for other company services.

That's why it's not enough that a certificate is valid and signed with the appropriate CA, it also has to be ensured that the gateway certificate is really the gateway certificate and also matches the gateway you're currently talking to, anything else undermines the whole thing Security concept of certificates.
In order to install VPN Tracker on newer macOS versions, you need to "allow" the app in System Preferences under "Security".

To do this:
- Make sure the VPN Tracker app is in the Applications folder
- You will need to complete this step locally on the Mac. It is not possible to do this step over Remote Desktop or Screen Sharing tools.

Tip: If you have Full keyboard access enabled, you may be able to use the tab key (↹) to highlight "Allow" and then confirm it with the Space bar.
An L2TP connection is basically a PPP tunnel over an IPSec connection and the PPP protocol is so old that it predates the existence of subnet masks. When the PPP server at the remote end assigns you an IP address, PPP infers the subnet mask from the assigned IP address:

If the IP address starts with 192.168. the inferred mask is /24,
if the IP address starts with 172.16. to 172.31. the inferred mask is /16
if the IP address starts with 10. the inferred mask is /8.

Those where the old network classes and this is the official standardized behavior for the PPP protocol. For more information, please see https://en.wikipedia.org/wiki/Classful_network#Classful_addressing_definition

If you don't like the entire 10.0.0.0/8 network to be routed over VPN, you need to ensure that VPN clients get an IP address from a different address range, for example an address from a 192.168.x.0 network (preferable with x not 0 or 1 as that will often collide with networks users have at home).

Any additional remote networks you can enter in VPN Tracker are optional and they are "additional" to the network you will gain access anyway derived from the assigned IP address which quite often is the only network required (in which case additional networks can be left blank).

A plain IPSec connection without PPP tunneling will not have this issue as IPSec is aware of subnet masks but when used for L2TP, IPSec only encrypts the PPP traffic whereas PPP handles the traffic routing.
The L2TP protocol standard officially only supports username & password authentication, so 2-factor is not supported. Some vendors have added non-standard L2TP authentication variants, but these are not supported by VPN Tracker at this time.
You can change the language of all equinux Software products by changing the language settings of your device. For instance, on the Mac, you can do the following:
‣ Open "System Preferences."
‣ Click "Language & Region."
{S_519_50%}
‣ Change to your preferred language by dragging your selected language to the top of the list.
{S_520_50%}
‣ Close your software. For example, with VPN Tracker, you can do so by choosing "VPN Tracker" > "Quit VPN Tracker."
{S_525_30%}
‣ Reopen the software.


For the configuration of a VPN connection under Mac OS X, you will need the following:
  1. VPN Tracker 365: Download here
  2. An internet connection
  3. A VPN Router/Gateway


Create a new connection


In VPN Tracker 365, try the following:
‣ Click on the plus symbol in the bottom left corner:
{S_1234}
‣ Choose: "New Company Connection"


Choose your VPN Router


‣ In the list of VPN Gateway vendors, choose the manufacturer and model of your VPN router. In case your VPN router does not appear in the list, try the following:
‣ Choose "Use custom device profile."
‣ Click on "Create" to add your VPN connection.
{S_1236}

Your configuration guide


Our engineers have tested a large number of VPN gateways with VPN Tracker. For many of these, detailed configuration guides are available. In the newly created connection, you will be able to find the router specific configuration guide:

{S_1238}

Alternatively you will be able to find the configuration guides on our website at http://vpntracker.com/interop


Further details for creating your VPN connection on Mac OS X can be found in the configuration guide or in the VPN Tracker handbook.

VPN Tracker strictly follows Apple’s recommendation regarding where to place its files, so you will find VPN Tracker files only in standard system locations where they belong. Depending on the fact if these are system-wide or per-user files, they are either found in /Library (system-wide) or ~/Library (per-user), where ~ is a placeholder meaning "home of the current active user".

To access the system-wide library folder:

    ‣ In Finder Choose "Go" > "Go to Folder ..." 
    ‣ Enter /Library

To access the user library folder:

    ‣ In Finder Choose "Go" > "Go to Folder ..." 
    ‣ Enter ~/Library
To Remove VPN Tracker, remove the following files and folders:

  • /Library/Application Support/VPN Tracker 365
     
  • ~/Library/Application Support/VPN Tracker 365
     
  • /Library/Preferences/com.vpntracker.365mac.plist
     
  • ~/Library/Preferences/com.vpntracker.365mac.plist
     
  • /Library/PrivilegedHelperTools/com.vpntracker.365mac.agent
     
  • /Library/PrivilegedHelperTools/com.vpntracker.365mac.connectiond
     
  • /Library/LaunchDaemons/com.vpntracker.365mac.plist
     
  • All system extensions are found in the folder /Library/Extensions/com.vpntracker.365mac.*
     
  • Tip: Also remember to check your Keychain for VPN Tracker items (search for "VPN Tracker") and to remove the VPN Tracker entry from System Preferences > Network

    Note: Some of these files may be currently loaded by the system, some of them also are cached. To get your system into a state as clean as if VPN Tracker was never installed on it, please restart your system after removing.

    VPN Tracker is licensed per user. That means each person using VPN Tracker needs their own license.

    To prevent security issues, account sign-ins are checked by an automatic system. There are multiple possible causes that can trigger an account lock:

    • Sharing one account with other people
    • The account is being used as a "generic" account (e.g. "Lab computer 1"), instead of being personalized for one person
    To fix a locked account being shared with other people
    • Go to my.vpntracker.com
    • Sign in with your equinux ID
    • Go to "My Subscriptions" and choose "Add plans…"
    • Add additional licenses for each person that needs VPN access and complete your order
    • Once you have the correct number of licenses for your team, assign the new licenses to your co-workers – check out our Team Setup Guide for step-by-step instructions

    Once you have completed these steps, please contact our support team and include your equinux ID and order confirmation number. A team member will review your details and will be able to lift the restrictions on your account.

    For any other questions, please reach out to our Account Security Team.

    If you use Shimo and have found that it has stopped working, check out VPN Tracker.

    Alternative to Shimo 5

    VPN Tracker supports many of the same VPN protocols as Shimo, but is built to support new Macs and macOS releases, including macOS Sonoma and new macOS Sequoia.

    Fix your VPN - download VPN Tracker free

    Install the free VPN Tracker 365 trial and set up your VPN connection. Once you're connected, choose a VPN Tracker plan for ongoing updates, compatibility with the latest macOS releases and professional support.

    Need help setting up your VPN? How to move your Shimo VPN connection to VPN Tracker

    First, start VPN Tracker and create a new free user account to start your trial. Now we can set up your VPN connection:

    • In VPN Tracker, go to File > New > Company Connection
    • Choose your VPN gateway manufacturer and device model
    • or
    • Go to Protocols and select your VPN protocol

    Now you have a connection, you'll need to enter the connection details. You can look up some connection details in your Mac's Keychain:

    • Go to Applications > Utilities > Keychain Access
    • Search for "Shimo" in the top right corner
    • You'll find entries named "Shimo: vpn.example.com" – where "vpn.example.com" is your VPN's gateway address
    • Double-click the entry to open its details
    • To find your pre-shared key: Locate the Shimo entry with an "Account" label ending with "groupPassword"
      {S_1294}
    • To find your login password: Locate a Shimo Keychain entry with the account label ending in "userPassword"
    • Click "Show password" and enter your macOS account password to reveal the password (note you may be prompted twice for it)
    Enter the details into VPN Tracker

    Choose "Configure" from the top right corner of your connection and put the details for your VPN connection in:

    • For VPN gateway address, enter the gateway hostname from the Keychain entry names ("vpn.example.com" in our example)
    • For the pre-shared key, enter the password from the Keychain labeled "groupPassword"
    • Enter your username and password
    • Start your connection and see if you're able to connect

    Choose your authentication options

    {S_1297}

    Information about certificates

    Please keep in mind that, as well as the public part of the certificate, you also need to export the private key.

    Important: Private keys cannot be imported into the Keychain alone and can only be imported together with the corresponding certificate. For this to occur, the certificate and private keys need to be in PKCS12 format. You can generate this format by entering the following command into the Terminal:

    openssl pkcs12 -export -in (example.com).user.crt -inkey (example.com).user.key -out (example.com).user.p12

    Following this, (example.com).user.p12 can be imported by a double click. When generating your keys, you will be asked to enter a password, as private keys in PKCS12 format are always encrypted. This can be a password of your choice but please be aware you will need to enter it again during the import.

    Troubleshooting

    What to do if you can't connect?

    You may need additional details that your VPN admin might have given you when you first set up your VPN connection. Check your emails (tip: try searching for the VPN gateway address).

    If you need to transfer a license to another equinux ID, you can easily do this yourself at my equinux.

    ‣ First log in with your equinux ID and password: http://my.equinux.com
    ‣ Click the checkboxes for each product that you want to transfer
    ‣ Click the "Transfer" button below and enter the equinux ID or email address of the new license owner and click next.       
    ‣ Finally click "Confirm" to complete the transfer. The system will transfer the license, display a message and email both the old and new license owner that the license has been transferred.

    VPN Tracker 365 Plans cannot be transfered to another equinux ID. However, under https://my.vpntracker.com you can assign a plan to a colleague so they can use one of the VPN Tracker 365 plans that are connected to your account.
    This is especially useful if you are the admin of all VPN Tracker licenses in your company and want to manage who can use one of the purchased plans.

    For the configuration of a VPN connection under Mac OS X, you will need the following:
    • VPN Tracker 365: Download here
    • An internet connection
    • A VPN Router/Gateway

    Create a new connection

    In VPN Tracker 365, try the following:
    ‣ Click on the plus symbol in the bottom left corner:
    {S_300}
    ‣ Choose: "New Company Connection"

    Choose your VPN Router

    ‣ In the list of VPN Gateway vendors, choose the manufacturer and model of your VPN router. In case your VPN router does not appear in the list, try the following:
    ‣ Choose "Use custom device profile." 
    ‣ Click on "Create" to add your VPN connection.
    {S_301}

    Your configuration guide

    Our engineers have tested a large number of VPN gateways with VPN Tracker. For many of these, detailed configuration guides are available. In the newly created connection, you will be able to find the router specific configuration guide:
    {S_302}
    Alternatively you will be able to find the configuration guides on our website at http://vpntracker.com/interop

    Further details for creating your VPN connection on Mac OS X can be found in the configuration guide or in the VPN Tracker handbook.

    Your equinux ID is your personal account at equinux. You can use it to purchase and activate products & licenses.

    The first time you shop in our online store, you'll be asked to create an equinux ID. After your purchase, software licenses are automatically linked to your equinux ID and can be activated by simply entering the same equinux ID and password you used during purchase.

    Retail boxes and certain products may still require an Activation Code. Once entered, the product will be linked to your equinux ID.

    If you have forgotten your equinux ID and/or password, use our login & password retrieval form.

    If you are still using VPN Tracker 6 or older and run the VPN Availability Test, you may get an incorrect test result, which can block your VPN connection.

    To fix the problem, please tell VPN Tracker to ignore the test result:
    - Go to Tools > Test VPN Availability
    - Check the box marked "Ignore Test result"
    - Close the window without starting a new test

    Now your connection will connect again.

    If you travel a lot and need a tool that can check VPN availability, we recommend upgrading to a Mac that can run VPN Tracker 365, which includes Connection Checker – a fast and modern solution for frequent travelers and remote workers.
    When connected to a VPN, your network shares won't show up in the Finder sidebar menu:
    {S_1168}

    To access your file server via VPN, you have two options...

    Option 1: Manual Access:

    1. Open Finder.
    2. Open the "Go" menu.
    3. Choose "Connect to Server..."
    4. Enter the IP address (e.g."192.168...")
    5. Click "Connect".


    That's it! Now you have access to your files in Finder for this session. Please note, you will have to carry out these steps each time you need to connect.


    Option 2: Creating a Shortcut:
    You can also create a shortcut to your server within the VPN Tracker app, meaning it will be saved for whenever you need to access the server.

    1. Go to "VPN Shortcuts" in the app menu.
    2. {S_677}
    3. In the shortcuts section, click on the bottom menu and drag out the File Server icon.
    4. {S_678}
    5. Choose a VPN connection and a server to create your shortcut. If your chosen server does not appear on the list you can also enter it manually.


    After you have completed these steps your connection will be saved in the shortcuts section for whenever you need to use it.

    This video tutorial shows you how to quickly create a VPN Shortcut to a file server...


    VPN Tracker Personal Safe is secure encrypted cloud storage for your personal VPN connections and shortcuts.

    How to save a connection in Personal Safe

    Not sure if your VPN connection is backed up? The safe icon in the connection list indicates whether a connection has been stored in your Personal Safe:

    {S_1318}

    To add a connection to your Personal Safe, simply right click the connection and select 'Add to Personal Safe' for access across all your devices.

    {S_1319}

    Why should I use Personal Safe?
    VPN Tracker Personal Safe makes using VPN more reliable and secure:

    Security
    Personal Safe adds an additional level of security to your connections: all your connection details are encrypted using a highly-secure key (Argon3 + PKTNY) that only you can unlock.

    Backup
    Lost iPhone? Broken Mac? Personal Safe keeps your connections safe, so you can instantly get them on your replacement device. Sign in with your secure key and they are instantly downloaded and ready to go.

    Use your connections on all your devices
    iMac at home and iPad for the road? Your Personal Safe keeps your connections synced across all your devices – securely and effortlessly.


    How are connections stored?
    When you add a connection to your Personal Safe, it is encrypted using your personal encryption keys and then uploaded to a secure cloud storage location. It can only be accessed with your user credentials and encryption key.


    Is Personal Safe secure?
    Personal Safe has been designed from scratch for VPN connections. Unlike other storage systems that rely on passwords and leave files unencrypted, Personal Safe encrypts all your connections with keys that only you can use.

    That means connections are

    • Encrypted on your device and
    • Stored on encrypted storage at my.vpntracker.com that only you can access

    Even if someone could get access to your Personal Safe, the key-based security means they can't access the encrypted connection information without your password.

    We've designed the system so no-one (including the VPN Tracker team) can access or unlock your connections.

    For a faster VPN connection that is just as secure, we recommended changing from SSL VPN to IPSec VPN.
    In comparison to SSL VPN, IPSec is able to offer you much faster connection speeds as it runs on the network layer – level 3 of the OSI model – meaning it’s much closer to the physical hardware.

    Check out this post to find out more about how to improve your VPN performance.

    You can manage all of your VPN Tracker plans after logging in to our website https://my.vpntracker.com using your existing equinux ID and password.

    Here you will find all information about your subscriptions and payments and can manage your colleagues' VPN Tracker plans.

    In order to set up a VPN Tunnel under Mac OS X, you will need the following:
    • VPN Tracker 365: Download here
    • An internet connection
    • A VPN Router/Gateway


    Create a new connection


    In VPN Tracker 365, try the following:
    ‣ Click on the plus symbol in the bottom left corner:
    {S_670}
    ‣ Choose: "New Company Connection"


    Choose your VPN Router


    ‣ In the list of VPN Gateway vendors, choose the manufacturer and model of your VPN router. In case your VPN router does not appear in the list, try the following:
    ‣ Choose "Use custom device profile."
    ‣ Click on "Create" to add your VPN connection.
    {S_672}

    Your configuration guide


    Our engineers have tested a large number of VPN gateways with VPN Tracker. For many of these, detailed configuration guides are available. In the newly created connection, you will be able to find the router specific configuration guide:

    {S_674}

    Alternatively you will be able to find the configuration guides on our website at http://vpntracker.com/interop


    Further details for creating your VPN connection on Mac OS X can be found in the configuration guide or in the VPN Tracker handbook.

    VPN Tracker for Mac, iPhone and iPad support all major VPN-Protocols, including:
    • IPsec
    • IKEv2 (Beta)
    • L2TP (only macOS)
    • PPTP (only macOS)
    • OpenVPN
    • SSTP VPN
    • Cisco AnyConnect SSL VPN
    • SonicWall SSL VPN
    • Fortinet SSL VPN
    • WireGuard® VPN
    Note that protocol support may vary by edition, check our online store for details.

    SonicWALL Simple Client Provisioning enables VPN Tracker to automatically retrieve the settings for the VPN connection from supported SonicWALL VPN gateways. For most users, it is only necessary to configure the SonicWALL's WAN IP address in VPN Tracker – everything else happens automatically.

    For a list of supported SonicWALL devices, please refer to this FAQ.

    By default Zyxel creates firewall policies to allow traffic to flow from SSL VPN to LAN zone and from LAN to SSL VPN zone. Those rules are required to allow VPN traffic flow once the connection has been established. But there is no policy that actually allows VPN management traffic at the WAN port, client requests arriving at the WAN port are discarded by the firewall.

    To allow an OpenVPN connection on the WAN port, you first have to create an own policy. In the main navigation, select Security Policy > Policy Control, click on the + Add button and create a policy that allows traffic for the service SSLVPN to flow from WAN to ZyWALL. Please see screenshot below.

    {S_1469}

    If you have a charge from equinux on your credit card that you do not recognize, it may be for one of the following products offered through the equinux Online Store:

    • VPN Tracker (VPN software for Mac, iPhone and iPad)
    • Mail Designer 365 (email newsletter design software for Macs)
    • tizi (iPhone and iPad accessories)

    Common scenarios

    Auto-renewing products

    VPN Tracker and Mail Designer 365 are offered as subscriptions. When a plan has been configured to auto-renew, the associated payment method will automatically be charged.

    Additional team-members added

    If multiple employees are using one of our products, they may have configured team billing. This means the associated credit card may have been charged, in order to add a new team member to an account.

    Invoices and other questions

    You can download your invoices from our website:

    If you have checked with your team and still have additional questions regarding a charge, please contact our support team. Be sure to include the details from your credit card statement and the last 4 digits of your card.

    The private key of your personal certificate could be located in the systems keychain instead of your personal keychain. The personal certificate as well as the corresponding private key has to be located in your login keychain to get constant access. Please try to drag and drop both to your login keychain or delete them and import them to the login keychain.
    Currently, VPN Tracker does not support creating a custom password. We are planning on adding this feature in the future.

    Please note that your equinux password is not directly used as your VPN Tracker password. Instead, VPN Tracker automatically creates a strong password using key derivation for your added security.

    Please refer to the following pages for further information on VPN Tracker Personal Safe (formerly known as Connection Safe):


    VPN Tracker is aimed at making a complex technical matter like Virtual Private Networks (VPN) simple and user-friendly. The software is distributed with device profiles and configuration guides for many popular IPSec VPN gateways. These resources should provide all you need to establish a VPN tunnel successfully. You can find a list of devices and configuration guides here:

    http://www.vpntracker.com/interop

    For a general introduction to computer networking, VPNs and IPsec, there are several excellent introductions available online or as books, see for example here.

    If you experience specific configuration problems, our technical engineers are happy to provide support for setting up VPN connections with VPN Tracker. In many cases, connection problems are related to misconfiguration of either VPN Tracker or the VPN gateway.

    If you provide

    • A problem description and information on what you've already tried
    • A Technical Support Report from VPN Tracker ("Help" > "Generate Technical Support Report")
    • Screenshots of the VPN gateway configuration
    • A log from the VPN gateway

    we can usually quickly spot the cause for a problem and provide advice on how to resolve it.

    As there are several factors unrelated to VPN Tracker or the VPN gateway that can influence connectivity (e.g. firewalls/routers in between VPN Tracker and the VPN gateway), we cannot guarantee that a connection can be established under any circumstances.

    While we try our best, our support options may be limited if

    • you use a device which we did not test ourselves (most devices work just fine with VPN Tracker, though, and we're happy to take a look even at issues with untested VPN gateways)
    • you do not provide the information we need in order to assist you (see above)
    • your network administrator does not cooperate
    • you change connection parameters while we're trying to debug the settings

    Renewals can be canceled up until 10 days before their renewal date. The cancelation will take effect on the next possible renewal date. You can continue to use the software until the end of your term, at which point your subscription will end.


    You can add two-factor authentication to your equinux ID at id.equinux.com.

    Visit our step-by-step guide to 2FA for more details.

    To sign-in to your equinux ID with two-factor authentication, please make sure you're using the latest version of VPN Tracker for Mac or VPN Tracker for iPhone & iPad.

    VPN Tracker has three settings that can speed up connecting to Cisco devices and improve compatibility.

    • Establish a shared tunnel to 0.0.0.0/0 for split-tunneling
    • Send Cisco firewall attribute
    • Use ... as the application version during Mode Config

    Note: All settings described on this page require VPN Tracker 6.2 or newer.
     

    Establish a shared tunnel to 0.0.0.0/0 for split-tunneling

    What does this setting do?
    In a split-tunneling setup using EasyVPN, VPN Tracker will no longer establish an IPsec Security Association (SA) to each remote network, but establish a single SA to 0.0.0.0/0. Split-tunneling is achieved only through an appropriate routing setup. This can speed up the connection processes significantly for connections with multiple remote networks.

    When should I use this setting?
    The setting works with most Cisco devices that use EasyVPN and a split-tunneling setup.

    How can I try it?

    1. On the Advanced tab, uncheck the box “Establish a separate tunnel for each remote network” (see screenshot)
    2. Make sure the box “Establish a shared tunnel to 0.0.0.0/0 for split tunneling” is checked (see screenshot)

    If your connection does not work with this new setting, simply revert back to your previous setup by checking the box “Establish a separate tunnel for each remote network”.

    Send Cisco firewall attribute

    What does this setting do?
    This setting causes VPN Tracker to send a special attribute during EasyVPN indicating the presence of a firewall.

    When should I use this setting?
    You can try enabling this setting if your current EasyVPN-based connection to a Cisco device gets dropped at phase 2 (“The VPN gateway asked VPN Tracker to disconnect...” error).

    Use ... as the application version during Mode Config

    What does this setting do?
    This setting causes VPN Tracker to send a different application version than the default “VPN Tracker 6” during EasyVPN and Mode Config.

    When should I use this setting?
    You can try setting a different application version, e.g. “Cisco Systems VPN Client 4.8.0:Linux” if your current EasyVPN-based connection to a Cisco device gets dropped at phase 2 (“The VPN gateway asked VPN Tracker to disconnect...” error).


    {S_107}
    VPN Tracker 365 makes it really easy to set up a SonicWALL SSL VPN connection on your Mac. Just enter the Host name and VPN Domain into the VPN Tracker settings - and you are ready to go! Please check our Configuration Guide for more detailed instructions.

    Yes, as long as your VPN gateway uses Extended Authentication (XAUTH) to request the passcode, you can use any third party token with VPN Tracker.

    First of all, make sure phase 1 and phase 2 lifetimes in VPN Tracker (Advanced > Phase ...) match the values selected on the VPN gateway.  Please also check, that no session time limit is configured on the Cisco device.

    Please follow these steps, to prevent idle timeouts with split-tunneling, and to generally increase connection reliability:

    1. Uncheck the option "Establish a separate phase 2 tunnel for each remote network" (Advanced > Phase 2)
    2. Afterwards, check the box "Establish a shared tunnel to 0.0.0.0/0 for split-tunneling" (Advanced > Interoperability > Cisco)
    All VPN Tracker 365 plans are available with a yearly commitment.
    VPN Tracker is fully optimized for both small teams and larger enterprise teams. You can set up and manage your team at my.vpntracker.com.

    Our extensive Team Management Guide provides you with step-by-step instructions for the following team-related topics:
    • Creating a VPN Tracker team
    • Inviting team members
    • Assigning VPN Tracker plans to team members
    • Using the package installer and onboarding tools
    • Sharing VPN connections
    • Managing billing and invoices for your team
    The VPN client in macOS supports the "L2TP over IPsec" standard, but it doesn't support the newer IPsec VPN or OpenVPN industry standards found on most third party VPN devices.

    VPN Tracker supports IPsec (IKEv1 + IKEV2), L2TP, PPTP, OpenVPN, SSL, SSTP, and WireGuard® VPN and has predefined settings designed to work with the majority of VPN devices on the market. We also offer configuration guides that explain in detailed steps exactly how-to set up your VPN device.

    In addition to being compatible with more devices than macOS, VPN Tracker also makes working over VPN much more comfortable: VPN Shortcuts make connecting to the file servers, applications and devices over VPN as easy as working locally.

    Since macOS Sierra 10.12 the macOS built in VPN client no longer supports PPTP connections. In order to start a PPTP connection on a Mac running macOS High Sierra or newer, you will need to use an external VPN client like VPN Tracker.

    You can view a copy of all your invoices in our Online Store:

    You will find the invoices for your VPN Tracker 365 purchases in the section "Invoices", here:

    http://my.vpntracker.com

    You work in accounting and need access to the VPN Tracker invoices for your company? Please ask your VPN Tracker Team manager to invite you to you company's team with the role "Accounting". Afterwards you will receive emails as soon as a new invoice is available and you can dowload this from the web portal


    You will find the invoices for your Mail Designer 365 purchases in the section "Orders", here:

    https://my.maildesigner365.com

    You will find the invoices for your tizi products in the section "Orders", here:

    http://my.tizi.tv

    Other invoices can be found at http://www.equinux.com/goto/invoice
    ‣ If you would like to save a PDF copy of your invoice, then do the following:
     Press "Command + P"  
     Choose "PDF" > "Save as PDF"

    No, VPN Tracker is designed exclusively for the macOS platform.

    If your credit card is being refused, please check the following information, for possible mistakes or mismatches :

    • Please check the credit card number you have entered carefully for possible typos
    • Make sure the expiration date entered is correct
    • Check whether the security code you entered matches the code on your card: American Express cardholders can find the 4-digit code on the front of their card, other cardholders can usually find a 3-digit code on the back.
    • Try another credit card, if you have access to one
    • If you are certain your information is correct and your card is still not being accepted, it might be due to a technical issue with our credit card gateway. Please try again later.

    When activating the Personal Safe feature, VPN Tracker generates a Personal Safe key which is encrypted with your equinux ID password and securely stored on our servers. When creating your safe, you are given a Recovery Key, which you should store and keep in a safe place.

    If you change your equinux ID password later on, VPN Tracker can no longer decrypt your Personal Safe. You will need to re-enter your original password so VPN Tracker can re-encrypt your connections.

    If you have forgotten your original password, you have the option of entering your recovery key, instead of the original password.

    If you have forgotten both your original password and your recovery key, the only way to gain access to your Personal Safe is by resetting it on the server.

    Note: Please check your keychain (possibly also on an old computer or a backup) to see if your original password is possibly saved there.

    Important: Please be aware that, as a security measure, you will lose all of your stored connections if you perform a server reset. This FAQ instructs you how to perform a reset of your Personal Safe if required.
    To activate automatic renewal for your VPN Tracker plan, please follow these steps:
    • Log in to you your account at my.vpntracker.com
    • Go to "My Subscriptions" in the sidebar, where you will see your current active plan(s)
    • To activate automatic renewal, flip the switch from grey to green {S_1142}
    • After activating auto renewal, you will receive an email confirming the activation.


    SonicWALL Simple Client Provisioning requires VPN Tracker to send an initial data packet to the VPN gateway that is so large that it may be split ("fragmented") into two IP packets. Some routers are known to not let these packets pass.

    If a router between VPN Tracker and the SonicWALL is affected by this problem, you (or your SonicWALL's admin) will notice no connection attempt arriving at the SonicWALL when Simple Client Provisioning is turned on (i.e. there will be nothing in the SonicWALL's log, and a packet trace will show no packets from VPN Tracker), but everything will work fine with DHCP over IPsec.

    Routers known to have these problems:

    • AirPort Extreme with firmware versions prior to 7.3.1, works when upgraded to 7.3.1
    You purchased VPN Tracker 365, VPN Tracker World Connect or Mail Designer 365? You can use the app on up to three personal devices per license.

    To do so, simply sign in to your account to use your plan on your Macs (or your iOS device where applicable) using just your equinux ID and password.

    You may use the software in parallel on one computer per license.

    If you want to use the software on multiple devices in parallel, or other family members or colleagues also want to use the software on their computers, you will need a separate license for each person or each parallel use.

    A VPN Tracker 10, VPN Tracker 9 or Spot Maps license can be active on one Mac at the same time. If you want to use the Software on multiple devices, you will need an separate license per device.


    When you share a connection using TeamCloud, it is encrypted and then shared with members of your VPN Tracker Team.

    General Security Information
    • TeamCloud uses strong encryption to protect all data
    • The connection is encrypted using end-to-end encryption for each Team member individually
    • End-to-end encryption means that we can never access your encrypted connection

    Here's a brief overview of how the following security settings are handled by TeamCloud:

    Pre-Shared Key
    • Pre-shared keys for a connection are automatically included, so your team members can connect right away
    • The pre-shared key will not be added to a team member's Keychain, so they cannot access it
    XAUTH
    • Your username and password are not shared with your team, they are removed before the connection is shared
    • Each Team member can enter their own username and password
    • These can be stored inside their Keychain and additionally will be added as user-specific credentials to TeamCloud (only available to that team member)
    Security
    • Remote Connection Wipe: By removing a team member from your Team, their access to TeamCloud is also immediately revoked. Any connections they have on their Macs will be removed automatically.
    • Don't allow settings to be changed prevents users that aren't Team managers or owners from editing a connection
    VPN Shortcuts
    • VPN Shortcuts can be shared to TeamCloud directly

    If you have any feedback regarding these settings, please get in touch and let us know your requirements.

    There are three possible causes for this:

    1. equinux is constantly improving VPN Tracker 365 and as a result VPN Tracker has a high update frequency. Especially if you don’t use VPN Tracker on a daily basis, it’s not unlikely that we already released an update since the last time you were using VPN Tracker. Sometimes there are less than 24 hours between updates, especially with security fixes where it's critical they are released as soon as possible.
       
    2. If you were using an older VPN Tracker version, it may be required to install an intermediate update first before you are be able to install the most up-to-date version. In that case you may install an update and directly on next launch VPN Tracker may offer another update.
       
    3. You might have multiple copies of VPN Tracker installed on your system. For technical reasons updates to VPN Tracker 36517.0.6 and below have to be installed using the system installer and if multiple copies of VPN Tracker exist on your system, the installer may choose to update the wrong copy. To solve that problem:
       
        ‣ Place a copy of VPN Tracker into a dedicated folder (we recommend the Applications folder).
          ‣ Use Spotlight to find copies in other folders.
        (Hold down the CMD key in Spotlight to quickly see the location of a hit)
          ‣ Delete all copies that are not in the dedicated folder.
          ‣ Finally start VPN Tracker from the dedicated folder and re-apply the update.


    Downloaded VPN Tracker 365 and want to start setting up your account? You can follow these simple steps to verify your email address and get started with the app:

    1. After you've downloaded and opened VPN Tracker 365, click on Sign in > Create Account

    2. {S_1110}

    3. Enter the credentials for your new account (Name, Email, Password) in the space provided.
    4. Next you'll receive an email to the address you used to sign up with:

    5. {S_1109}

    6. Click on the link in the email to verify your address. If you can't find the email in your main inbox, make sure to check your spam folder.
    7. Once your address has been verified, you will be able to purchase a VPN Tracker 365 plan and set up your own connections.

    TIP: Add newsletter@equinux.com to your address book to make sure you never miss a message from the VPN Tracker 365 team.
    When an IKE server receives a connection request, and there's more than one IKE VPN tunnel configured on that server, the problem arises that the server needs to decide which tunnel this request is targeting and quite often it must base that decision only on the information available in the very fast packet. Knowing the correct tunnel is important as the tunnel configuration defines the cryptographic parameters as well as which pre-shared key or certificates to use. Which information will be available in the very first packet depends on the chosen exchange mode.

    In Main Mode the first packet contains a list of encryption algorithms, hash algorithms, DH groups, the desired kind of authentication (pre-shared key or certificates, but neither the key itself nor any certificates, both are validated at a later time), as well as information whether XAUTH must be performed, may optionally be performed or must not be performed. Further it can see the IP address of the sender from the network packet as well as the IP address to which this packet was sent to (as a gateway may have more than one address). It now needs to decide upon a tunnel only based on this information. Since Main Mode is typically used for static gateway-to-gateway connections and gateways typically have either a fixed IP address or at least a fixed (possibly "dynamic") DNS name, most servers base their decision only on the sender IP address. In case a VPN gateways also allows mobil users to connect using Main Mode, it will either only allow one such connection (this is a fallback connection, that will always be used when the sender IP address doesn't match any other configured Main Mode tunnel) or it allows more than one in which case it will try to guess the right one solely by the connection settings offered in the first packet. If these settings match more than one tunnel, any of these may win, which can easily cause the wrong tunnel to be targeted.

    In Aggressive Mode the same information is available but additional to that the local identifier (type and value) is sent in the first packet. As this identifier can be chosen freely and as it's also easy to make it unique for every tunnel, most gateways will base their decision solely on this identifier in Aggressive Mode. So it's fundamental easier to operate multiple user VPN connections using aggressive mode. All that is required is configuring a unique remote identifier for each of them and then using this remote identifier as local identifier in the client (what is remote for the gateway is local for the client and the other way round).

    Testing VPN throughput using a remote file share is usually not a good idea for two reasons:

    The first reason is the file sharing protocol itself. File sharing protocols like SMB, AFP, or NFS have been designed for local networks that are fast, reliable, and have a very low latency. The Internet on the other hand is slow (at least the connection to it), unreliable and has a very high latency. For realistic results, you need to use a protocol that was optimized for such a situation, like HTTP or FTP.

    The second reason is the implementation of the file sharing protocol. Today most file shares use SMB, the Windows file sharing protocol. Apple has its own implementation of that protocol but this implementation is anything but good. While the SMB 3.x implementation is already poor, the SMB 1.x/2.x implementation (compatibility mode) is horrible, and for several reasons macOS will often fall back into that compatibility mode. When testing with a local NAS file share, we got 28 MBps using SMB 3 and only 18 MBps using SMB 1, compared to 50 MBps using AFP.

    If you have a Mac at the remote side, it’s pretty easy to setup a benchmark HTTP server. All you need is to open the standard application “Terminal” (use spotlight to find it) and then run the following set of commands (every command is confirmed by Return/Enter):

    mkdir /tmp/www-bench
    cd /tmp/www-bench
    dd count=1048576 bs=1024 if=/dev/random of=1GiB.dat
    php -S 0.0.0.0:8080

    The First command creates a new directory, the second one enters that directory, the third one creates a 1 GiB data file filled with random data, the last one starts a primitive HTTP server that serves the content of the current directory at port 8080. Now your VPN users can just open this address in Safari (or any other browser):

    http://a.b.c.d:8080/1GiB.dat

    Where “a.b.c.d” is the IP address of the Mac where you just typed the commands above. By watching the transfer speed in browser, you get a good idea of how capable your VPN is. Of course, this is limited by many factors, like the speed of your local Internet connection, the speed of the remote Internet connection, and the CPU power of the VPN gateway (which is usually far less than the CPU power of a Mac).

    To clean up after the test, activate the terminal window again and hit CTRL+C to stop the HTTP server, and finally run the following two commands:

    cd
    rm -r /tmp/www-bench

    VPN Tracker is now available on iPhone and iPad! Use brand new VPN Tracker for iOS to securely connect to your SonicWALL SSL VPN on the go on your iPhone or iPad.

    Get early access here.'>Discover VPN Tracker for iOS.
    VPN Tracker offers complete support for SSL VPN connections - including SonicWALL SSL, Cisco AnyConnect SSL, and Fortinet SSL, as well as for OpenVPN, IPsec (IKEv1 + IKEv2), PPTP (Mac only), L2TP (Mac only), SSTP, and WireGuard®.

    To find out how to set up an SonicWALL SSL VPN connection, please refer to our SonicWALL SSL VPN configuration guide.

    Find out more about our VPN Tracker plan options here

    WireGuard is a registered trademark of Jason A. Donenfeld.
    You can connect to the following 21 countries:
    1. Germany
    2. Austria
    3. United States
    4. Australia
    5. Brazil
    6. Canada
    7. France
    8. Japan
    9. Luxembourg
    10. Netherlands
    11. New Zealand
    12. Singapore
    13. Spain
    14. Sweden
    15. Switzerland
    16. United Kingdom
    To choose the country you want to connect to, try the following:
    ‣ Choose "File" > "New" > "World Connect Destination"
    {S_402_50%}
    ‣ Then, choose "World Connect" and "Countries"
    {S_403_50%}
    ‣ Check your country of choice:
    {S_404_50%}


    To deactivate your VPN Tracker renewal, please follow these steps:
    • Log in to you your account at my.vpntracker.com
    • Go to "My Plans and Billing" in the sidebar, where you will see your current active plan(s), in case your plan is a team plan, please go to "Team Plans and Billing" in the sidebar
    • To deactivate your renewal, flip the switch from blue to grey {S_1139}
    • After deactivating auto renewal, you will receive an email confirming the deactivation.

    Please be aware that by deactivating automatic renewals you will lose pricing benefits. The possibility of grandfathering pricing is exclusively available for customers who keep automatic renewals activated at my.vpntracker.com once this option has been deactivated, any associated pricing benefits (e.g. discounts, special offers, etc.) will be lost.


    VPN Tracker fully supports SonicWall VPN connections on Mac, iPhone and iPad, allowing you to securely connect to your SonicWall IPsec or SSL VPN from macOS or iOS devices. Download VPN Tracker to get started.
    VPN Tracker offers support for countless VPN protocols and gateways, including support for VPN connections on the Ubiquiti EdgeRouter.

    Our detailed step-by-step guide shows you exactly how to set up a secure L2TP VPN connection to a Ubiquiti EdgeRouter on your Mac in VPN Tracker.

    You need to enter your equinux ID and password to activate most equinux applications. However sometimes applications will also require you to enter your Mac OS X user password in order to access certain required system components.

    So if you see a window like the one below, you'll need to enter the username and password of an Administrator account on your Mac to proceed, not your equinux ID and password.

    {S_169}
    We offer a free 30-day demo of VPN Tracker 365, no credit card required.

    To get started, you just need to

    Then, once you have configured your connection, you'll see a free demo option in the store window that pops up.

    Note: If you don't see the free demo option, please click the account popover at the top left of your screen to verify your email address first.

    {S_1108}
    License management for Resellers is performed as follows:
    1. Go to my.vpntracker.com and log in with your reseller ID
    2. Navigate to the Reseller section in the left hand menu, here you will see all of your orders and the plans you purchased with each order.
    3. Next to the license(s) you want to Transfer to a customer select "Transfer all..."
      Please note, this button will only appear if the license is available for transfer.
      {S_1463_80%}
    4. Enter the email address of the customer you are transferring the licenses to and press "Transfer".
      {S_1464_50%}


    VPN Tracker is designed as a user license. One license can be used by only one person.

    A company counts as a group of users. Each user of the VPN Tracker software needs their own personal VPN Tracker user account as well as their own user license. The information about the VPN Tracker account, may only be used by the owner of the account. A sharing of login and password (for example between members of an organization or others) is not permitted.

    Managing multiple users in an organization via team management
    Employees or users in an organization are managed using VPN Tracker Team Management. With this, an administrator can assign VPN Tracker user licenses to individual VPN Tracker user accounts and also withdraw them. Usage of the team management is mandatory for the use of VPN Tracker in organizations. It is designed to meet the security demands in organizations.

    Team Management Guide →

    Accounts with suspicious behavior
    VPN systems are security systems which regulate confidential access on a personal level. The sharing of logins and passwords will inadvertently lead to an insecurity in the entire system, for example when an employee leaves the company. An ex-employee would still be able to gain full access to the VPN Tracker main account. Accounts which display suspicious behavior may be automatically blocked by our system. This is to safeguard the security of your account.
    A purchasing account is an account which is solely used for purchasing and distributing licesnes. This type of account cannot be used for the activation of software. Purchasing accounts are the only accounts which are not personalised and may in this form be managed by multiple people within one company.
    To set up a connection to a remote server via PPTP VPN on your Mac, please carry out the following steps:

    • Open the VPN Tracker Connection Creator for PPTP VPN
    • Enter the IP address or Host Name of the PPTP server you want to connect to, then follow the remaining steps in the setup wizard
    • Save your new VPN connection in your account using secue end-to-end encryption to start using on your Mac

    To renew your expired VPN Tracker plan, please follow these steps:
    • Log in to your account at my.vpntracker.com
    • In the Teams view under "Subscriptions", you will see a list of both your active and your expired plans
    • To renew an expired plan, please click on: “Reactivate license
    • You will then be shown your available plan options

    Please note:
    • Grandfathering pricing is exclusively available for customers using the automatic renewal option. If your plan has expired, you can re-obtain VPN Tracker for the current price tier
    • After starting your new plan, you will regain full access to your account including your Personal Safe and Team Management features.
    Note: Setting up connections on my.vpntracker is currently in beta and coming to more accounts later this year.

    You can create and edit connections right inside my.vpntracker.com using any browser. Thanks to advanced engineering, this works with the same data security you know from VPN Tracker on the Mac.

    It works like this

    • Choose your device brand and model
    • Enter your connection details
    Here's the key: None of this information is transferred over the internet. It's only being entered locally in your browser, on your device.

    To save your new connection:

    • You enter your equinux ID password
    • Your encrypted secure master key is fetched from my.vpntracker

    Now a program is run locally on your device through your browser that handles encryption:

    • The local encryption program decrypts the master key on your device
    • Then it uses your master key to encrypt the new connection data
    • The fully encrypted connection is then uploaded to your Personal Safe or TeamCloud on my.vpntracker
    • Your Mac, iPhone or iPad can then fetch the encrypted connection, ready for you to connect

    So there you have it. Integrated connection editing on my.vpntracker with the full security and end-to-end encryption you know from VPN Tracker for Mac.

    If you are an existing VPN Tracker customer and want to upgrade to VPN Tracker 365, you can simply install VPN Tracker 365 and your connections will automatically be imported:

    Download VPN Tracker 365

    Once you have VPN Tracker 365, you can purchase a VPN Tracker 365 plan.

    In certain circumstances, due to a bug in macOS, the Kernel Extension required by VPN Tracker may not be installed correctly by your System.

    If that happens, you may see the error above.

    To fix the problem, please try this:

    • Go to Macintosh HD/Library/Extensions and delete the file com.vpntracker.365mac.kext
    • Then open the Terminal app (under Applications > Utilities) and enter the following command:
      sudo kextcache --clear-staging
    • Then reboot your Mac and try launching VPN Tracker 365 again

    If the problem is not fixed, please try this:

    • Restart your Mac and hold down Command+R to boot into Recovery Mode
    • Choose "Disk Utility"
    • Choose your harddrive and click "Mount"
    • Exit Disk Utility
    • Go to the menu bar and choose "Utilities > Terminal"
    • Enter the following commands:
      cd /Volumes/Macintosh\ HD/Library/StagedExtensions/Library/Extensions/
      rm -rf com.vpntracker.365mac.kext
    • Restart your Mac and try launching VPN Tracker 365 again
    SonicWALL listed a known issue in the release notes of 6.5.4.13:

    An established IPSEC VPN tunnel intermittently fails in a NAT environment. (GEN6-2296)

    Please contact Sonicwall for more information on when Sonicwall plans to fix this issue.
    VPN Tracker is the best choice for professionals looking to connect a Mac or MacBook remotely to the company network. As well as the highest security standards, VPN Tracker offers a complete service specifically tailored to the needs of business users.

    This guide tells you all you need to know about getting VPN Tracker set up for remote work on your Mac.

    P.S. VPN Tracker now also works on iOS so you can connect to your company VPN on the go on iPhone and iPad! Find out more.
    1. Open the connection in VPN Tracker and go to “Edit > Setup > Advanced Settings”.
    2. Navigate to “Traffic Control” and add the Fritzbox’s IP range, e.g., 192.168.178.0/24, under “Use VPN for the following addresses only”.

    “Use VPN for the following addresses only”
    192.168.178.0/24

    3. If your Fritzbox uses a different IP range, enter the corresponding range instead.
    If you need to enter multiple remote networks, or want to adjust routing for multiple networks with Traffic Control, you can do so by clicking the plus arrow to the left of the configuration:

    {S_1258}

    Here you can add and remove address fields to use with Traffic Control.

    You can enter the addresses or networks in the following formats:
    • As a single address, e.g. "192.168.10.4",
    • as a single remote network, e.g. "192.168.10.0" (VPN Tracker will use the most typical subnet),
    • in CIDR notation, e.g. "192.168.10.0/24",
    • or with the full subnet, e.g. "192.168.10.0 / 255.255.255.0", which VPN Tracker will then convert to CIDR notation.
    This is possible as long as you have purchased the original license for the customer AND you have purchased the license via credit card or Paypal. If that isn't the case, you can purchase a regular license and assign this to your customer in the reseller portal.

    To add new licenses to an existing license with the same expiration date, please follow these steps:
    In the reseller Portal, you can see products with the order number. If the order number begins with "CDE*" or "CUS*" it is unfortunately not possible to add another license. If you have a different order number next to your product, please follow these steps:
    1. Copy the first characters of your order number before the "..." {S_1197}
    2. Go to your products view and search for this number. The corresponding number can be found under "Plan ID". {S_1198}
    3. To add licenses, klick on the "Add licenses" Link.

    Further steps can be found in this FAQ: {FQ1803}

    Please note that this feature is new and is not available for all license types. For future orders, please pay attention to pay via Credit Card, as only these licenses can be consolidated.
    For detailed information and list of compatible WatchGuard devices, please refer to this page.
    Guides for this router can be found in our Configuration Guides.
    Here is a list of products that are compatible with VPN Tracker:
    {S_406}
    As an admin in your company you can manage all VPN Tracker plans for your team members.

    You can assign a plan to a new member and also revoke a plan if a colleague leaves your team.

    To do so visit my.vpntracker.com and log in using your equinux ID and password.

    In the "Team Management" section you can create a team, invite new team members and change VPN Tracker plans for each colleague.

    Get step-by-step instructions for this in our Team Management Guide.

    Yes, NAT-Traversal is supported by VPN Tracker. VPN Tracker supports the current version of NAT-Traversal that uses UDP encapsulated packets on port 4500 (RFC 3947), as well as previous draft versions that send UDP encapsulated packets on port 500. In addition, Cisco's UDP encapsulation is also supported.

    NAT-Traversal helps to establish VPNs from networks behind routers that perform Network Address Translation (NAT). Such routers can be found in many places: home DSL routers, wireless hotspots, Internet cafes, hotels, airports, etc. Many mobile ISPs (3G modems) also require NAT-Traversal to be used.

    VPN Tracker automatically recognizes if NAT-Traversal is needed, and turns it on and off accordingly. It can even test your local router to see what NAT-Traversal method works best with it.

    Please follow these steps:

    1. Your Mac may not be remotely controlled during installation. Further details can be found here: {FQ1398} Be sure to perform the initial setup locally on the computer.
       
    2. There may be a problem with launchd, which is responsible for installing and starting the background processes of VPN Tracker. In the easiest case, this problem can be solved by just restarting your computer.
       
    3. In case a restart did not solve the problem, start the program Terminal (from Applications → Utilities → Terminal) and perform (copy and paste) the following commands:
       
      sudo launchctl bootout system/com.vpntracker.365mac.agent
      sudo rm /Library/PrivilegedHelperTools/com.vpntracker.365mac.agent
      sudo rm /Library/LaunchDaemons/com.vpntracker.365mac.agent.plist
      sudo rm /var/run/com.vpntracker.365mac.agent.socket
      Confirm commands with your password when being prompted for it (note you won't see the password being typed). Afterwards, please restart your computer.
       
    4. If none of the above did solve the problem, see if you can locate any crash logs Start the App "Console" ( from Applications → Utilities → Terminal) and open /Library/Logs on the left, then select DiagnosticReports. Search for a current entry of com.vpntracker.365mac.agent. In case there is a new entry for every start of the app, please send us one of these reports for analysis.

    Just purchased a new Mac and want to wipe your old device? VPN Tracker 365 makes it easy to move all your existing connections over so you continue connecting seamlessly:
    1. Make sure your connections are stored in your Personal Safe or in TeamCloud (look for the safe or cloud icons in the Status tab)

      {S_1278_50%}

    2. Sign out of VPN Tracker 365 on your old Mac (choose "VPN Tracker 365 > Sign out… " from the menu bar)
    3. Sign in to VPN Tracker 365 on your new Mac with your equinux ID and password

    Give your connections a test and once you're satisfied, you can go ahead and wipe your old Mac.
    VPN Tracker is a modern VPN solution with support for the latest macOS versions, including macOS 15 Sequoia. As a Universal app, VPN Tracker for Mac is also optimized for new Macs with Apple's M1 + M2 Chips.

    Start your free VPN Tracker trial today.

    Learn more about VPN Tracker as an alternative to Shimo
    Considering upgrading to a brand new MacBook Pro with M1 Pro or M1 Max? VPN Tracker 365 is fully compatible with the next generation of Macs - meaning you can continue working productively with your VPN on your new device.

    Don’t have a VPN Tracker 365 plan yet? Find an overview of all licensing options here.
    Just visit my.vpntracker.com to adjust your renewal options. Please note that you may lose pricing benefits ("grandfathered pricing") if you choose to deactivate auto-renewals.

    Please try this:

    Open the Terminal app (from Applications → Utilities → Terminal) and paste in this command:

    sudo launchctl enable system/com.vpntracker.365mac.agent
    Confirm it with your password (note you won't see the password being typed).

    The problem should be resolved.

    You can assign different roles to Team members, which give them access to certain features.

    Note: Roles are currently being rolled out – if you do not see the role dropdown option in your Team, please reach out and we can set your team up.

    You can assign the following roles:

    Manager Organizer Member Billing
    Purchase and manage subscriptions Yes - - Coming soon
    Invite and remove Team members Yes Yes - -
    Change roles Yes - - -
    Add, edit and remove TeamCloud connections Yes Yes - -
    Receive TeamCloud connections Yes Yes Yes -
    Download invoices Yes - - Yes

    Are you seeing a 'Server certificate' error message whilst activating your equinux software?

    One likely cause is your system's date & time: Make sure your system clock is set correctly by checking 'Set date & time automatically' under System Preferences > Date & Time.

    We also use a fairly new security certificate to protect your data. However, older versions of OS X might not immediately recognize the certificate.

    To make sure OS X will recognize the certificate, you could try one of the following two fixes:

    Run Software Update

      ‣ Go to the System Preferences and select "Software Update"
      ‣ Install any available system updates 
      ‣ Afterwards, restart and try activating again

    Disable your firewall

    Please make sure you are not running any firewalls which may block access to our activations server. Applications you may wish to disable temporarily include:

    • Mac OS X Firewall
    • LittleSnitch (Litte Snitch Configuration - Preferences … - General - Stop)
    • Intego NetBarrier

    Disable your proxy

    In some cases the use of proxies may interfere with certain certificates stored in your Keychain.

      ‣ Open System Preferences
      ‣ Go to the "Network" section
      ‣ Choose your network connection and click "Advanced…"
      ‣ Uncheck any proxies you may have configured and click "Ok"

    Check your Keychain

      ‣ Open: "Application" > "Utilities" > "Keychain Access" 
      ‣ Select "Keychain Access" > "Keychain First Aid"
      ‣ Enter your OS X account password, select Repair on the right and hit Start

    Install the root certificate manually

    • Download the latest Let's Encrypt root certificates
    • Double-click to add the certificate to your Mac's keychain
      Tip: If you have multiple users on the Mac, add it to the 'System' keychain to fix this problem for all users
    • Double-click the new entry "ISRG Root X1" to open the trust settings

      {S_1288}

    • Under "Trust", choose "Always trust"

      {S_1289}

    • Close the window and confirm with your Mac user password

    You should now be able to activate your software using your equinux ID and password.

    VPN Tracker 9 & VPN Tracker 10

    Older VPN Tracker versions may also have issues due to certifcates as described above. As these versions are end-of-life, we can no longer offer support for them. The steps above should also apply to these versions. For support and to use VPN Tracker on the latest macOS versions, please switch to a new VPN Tracker plan.

    We use analytics to help us improve the app and your overall VPN experience. All measurements are completely anonymous and we never evaluate any personal information or any data going through your connection.

    What is measured

    • Generic connection settings (e.g. what type of connection it is, which options are being used etc.)
    • Which features are used (e.g. is auto-connect enabled, are any actions configured etc.)
    • How many connections you have

    Your data, your privacy

    • Your specific network settings or credentials are never read, captured or transmitted
    • Your VPN traffic is never analyzed, captured or accessible

    You’re in control

    If you’d prefer not to share any anonymous usage information with equinux, you can deactivate this option at any time in VPN Tracker’s preferences by unchecking 'Share diagnostics data'.

    Due to a bug in macOS 13.4 you may encounter a System Extension issue when starting a VPN connection. Please update to VPN Tracker 23.1.4 which mitigates this issue.

    Download latest VPN Tracker version

    Note that in certain cases, you may still experience a System Extension issue when connecting to multiple VPNs. Restarting VPN Tracker will temporarily resolve the issue.

    We are working on an additional update to work around this bug in macOS 13.4.

    Our activation process requires that your Mac accepts cookies.

    ‣ To check this, please open up Safari. 
    ‣ Click on "Safari" in the main menu at the very top of the screen.
    ‣ Choose "Preferences." 
    ‣ Select the "Privacy" tab and verify that cookies are always accepted. 
    ‣ Make sure JavaScript at "Security" is also activated. 
    ‣ Please close Safari.
    ‣ Restart the application and retry the activation.

    With VPN Tracker 365 you can create a team under https://my.vpntracker.com and assign each team member a VPN Tracker 365 Plan.
    This will not give each team member access to your equinux ID. The team members will only see their assigned plan in their own equinux ID after logging in to https://my.vpntracker.com. You will stay the only admin of your equinux ID.

    Sometimes decrypting the content can fail due to incompatible keys after a system failure. Try syncing the connection again from the app. If that fails delete the connection and create a new one.

    Unfortunately, we cannot guarantee this. Secure networking is a complex subject. VPN Tracker is extremely reliable and is used by customers around the world. But there are some rare scenarios in which VPN connections cannot be established (e.g. when a firewall is set up to actively block VPN connections).

    We recommend using the free trial version to test VPN Tracker with your particular network and usage scenario.

    If you require any assistance setting up your VPN connection with VPN Tracker, you can contact equinux support at any time.

    If VPN Tracker 365 is in your Downloads folder, your Mac treats it with additional security and may not let it auto-update. In this case, you may receive the following message:

    "VPN Tracker can’t be updated when it’s running from a read-only volume like a disk image or an optical drive. Move VPN Tracker to the Applications folder using Finder, relaunch it from there, and try again."

    To resolve this issue, please download a fresh copy of VPN Tracker 365 directly from our website and then drag the app to your Applications folder.

    For a list of tested ZyXEL devices, please refer to this page VPN Tracker may also work with additional IPsec capable devices from ZyXEL, please contact support if you have any questions.
    New Mac? No problem. The latest version of VPN Tracker for Mac offers full support for Macs with M2 chips, as well as compatibility with the latest macOS versions, including macOS 15 Sequoia.

    Download the latest version here.
    Your VPN connections are initially arranged by creation date. You can easily sort and rearrange them by dragging and dropping.
    {S_1245}

    It’s also possible to create Groups of VPN Connections by clicking on the plus symbol in the lower right and selecting “New Group”. Just drag your connections into the appropriate group.

    Fortinet recommends using the IPsec protocol for FortiGate devices and now explicitly highlights this preference (as of November 2024):

    {S_1480}

    Our experience also shows that IPsec connections are significantly more performant, so we likewise recommend using IPsec.

    If you are an existing VPN Tracker customer and want to upgrade to VPN Tracker 365, you can simply install VPN Tracker 365 and your connections will automatically be imported:

    Download VPN Tracker 365

    Once you have VPN Tracker 365, you can purchase a VPN Tracker 365 plan.

    Yes! PPTP connections are included in all VPN Tracker editions. Please note that PPTP VPN is only supported in VPN Tracker for Mac, not on iOS.

    Start your free trial →
    To combine multiple VPN Tracker 365 plans into one so they have the same expiration date, please follow these steps:
    • Log in to your account at my.vpntracker.com and select your team from the sidebar menu
    • Under Subscriptions, you can see an overview of your existing plans
    • At the top of the page you will see a "Merge Subscriptions" button. Press this. {S_1322}
    • Select the plans you would like to combine by clicking on the checkbox on the left side next to each plan
    • Once you have selected all plans, click Combine Subscriptions at the bottom of the window

    {S_1153}


    On the next page, you can preview the plans which will be merged and also have the option of upgrading to a different license type or adding new licenses, if needed.

    On the right, you will see your new plan. Your new plan will start from today’s date and will run for one year. Your existing licenses will also be renewed.

    {S_1154}

    The Yearly total is the total price for one year. The Prorating Discount is the remaining value of your existing licenses which gets deducted from the yearly total to make the Amount due now. Check the Terms and Conditions and click Pay now to finalise your changes.

    If you have already purchased a VPN Tracker license but would like to change to a different product, you have two options:

    1. Purchase an upgrade In most cases you can upgrade your existing plan. The VPN Tracker store will automatically pro-rate your purchase based on the remaining value of your current product.

    Go to your my.vpntracker upgrade page to see your upgrade options.

    2. Convert your product to store credit If you purchased with a different account or want to swap to a different product line altogether, you can convert your existing license to store credit and put that towards your new purchase: Note: If the value of your old product is greater than the cost of your new product, you'll receive another promocode over the remaining value.

    You need an active VPN Tracker 365 plan to connect to your VPN. If your plan expires, you can see your connections, but you will need to renew to continue using your VPN connections.

    Yes, this is possible. If you set up shared networking for the guest operating system it shares the network connection of your Mac and you can access all network resources that are accessible from OS X.

    Note that if you are using remote DNS for your VPN connection, you will need to manually enter the DNS server in your guest operating system in order for it to work – there is no way for VPN Tracker to “transmit” this setting to the guest operating system

    For information on how to set up VPN Tracker with Parallels, check out our VPN Tracker with Parallels Configuration Guide.

    If you are trying to edit a connection that someone else sent to you, please ask the person who sent you the connection for the password.

    In the export settings of the connection it is possible to set a password to prevent users from editing the connections. If this password is set, the imported connection cannot be edited without entering this password.

    Please note, this password is different from the import password.
    For the simultaneous use on two computers, you will need two licenses of VPN Tracker. A VPN Tracker license does not permit the simultaneous use on multiple computers. In this case each computer that is connecting simultaneously will need a unique license.

    For this we offer the convenient Team store, which allows convenient purchasing multiple licenses. Go to Team Store
    VPN Tracker for Mac is fully compatible with:

    • macOS 15.0 Sequoia
    • macOS 14.0 Sonoma
    • macOS 13.0 Ventura
    • macOS 12.0 Monterey
    • macOS 11.0 Big Sur
    • macOS 10.15 Catalina
    • macOS 10.14 Mojave
    • macOS 10.13 High Sierra


    Technical Support Report (TSR) is generally not encrypted and can be viewed directly by every user, unless the connection has been locked, then the TSR is encrypted with the unlock password of the connection.

    The TSR contains connection logs, application logs, screenshots of the app and information on installing and configuring VPN Tracker. In addition, the current system and network configuration of the computer, as well as precise filtered log messages from the console and a heavily filtered system profile, but always only information that is relevant for VPN use or use of VPN Tracker itself. In addition, there may be crash logs of the VPN Tracker system components, if available.

    The TSR does not contain any passwords (pre-shared key, key file, XAUTH or other login data), even if they have been saved in the connection. It does not contain any keys or certificates of connections. It does not contain an unfiltered system log with log messages of irrelevant applications. It does not contain a complete system profile and no file content, except for files that VPN Tracker has created and managed itself. It is not possible to set up a VPN tunnel with the data from a TSR alone, since all the security-relevant information that would be required for this is not available.

    If you want to send us a TSR, use our support form to send the TSR SSL encrypted to us:

    VPN Tracker Support Form
    When you share a VPN connection via TeamCloud, the connection is made available to your entire team by default.

    Can I share VPN connections only with specific users?
    TeamCloud group support is now available. Use this feature to share connections with just a subset of your team (e.g. only admins or only the marketing department.)
    Please check if it is possible to open the address https://my.vpntracker.com in Safari. This Problem tends to ocurr if our Website is blocked through the firewall or another content filter.
    We'll send you an email with all of the details two weeks before your plan is due for renewal. When your plan renews, your preferred payment method will be be billed and we'll send you an email with your invoice.

    Your VPN Tracker 365 app will just continue working as before and any plans that are assigned to team-members will remain assigned as well. Simple, automatic, secure.
    A VPN (virtual private network) is a communication method between two parties in the internet over a so called VPN tunnel.

    The VPN Tracker Software is a VPN tool, which can be used to create a VPN connection on Apple Mac computers.

    What's the point of a VPN?

    When you are travelling away from home or your office, for example the coffee shop around the corner or you're working from home, a VPN gives you the option to create a secure connection to a private or company network. This gives you access to Servers, Cameras or other services which are usually only accessible in your local network. We call this VPN Tracker Company Connect. With VPN Tracker Company Connect you can move about your company's network as if you are sitting at the desk in your office, no matter if you are in a different country, or visiting a customer a few miles away.

    Secure data

    VPN connections can also be used to generally secure a data connection (for example in a public WIFI) or to simulate a connection from a different country. We call this VPN Tracker World Connect.

    How do you establish a VPN connection?

    In order to establish a VPN connection, you need a VPN software, also called VPN tool or VPN client. VPN Tracker is the leading VPN software for Apple computers. The VPN Software allows you to configure and establish a VPN connection to the remote network.
    Great news: WireGuard® VPN support is available in VPN Tracker for Mac, iPhone and iPad!

    WireGuard® is a registered trademark of Jason A. Donenfeld.

    In our online store we accept a variety of payment methods:

    • Visa
    • Mastercard
    • American Express
    • PayPal*
    • Personal/Business Checks* (US Orders Only)
    • Bank Transfers* (European Union Only)

    * License will be emailed to you once your payment has cleared.

    When paying my check or bank transfer, you will receive an email with additional payment details once you have placed your order. Bank Transfer and Check orders are currently not available for Mail Designer Purchases

    If you wish to remove a payment method from your account - e. g. because it has expired or is no longer valid - please get in touch with our support team.

    Please be aware that all active subscriptions require a linked payment method. Without this, the subscription will end immediately.
    Please try this:
    • Open the Terminal app (from Applications → Utilities → Terminal)
    • Paste in this command: sudo rm -f /var/run/vpncontrol.sock
    • Confirm it with your password
    • Then reboot your Mac

    Then try connecting again. The problem caused by the underlying networking components should be resolved.

    VPN Tracker offers support for SSTP (secure socket tunneling protocol)! SSTP support is available in all VPN Tracker plans for Mac, iPhone and iPad. Get the latest version here.

    No, you currently cannot undo remote connection wipe. However, you can reinstate a team member. Remember, you will need to redistribute your team’s VPN connections to the new user before they will be able to connect.

    With TLS-Crypt the data is encrypted twice. Once with the connection key, which is renegotiated every connection, and once with a static key, which is part of the config and therefore never changes. In order to better secure this static key, with TLS-Crypt the packets contain an additional timestamp that is otherwise not needed and this causes the problem.

    We therefore recommend turning off TLS crypt on the server. TLS crypt is activated by the following entry in the server config: "tls-crypt ta.key".

    If you remove this, nothing changes except that TLS crypt is no longer used and must also be switched off in VPN Tracker. This still gives you an encrypted connection, it's just no longer double encrypted, but simply encrypted once.

    This makes the connection even faster and not more insecure. TLS-Crypt only serves to make it impossible for attackers to find an OpenVPN server on the network and, if necessary, to paralyze it via a DoS attack, because if the first packet is not correctly encrypted, the server will not respond to the packet at all.

    Without a TLS crypt it would respond and only the negotiation of the key would then fail, but then an attacker would know that an OpenVPN server is running there and could bombard it with requests until it collapses, since it is responsible for every request computing time has to be spent.
    A VPN (virtual private network) is a communication method between two parties in the internet over a so called VPN tunnel.

    The VPN Tracker Software is a VPN tool, which can be used to create a VPN connection on Apple Mac computers.

    What's the point of a VPN?


    When you are travelling away from home or your office, for example the coffee shop around the corner or you're working from home, a VPN gives you the option to create a secure connection to a private or company network. This gives you access to Servers, Cameras or other services which are usually only accessible in your local network. We call this VPN Tracker Company Connect. With VPN Tracker Company Connect you can move about your company's network as if you are sitting at the desk in your office, no matter if you are in a different country, or visiting a customer a few miles away.

    Secure data


    VPN connections can also be used to generally secure a data connection (for example in a public WIFI network) or to simulate a connection from a different country. We call this VPN Tracker World Connect.

    How do you establish a VPN connection?


    In order to establish a VPN connection, you need a VPN software, also called VPN tool or VPN client. VPN Tracker is the leading VPN software for Apple computers. The VPN Software allows you to configure and establish a VPN connection to the remote network.
    Configuring VPN Shortcuts allows you and your team members to use VPN Tracker 365 to get quick and easy access to your most important internal services, including:
    • File Servers
    • Company intranet & internal websites
    • Company email accounts
    • Internal databases
    • Remote Desktop
    • Internal calendars

    When you click on a Shortcut in VPN Tracker 365, your VPN will connect automatically and your chosen service will be launched:

    {S_1207}

    To learn how to set up VPN Shortcuts in VPN Tracker 365, check out this 2 minute video tutorial:


    Please go to"Configure" > "Advanced" > "Additional Settings"
    and make sure
    • Always prompt for XAUTH credentials is not checked.
      If this option is checked, VPN Tracker will in fact always prompt you, whether it finds credentials in your keychain or not.
       
    • Use stored XAUTH password as passcode is not checked.
      If this option is checked, VPN Tracker assumes that the password stored in keychain is in fact a passcode and it will only hand it out to the gateway if the gateway asks for a passcode. If it asks for a password instead, VPN Tracker doesn’t have any such info and thus asks you to please provide one.
    When VPN Tracker support asks you to collect system log messages, here's how to get them:

    • Open Console.app, which you can find in Finder in Applications > Utilities.
    • Either press the “Start streaming” text or the “Start” toolbar icon.
    • Start VPN Tracker 365 and reproduce the issue.
    • Switch back to Console.app and click on the “Pause” toolbar icon.


    Unfortunately, there is no direct text export for the collected log messages in Console.app. To save them please follow these steps:

    • In Console.app, click into the log message list and press +A to select all messages, then press +C to copy them.
    • Open any text editor and create a new file, for example using TextEdit.app.
    • Press +V to paste the copied log messages into your text editor.
    • Save the file and send it to our support.
      Yes! When you upgrade to VPN Tracker 365, all of your previous settings and connections will be automatically migrated after you install VPN Tracker 365.
      In AnyConnect gateways, the case sensitivity of the gateway address can sometimes matter. gateway.example.com and Gateway.example.com are treated differently. Please ensure that the case exactly matches the AnyConnect gateway settings.
      When you choose your VPN device in VPN Tracker 365, you'll see the configuration options and features supported by that VPN gateway when we tested it.

      If you would like to choose other values, you can switch to a generic profile to reveal all the options VPN Tracker supports.
      Note: By doing so you will be able to select options that your VPN gateway may not support, so be sure to carefully check the settings match your VPN gateway's configuration.

      To see all options:

      • Go to Configure > Basic
      • Click on the currently selected Profile under "Connection based on"
      • Choose "IPsec/L2TP/OpenVPN/SSL/PPTP"
      • Choose your VPN protocol from the list and click Apply
      • Choose "Don't overwrite" to preserve the default settings for your device

      {S_1166}

      {S_1167}

      You'll now be able to choose all options supported by VPN Tracker 365 for your VPN protocol.
      Select the connection which VPN Tracker is trying to connect to and go to "Configure". Under "Actions", you will see this option: "Connect this VPN when VPN Tracker is opened". If checked, this will auto-start this connection every time you start the app.

      {S_1173}

      Note: If this auto start connection has an issue (e.g. no VPN gateway has been entered), you will be prompted with an error message each time you start VPN Tracker. Either solve the issues with the connection or – if you do not need to run the connection – uncheck the option "Connect this VPN when VPN Tracker is opened" to stop the error message from appearing.
      For error messages related to a possible faulty internet connection, try the following steps:

      1. Are you connected to the internet? Check your internet connection by opening a website like www.google.com in your browser (e.g. Safari).
      If that works, proceed to Step 2.

      If no page loads, try the following:

      • Check your Wi-Fi connection: Make sure Wi-Fi is enabled on your device and connected to the correct network.
      • Check cable connections: If you are using a wired connection, ensure the cable is securely connected and undamaged.
      • Restart the router: Disconnect the router from the power source for about 30 seconds, then plug it back in. Wait a few minutes for the connection to re-establish.
      • Contact an administrator or provider: If the problem persists, there may be an issue with your internet provider. Contact your administrator or your internet provider's customer service.
      • Use a mobile hotspot: If you have access to mobile data, try setting up a hotspot to test the connection.

      2. If a specific server is mentioned in the error message, try accessing the specified address via your browser (e.g., Safari).

      If that works, proceed to Step 3.

      If it doesn’t work, there may be an issue with the server mentioned in the error message. In this case, please try the action in VPN Tracker that triggered the error message again at a later time.


      3. Check if your current VPN connection or a firewall is blocking access to the internet or a specific site, and disable this block if necessary.

      • You can see and configure if your currently active VPN connection excludes certain internet addresses in the connection configuration: In VPN Tracker, select the connection, choose "Edit," and then "Advanced Settings." In the "Traffic Control" area, there may be internet addresses listed that the VPN restricts access to.
      • To check if your firewall excludes certain internet addresses, temporarily disable your firewall and try again the action in VPN Tracker that triggered the error message.
      • Check your firewall settings for blocked applications or websites. Some firewalls allow specific IP addresses, domains, or applications to be selectively blocked or allowed.
      • If you find that a rule is blocking access, you can adjust this rule or add an exception to allow access to specific websites or services.
      • If you are still unable to gain access to certain areas, contact your firewall manufacturer's support or your IT support.


      In macOS Catalina, a message may be displayed warning you about a Legacy System Extension. This message can be disregarded:

      Since macOS Big Sur, VPN Tracker uses a new System Extension that uses the very latest system APIs and is fully supported by newer macOS versions.

      Due to bugs with the way macOS Catalina loads newer System Extensions, VPN Tracker for Mac will continue to use the legacy System Extension under this and older macOS versions.

      Rest assured that when you choose to upgrade to the latest macOS version, VPN Tracker for Mac is ready with support for the new release.
      To use the VPN Tracker 365 Reseller Portal, you'll need separate accounts for your reselling activities and your personal VPN Tracker 365 license(s) and connections.

      Please note: You need to create a separate personal account by July 1st 2021 to continue using VPN Tracker 365.

      If you have VPN Connections and Shortcuts saved in your Personal Safe (formerly known as Connection Safe), you can transfer them over to your new personal account in just a few simple steps.

      Step One: Download a local copy of your Personal Safe connections from your Reseller account

      • Go to VPN Tracker 365 > Preferences > Personal Safe
      • Uncheck the box "Enable Personal Safe" to disable Personal Safe sync for all saved Shortcuts and connections and download a local copy on your Mac:

        {S_1259}

      • Important: In the dialog, select "Only Remove from Personal Safe"

        {S_1260}

      • Your connections will be stored locally on your Mac


      Step Two: Set up a new personal account

      • Sign out of your Reseller account via the button in the top left corner:

        {S_1261}

      • If you have not done so already, you should now create a new personal account.
      • This will be the account you use with your own personal VPN Tracker plan, as well as for internal Team Management (if relevant)


      Step Three: Assign your plan to your new account

      • Log in to my.vpntracker using your original Reseller account
      • Using the Reseller tools, transfer licenses to your new Personal account
      • Sign in to my.vpntracker with your new Personal account and assign yourself the license


      Step Four: Re-sync your connection and shortcuts data to your Personal Safe

      • Sign back in to VPN Tracker 365 with your new personal account
      • Open up your Personal Safe preferences again
      • Check "Enable Personal Safe" to add your connections to Personal Safe


      You can now access all your personal data in your own personal VPN Tracker 365 account and enjoy a much more streamlined and organized overview in your reseller account.
      Test to see if your network or provider is working properly. If it works fine, then this could be a NAT-T/IPSec Passthrough problem.

      Please refer to this FAQ for further assistance on NAT-T/IPSec :
      {FQ509}

      Additionally, please re-run the VPN Tracker Connection Checker and see if this solves the issue.

      If this does not solve the issue, please send us a technical support report:
      {FQ640}
      You can easily deploy VPN Tracker on multiple Macs. By using the VPN Tracker installer package and pre-authorizing the System Extension with an MDM-profile, users will not need to enter an administrator password to start using VPN Tracker.

      Installing VPN Tracker remotely
      Download the Installer package file from our downloads page. This can be installed remotely and takes care of authorizing the components VPN Tracker needs.

      Pre-authorizing the System Extension

      VPN Tracker 365 uses a System Extension to create a secure VPN tunnel and manage network traffic.

      For Enterprise rollouts on MDM-managed Macs, you can pre-approve VPN Tracker's Extension using a special profile.

      Our Team ID is MJMRT6WJ8S.
      (Note: Earlier versions used Team ID CPXNXN488S - these should be replaced with the current version)

      VPN Tracker uses a Kernel Extension (KEXT) on macOS 10.15 Catalina and lower. The following bundle identifiers can be used to pre-authorize the KEXT:
      New (version 21 and later): com.vpntracker.365mac.kext
      Older versions: com.equinux.vpntracker365.kext

      Starting with macOS 11 Big Sur, a new System Extension is used:
      com.vpntracker.365mac.SysExt

      Troubleshooting
      If users are still seeing the "Allow System Extension" prompt, please try explicitly listing the System Extension identifier com.vpntracker.365mac.SysExt in your MDM profile (and not just referencing the Team ID).

      To check the status of the System Extension, you can run systemextensionsctl list in Terminal.

      Please see Apple's Support Document for more details.
      The possibility of grandfathering pricing is exclusively available for customers using the automatic renewal option. In cases where your plan cannot be renewed due to a problem with the payment method (i.e. expired, lost or stolen), the plan will be canceled after a few tries. You are then free to re-obtain your plan at any time you wish for the then current price tier.

      In order to profit from your existing price, please ensure you update your payment method prior to the renewal date.
      VPN Tracker Team Management features allow you to conveniently manage groups of users, assign licenses and share connections.

      As a Team Manager or Organizer, you can assign available VPN Tracker licenses to your team members via your my.vpntracker portal.

      How to assign licenses:
      • Log in to your my.vpntracker account and select your team in the sidebar
      • Scroll to Team Members. Here you will see a list of the colleagues you have invited to your team and their current license
      • Click Manage to be shown your available licenses and select a product from the list to assign it to a user
      • If you have no available licenses, you can purchase more from the Team Store by clicking Buy licenses

      {S_1276}

      For more step-by-step information on setting up and managing your VPN Tracker Teams, check out this detailed guide.

      SonicWalls distribute IP addresses using the DHCP protocol. Once the VPN tunnel itself has already been established, the VPN client must perform a DHCP exchange to obtain an IP address and use this IP address for all traffic sent over the VPN tunnel. There are two reasons why this can fail:

      1. The SonicWall never received your DHCP request (DHCP-Discover). That would be the case if there is an issue with the VPN tunnel itself not working properly.

        Try these:
        • Re-run the VPN Tracker Connection Checker from the "Tools" menu. Then try connecting the VPN again. This will let VPN Tracker automatically detect the best settings for your internet connection.
           
        • Make sure that you have no software installed that blocks VPN traffic in general. Please see this FAQ entry for more details.
           
      2. The SonicWall doesn’t want to reply to your DHCP request. The DHCP protocol is designed in such a way that there can be multiple DHCP servers per network and only those who think they can fulfill a request will also respond to it, all others will stay silent (there is no “negative” response for discover requests).

        Try these:
        • Try rebooting the SonicWall. SonicWalls are pretty stable but we’ve seen it a couple of times that the DHCP server is acting strange, as if all IP addresses are reserved, yet that’s not what you will see in the web interface. Rebooting will fix that behavior at once.
           
        • Make sure you have sufficient addresses left in the address pool. If the pool is too small and all addresses are in use or reserved, it is expected behavior that the SonicWall doesn’t respond.
           
      VPN Tracker is available for iOS! Use the brand new VPN Tracker for iOS to securely connect to your Cisco AnyConnect SSL VPN on the go on your iPhone or iPad.

      Discover VPN Tracker for iOS now.

      As a reseller you can purchase VPN Tracker 365 plans and resell them to your customers.

    • You can purchase plans for customers at your existing discount.
    • Purchased plans will be available for you to re-distribute to your customers.
    • You will be pinged by our system when your customer licenses are due for renewal, allowing you to offer them plan extensions.
    • Once you've purchased a plan, you can transfer it to your customers under https://my.vpntracker.com.
    • Absolutely! VPN Tracker for iOS is powered by TeamCloud and Personal Safe, meaning your existing VPN connections show up instantly – zero setup required!

      Discover VPN Tracker for iOS now.
      You can recover a deleted Keychain or missing Keychain data using Time Machine backups if you have them set up. Here’s a step-by-step guide:
      1. Verify Backups Are Available:
      Ensure that Time Machine or another backup system has been configured on your Mac. Without a backup, recovery of deleted data may not be possible.
      2. Locate Keychain Files:
      Keychain data is stored in ~/Library/Keychains/. To access it:
      • Open Finder.
      • Press Shift + Command + G and type ~/Library/Keychains/.
      • Press Return to open the folder.
      3. Launch Time Machine:
      • With the Keychains folder open, click the Time Machine icon in the menu bar or open it from the Applications folder.
      • Navigate through your backups until you locate the version of the Keychain files you want to restore.
      4. Restore Keychain Files:
      • Select the desired Keychain files.
      • Click Restore to place them back into the Keychains folder.
      5. Reintegrate the Keychain:
      After restoring, open Keychain Access (via Spotlight or Applications > Utilities) to verify the recovered Keychain data. If the Keychain doesn’t automatically appear, use the File > Add Keychain option in Keychain Access to manually import it.
      6. Check for iCloud Sync:
      If you use iCloud Keychain, check if your missing passwords have synced back automatically. Ensure iCloud Keychain is enabled under System Settings > Apple ID > iCloud > Passwords and Keychain.
      Although SonicWALL’s Mobile Connect and NetExtender offer great VPN user experience, they are designed to work only with SonicWALL devices. VPN Tracker 365 gives you an opportunity to create and use multiple VPN connections alongside SonicWALL SSL VPN. You can choose from more than 300 gateways of well-known brands, working with the major protocols - OpenVPN, IPSec, L2TP and PPTP.

      Are you using virtualization software, such as VMware, Parallels or VirtualBox? These software products create network interfaces for their internal networking needs, and sometimes the network addresses they choose happen to conflict with the remote network of a VPN connection. Even if you are not currently using this software (but have it installed or not completely uninstalled) their network interfaces exist and can cause conflicts.

      To find out which network interface is causing the conflict:

      1. Attempt to connect to your VPN (so the error message appears in the VPN Tracker log)
      2. Set the log level in VPN Tracker to “verbose”
      3. Look for a line that says
        Remote network ... conflicts with local network ... of interface ...

      This is the network interface that is causing the problem. On most Macs, “en0” will correspond to the Ethernet interface and “en1” to the AirPort interface. Any other enX interfaces are either from virtualization software, or from additional network hardware (e.g. USB network adapters/modems). Network interfaces whose names start with “vboxnet” generally belong to VirtualBox and network interfaces starting with “vmnet” to VMware.

      • If the network interface is a "real" interface, see this FAQ for more information.
      • If the interface is virtual, change the network address(es) used by the virtualization software. More information can be found in this FAQ.

      Symptom


      When using Personal Safe, a data conflict may arise. E.g. if a connection is altered on machine A and also updated in the safe, and then the same connection is altered on machine B before it had a chance to update the connection from the safe, VPN Tracker has a problem: The connection now exists in two different versions, the version in the safe and the local one.

      Solution


      We decided that at all times, there can only be one “truth”, and as VPN Tracker is not able to tell who’s speaking the truth, it will show a conflict state and ask the user to please resolve it. Three options are available.
      1. Do nothing; the conflict will persist until resolved.
      2. The safe is right; the version from the safe is downloaded.
      3. VPN Tracker is right; the version of VPN Tracker is written to the safe.

      Reasoning


      The reasoning behind that is in fact very simple. You can change option A of a connection without breaking it and that change may also be meaningful. You can also change option A of a connection without breaking it and that change may be meaningful, too. However, changing both of these option may not be meaningful at all, these options may now even contradict with each other and that can easily break the connection. That’s why we decided to never merge individual changes into a single one.
      • {FAQ_1195}
      • {FAQ_1196}
      • {FAQ_1197}
      • {FAQ_1198}
      • {FAQ_1199}
      The Team Management feature is an important security measure put in place to keep your VPN Tracker account safely protected from threat. As the information stored in your VPN Tracker account is highly sensitive, we strongly urge all VPN Tracker admins with licenses for multiple users to set this feature up.

      Here are some of the main security advantages from setting up Team Management:
      • Roll out VPN connections via TeamCloud
      • You can see who has access to your VPN and identify any users who should not have access to the connection.
      • You do not have to share your admin account with any other users.
      • You can easily revoke licenses from team members who pose a potential security risk (i.e. ex employees.)
      • Without Team Management, any of your other VPN Tracker users have the ability to sign in to your admin account and gain access to critical features, including assigning or revoking plans.

      To set up Team Management, please visit my.vpntracker.com

      To learn more, please refer to our Team Management Guide.

      Once you have decided which product to purchase, the next step is to proceed to our Online Store and place your order. We accept all major credit cards, PayPal and bank transfers or checks, depending on your country.

      After your order has been processed you will receive a confirmation for your purchase. This will confirm the items purchased, and additional payment instructions if you're paying via bank transfer or check (in those cases you will also receive an additonal email confirming your payment when it has been processed.)

      In the purchase confirmation email you will also receive additional information like the download links for your purchased apps.

      Visit my.vpntracker.com, log in to your account, and go to "Subscriptions" to update your payment method.

      Go to your current subscription and click on "Edit" to change the payment method. Click "Choose another way to pay" to add a new credit card or alternatively, add a PayPal account. This will be used as your new default payment method for your plan.

      {S_1308}
      Your TeamCloud storage allowance depends on the type of VPN Tracker plan you have.

      On this page, you can find an overview of TeamCloud storage in each VPN Tracker edition, as well as other significant features.
      ‣ Download the app.
      ‣ Go to your downloads folder and find the app.
      ‣ Drag the app that you downloaded and drop it into the Applications folder.


      Some VPN gateways are configured to route all your internet traffic through the VPN, rather than just traffic intended for specific networks. With VPN Tracker 365, you have the flexibility to control which traffic is sent over these VPN connections using a feature called Traffic Control.

      Follow these steps to configure Traffic Control:

      • Edit your connection.
      • Go to Advanced Options.
      • Locate and expand the Traffic Control section.
      • From the drop-down menu, choose “Only use VPN for the following addresses”.
      • In the text field, specify the network you want to access through the VPN. For example, enter 192.168.123.0/24.
      • Save your changes.

      By configuring Traffic Control, you ensure that only the specified traffic is routed through the VPN.
      VPN Tracker itself has little to no influence on your throughput speed. It will process data as fast as your system wants to send it out and it will process incoming data as fast as it comes in. The delay the actual data processing adds to the round-trip time is far below 0.1 ms, which is never noticeable.

      In most cases, the factor limiting your connection speed is actually the VPN gateway you are connecting to, as this must handle all VPN connections of all VPN users at the same time as performing other tasks (e.g. keeping the whole network behind the gateway with all its hosts connected to the Internet.)

      How to proceed


      Please verify that the remote side doesn't have any speed issues and then try to reboot your VPN gateway.

      If rebooting didn't help and someone at the remote side can confirm that their internet speed is working as normal, please consider the following two questions:

      1. Are you the only VPN user?
      2. What kind of service/protocol are you using over the VPN? (web, mail, file access, etc.)

      Both of these factors could also be affecting your connection speed.
      1. What are connection drops during rekeying?

        Connection drops during rekeying occur when the VPN connection is interrupted during the key update (rekeying). This causes traffic to not be processed for a short period, which is particularly problematic for stable connections such as video conferences.

      2. Why does the problem occur during rekeying?

        The problem arises because, when using TCP with OpenVPN, the firewall does not accept any traffic during the rekeying process. This leads to an interruption of the traffic.

      3. What impact do connection drops have on a video conference?

        During a video conference, connection drops during rekeying can result in a complete interruption of the traffic. This causes the connection to break, disrupting or even ending the video conference.

      4. Why is TCP susceptible to this problem?

        According to OpenVPN, TCP is problematic for VPN connections because it is more sensitive to traffic congestion during network disruptions or the rekeying process. OpenVPN therefore recommends using UDP instead, as it can better handle rekeying processes.

      5. What solution does VPN Tracker provide for the problem?

        VPN Tracker offers a particularly user-friendly solution: when establishing a connection, VPN Tracker automatically sets the rekeying timer to 24 hours. This significantly minimizes connection drops due to rekeying processes, keeping the connection especially stable. Additionally, VPN Tracker supports switching to UDP, which allows for an even more reliable connection.

      6. Why should the rekeying timer be set to 24 hours?

        A longer rekeying cycle reduces the frequency of connection drops. By setting the timer to 24 hours— as VPN Tracker does by default— the likelihood of the rekeying process being triggered during a critical phase, such as a video conference, is decreased.

      7. What advantages does VPN Tracker have when using UDP over TCP?

        VPN Tracker makes it easy to configure UDP, which offers faster connections and less sensitivity to packet loss. UDP is more efficient and resilient to interruptions during the rekeying process, which is particularly beneficial for bandwidth-intensive applications like video conferencing or streaming.

      8. What recommendations does VPN Tracker provide for companies to optimize their VPN connections?

        For companies relying on stable connections, VPN Tracker offers simple and effective solutions:

        • By default, the rekeying timer is set to 24 hours to minimize connection drops.
        • It is recommended to use UDP instead of TCP whenever possible to further enhance performance.

      Yes, VPN Tracker does support Extended Authentication (XAUTH).
      For performance reasons, we would recommend IPsec. L2TP only adds more overhead to the protocol stack for no real benefit.

      In network environments where IPsec won't work, L2TP over IPsec won't work either.
      If you are still receiving an unknown download error after clicking "Retry", please try the following steps:
      1. Check if you can reach my.vpntracker.com
      2. If you can access my.vpntracker, try quitting and relaunching the app
      3. If that doesn't help, try again a bit later
      4. If it's still not working after a cup of coffee - reach out

      We offer a free trial version of all available VPN Tracker plans so you can test your VPN connections with VPN Tracker before purchasing. VPN Tracker Mac Trial licenses are valid for 7 days and offer the exact feature set of the appropriate plan so you can fully test all features of the plan. You're able to test all connections and protocols to ensure your connections works before purchasing. If you are happy with VPN Tracker, you won't need to do anything to continue using it. All your created connections and settings will remain in the app and the trial license will convert to a paid license after the trial period. Otherwise you can cancel your trial license up to 24 hours before the end of the trial period.

      Get the free VPN Tracker trial

      For a list of compatible devices, please refer to this page.

      If you router is not in the list please refer to this FAQ and the VPN Tracker manual for help determining compatibility.

      Please note that the local router (i.e. the router at the location where your Mac with VPN Tracker is) in most cases does not have to be specifically compatible with VPN or VPN Tracker. Almost all routers work fine with VPN Tracker.

      One of our customers has kindly provided instructions on how to integrate Cisco EasyVPN and VPN Tracker with a DMVPN setup:

      EasyVPN Server and DMVPN Hub on 1 Cisco router tutorial

      Using VPN Tracker 5 with a Cisco Easy VPN Server

      First, log in to VPN Tracker with your equinux account. If VPN Tracker still asks you to buy the software, then:

      ‣ Go to "VPN Tracker" > "Refresh My Account"
      {S_523_30%}

      Then, try to activate your VPN Tracker again.
      Using your iPhone's personal hotspot
      Unfortunately, as of iOS 10 or later, iPhone personal hotspots no longer support PPTP VPN connections.

      Can I use an Android phone instead?
      The restriction on PPTP over personal hotspot also applies to many Android phones, though it may vary by manufacturer and OS version. If you have an older Android device around, it might be worth testing with that first (we recommend holding off on any updates, that might disable PPTP support).

      Other options
      As an alternative, you may be able to use a personal WiFi hotspot device ("MiFi"), provided it supports PPTP passthrough. Check your device's specs for "VPN passthrough" or "PPTP passthrough".
      Plans that are set to auto-renew may keep pricing benefits ("grandfathered pricing").

      By deactivating the auto-renewal option, you will automatically lose any of your existing price benefits (i.e. promotions or introductory offers.) This action cannot be reversed. Should you then wish to renew your plan at a later point, you will be billed at the regular plan price.

      Please be aware that your plan will also end if your payment method cannot be charged at the time of renewal (i.e. expired, lost or stolen). If you need to update your payment method, you can do so at any time in your my.maildesigner365 or my.vpntracker account.
      No. VPN Tracker licenses are personal and not transferable to others. Each colleague needs his own license. For this we offer the convenient Team store, which allows convenient purchasing for multiple people. Go to Team Store
      To upgrade an existing VPN Tracker license, please log in to your my.vpntracker portal and carry out the following steps...

      • Choose your team or your account in the sidebar menu and click on Subscriptions
      • Choose the plan you wish to upgrade and click on Upgrade edition

      {S_1270}

      You will then be taken to the checkout page. Here you can choose which edition to upgrade to. On the right hand side under New plan, select a product from the dropdown list (i.e. VPN Tracker VIP) to calculate your upgrade price.

      You can now review your new plan before purchasing. The Prorating Discount is the remaining value of your existing license(s) which is deducted from the yearly total to result in the Amount due now.

      {S_1273}
      If VPN Tracker for Mac is already installed, Tunnelblick connections can be imported directly as follows.

      File > Import > Tunnelblick Connections...

      VPN Tracker then searches the directories

      ~/Library/Application Support/Tunnelblick/Configurations
      and
      /Library/Application Support/Tunnelblick/Shared

      and then offers a file selection for the first directory that contains connections. The selected connection is then imported directly.

      Remote Connection Wipe offers additional security by removing information about your VPN infrastructure. You may also want to use Remote Connection Wipe for compliance purposes or when working with external contractors.

      Remote Connection Wipe also has the added benefit of working with any VPN connection, even those that don’t offer user authentication. This lets you to block VPN access for an individual user without having to distribute a new connection to your entire team.

      The number of VPN connections you can save in your account depends on your VPN Tracker edition.

      Should you require more storage than you have allocated in your current plan, you can easily cross-upgrade. Your remaining balance will be pro-rated against your new plan.
      Yes you can import your ovpn profile into VPN Tracker. Follow the steps below to get started:

      Step One: Add a connection


      1. Open VPN Tracker 365
      2. Click on File > New > Company Connection
      3. Click on IPSec/L2TP/OpenVPN/SSL/PPTP
      4. Select “Connection based on OpenVPN protocol”
      5. Click “Create”
        {S_1225_60%}

      Step Two: Configure your VPN connection


      1. Click on “Configure” and go to the “Basic” tab
      2. Drag and drop your ovpn file into the grey space "Drop OpenVPN configuration file here", or click on the space to browse for your file in Finder
      3. Your device’s unique configuration settings will be automatically filled out by VPN Tracker 365
      4. Click “Done” to save your settings
        {S_1226}

      Connect to your VPN


      1. Check first of all that your internet connection is working as it should be
      2. Use this link as a test: http://www.equinux.com
      3. Start the VPN Tracker 365 app.
      4. Click on the On/Off slider to turn on your connection.
        {S_1227}

      Done!

      Check out our VPN Tracker OpenVPN Setup Guide for further information and troubleshooting.

      If you have entered information or have started to apply settings in your application demo, those changes will remain unchanged - even after activating the software.

      If you have a company Mac that has been set up with Mobile Device Management (MDM) software, your IT administrator may have blocked installing System Extensions.

      (VPN Tracker 365 uses a System Extension to create a secure VPN tunnel and manage network traffic)

      Please ask your IT administrator to add the following Kernel and System Extensions to your list of permitted Extensions:

      Team IDs:
      CPXNXN488S
      MJMRT6WJ8S

      Kernel Extensions:
      com.vpntracker.365mac.kext
      com.equinux.vpntracker365

      System Extension:
      com.vpntracker.365mac.SysExt

      Please see Apple's Support Document for more details.
      To manage and set up VPN connections, VPN Tracker uses a Network Extension, also referred to as a System Extension. This component integrates directly with macOS to provide the necessary system services required by VPN Tracker. Without it, VPN Tracker cannot establish VPN connections.

      When prompted by the system to allow a new network extension, please confirm this action in the system settings, which should automatically open.

      If the system settings do not open automatically, follow these steps based on your macOS version:


      • macOS 15 Sequoia and newer: System Settings > General > Login Items & Extensions, scroll down and click on the ⓘ icon next to “Network Extensions”. Enable the toggle next to VPN Tracker 365 in the dialog that appears.
      • macOS 13 Ventura and macOS 14 Sonoma: System Settings > Privacy & Security, scroll down and choose “Allow” in the confirmation box.
      • macOS 11 Big Sur and macOS 12 Monterey: System Preferences > Security & Privacy, scroll down and choose “Allow” in the confirmation box.
      Viruses that infect existing applications are very rare on macOS, but they do exist. However, warnings that VPN Tracker 365 or Mail Designer 365 are infected are very likely false-positives, meaning the tool has incorrectly identified malware in these apps that is actually not there.

      As VPN Tracker has low-level access to your system, it is digitally signed and checks that the app has not been altered in any way every time you launch it. If VPN Tracker it looks as though changes have been made to the VPN Tracker app, you'll see that message.

      What can cause this issue?

      Unfortunately other applications (e.g. Uninstaller/Deinstaller, Clean-Up Tools, and so on), that can cause this problem.

      Should you repeatedly run into that issue, please send us a copy of your VPN Tracker app. Locate VPN Tracker on your harddrive, copy it to your Desktop and create a zip file (CTRL-/right click VPN Tracker, then choose "Compress VPN Tracker"). By comparing the broken copy we can find out what has been changed and offer advice how to prevent it from happening again.

      You can recognize a Personal Safe error by the yellow warning triangle next to a connection {S_1248}

      This means that the local saved version of the connection does not match the version in the cloud. To resolve the conflict, click on the connection in the left menu and open the tab "Personal Safe"
      Click on the button "Fix sync issue".
      A dialogue will open. You have the option to choose which version of the connection you would like to keep. The local version, or the cloud version. {S_1254}

      To keep the local version, please choose: "Upload and overwrite cloud version"
      To keep the Cloud version please choose: "Download and overwrite local version"
      TeamCloud is included in all VPN Tracker editions at varying levels. For more specific information about plan options and included features, please refer to the VPN Tracker Store.
      The VPN Tracker World Connect App from the App Store lets you connect to VPN servers in countries around the world – but cannot connect to company VPNs.

      VPN Tracker from our website (www.vpntracker.com/download) connects to hundreds of VPN devices and gateways in your office – AND also connects to VPN servers globally.

      For the most functionality, download VPN Tracker from our website.
      Yes! Pre-configuring VPN Shortcuts to share with your team is a productive way to ensure everyone can get connected to crucial internal services such as...
      • Network shares
      • Databases
      • Email accounts & calendars
      • Company intranet
      • Remote Desktop
      ...whilst working via VPN.

      How to share VPN Shortcuts with your team
      Go to the connection your Shortcuts are configured for and click "Configure" to open the configuration window.

      At the bottom of this window, go to "Export Settings" here you will see a range of different settings for your connection export. Go to "VPN Shortcuts" and check the box next to the Shortcuts Collection you wish to share:

      {S_1211}

      Close the settings window, then click "Export". Select an export location and enter an import password for better security. Once you're ready, click "Export" to create a .zip file of the connection which you can send to your team members:

      {S_1212}

      Once a team member receives the file, all they need to do is double click it to open the connection in the VPN Tracker 365 app on their Mac, then enter your import password. Following this, the VPN connection, along with all the Shortcuts you configured, will be ready to use straight away.

      Learn more about Shortcuts in this 2 minute video tutorial:


      Managing your VPN Tracker account is easy!
      • Go to my.vpntracker.com and sign in with your equinux ID and password.
      • Under "My Subscriptions" in the sidebar menu, you'll see a list of your current VPN Tracker 365 plans.
      • Activate automatic renewals to ensure your license is renewed at your current rate.
      • Alternatively, you can let your current license expire and then purchase a new plan at the new customers rate from our online store.
      {S_1221} We generally recommend leaving auto-renewal enabled to prevent any disruption to your VPN service: Our system always sends a reminder before your plan will auto-renew to give you plenty of time to deactivate auto-renewal if it's no longer required.
      VPN Tracker World Connect is an independent product you can use in the VPN Tracker 365 app.
      You can purchase your World Connect Pass independently of an active VPN Tracker 365 plan.

      Haven’t tried the demo yet? Download the VPN Tracker 365 app for free from our website and start your trial.
      VPN Tracker offers complete support for OpenVPN connections, as well as IPsec (IKEv1 + IKEv2), PPTP, L2TP, SSL (including SonicWALL, Cisco AnyConnect & Fortinet), SSTP (Windows) and WireGuard® (Beta - learn more).

      To find out how to set up an OpenVPN connection on your Mac, iPhone or iPad, please refer to our OpenVPN configuration guide.

      WireGuard is a registered trademark of Jason A. Donenfeld.

      Once you have set up a personal VPN connection in VPN Tracker 365, it is best practice to back the connection up in your Personal Safe. This way, you will not have to configure the connection again if you get a new Mac.

      To save a connection, right click on the connection in the sidebar and click “Add to Personal Safe ...”

      You can see whether or not a connection has been backed up if the Personal Safe icon appears next to it in the sidebar:
      {S_1247}

      The VPN connection is now saved to your account and can be accessed on a new Mac and on iPhone and iPad with VPN Tracker for iOS.
      VPN Tracker for iOS supports IPSec (including SonicWALL SCP & DHCP, EasyVPN and Mode Config), IKEv2 (Beta), OpenVPN, SSTP, SonicWALL SSL, Cisco AnyConnect SSL, Fortinet SSL and WireGuard®.

      Get VPN Tracker for iOS here.

      WireGuard® is a registered trademark from Jason A. Donenfeld.
      A VPN Tracker license does not permit the simultaneous use on multiple computers. In this case each computer that is connecting simultaneously will need a unique license. For this we offer the convenient Team store, which allows convenient purchasing for multiple people. Go to Team Store

      Availability of pre-release testing


      Generally, pre-release testing of Beta and Nightly builds is available to all VPN Tracker users. However, if you are considering updating to a pre-release version, please carefully consider the following information:

      Important information for pre-release testers


      Nightly and Beta versions of VPN Tracker are still in the development stages. The aim of pre-release testing is to identify any possible connection issues experienced by our testers and get these fixed for the final public release. This means we can't guarantee perfect stability and compatibility for existing connections.

      For this reason, we do not recommend an update to a pre-release version for production systems or anyone who requires critical access to their connection. In this case, we advise you stay on the main branch.

      Getting back to the main branch:


      If you've updated to a pre-release version and are experiencing issues with your connection, you can easily switch back to the last stable release.

      The following article describes where VPN Tracker stores its data in case you need to make manual backups instead of using Time Machine.

      VPN Tracker stores all its data files in the standard system locations as recommended by Apple. Depending on the fact if these are system-wide or per-user files, they are either found in /Library (system-wide) or ~/Library (per-user), where ~ is a placeholder meaning "home of the current active user".

      To access the system-wide library folder:

      • In Finder Choose "Go" > "Go to Folder ..."
      • Enter /Library

      To access the user library folder:

      • In Finder Choose "Go" > "Go to Folder ..."
      • Enter ~/Library

      VPN shortcuts, all information related to your equinux ID, accounting data, scanner results, and window positions are per-user settings.

      For a full backup of all your settings, you need to backup the following files and folders:

      • /Library/Application Support/VPN Tracker 365
      • /Library/Preferences/com.vpntracker.365mac.plist
      • ~/Library/Application Support/VPN Tracker 365
      • ~/Library/Preferences/com.vpntracker.365mac.plist

      Backup your keychain
      Please note that passwords in VPN Tracker are usually not stored in any of the locations named above but in your keychain. If you have no external backup of all your passwords, be sure to also backup your keychains which can be found in ~/Library/Keychains

      To safeguard your accounting data against accidental deletion, VPN Tracker keeps rolling backups.

      You can find them under:

      Macintosh HD/Users/YourUser/Library/Application Support/VPN Tracker/Accounting/

      (Note that the Library folder may be hidden: Choose "Finder" > "Go" from the menu bar and hold down the option key to open the Library folder).

      Your current Account files are stored in “Accounting.sqlite”. You'll also see all your Accounting backups in the same folder. They will be have a date in the file name.

      To revert to an earlier backup:

        ‣ Rename the “Accounting.sqlite” file to “Accounting-backup.sqlite”
        ‣ Delete the Accounting.sqlite-wal and Accounting.sqlite-shm files 
        ‣ Rename the backup you want to restore to “Accounting.sqlite”

      There are three main ways to take a screenshot on your Mac:
      • Press "Shift" (⇧) + "Cmd" (⌘) + "4" then click and drag the mouse cursor to capture a specific area of your screen.
      • Press "Shift" (⇧) + "Cmd" (⌘) + "4" and then the space bar to capture a specific window or element on your screen.
      • Alternatively, press "Shift" (⇧) + "Cmd" (⌘) + "3" to capture your full screen.

      VPN Tracker does not maintain VPN connections when the computer goes to sleep for the following reasons:

      1. Immediately after waking up, the system may have different network settings than when it went to sleep, e.g. because the network cable was replugged while the computer was asleep, or the computer was moved to another location where a different WLAN is available, or a DHCP lease has expired and the DHCP server has to assign a new IP address to the computer after waking up because it has already given the old one to someone else, or the network interface no longer exists, e.g. if a USB network adapter was unplugged. In these cases, not only would the connection immediately stop working after waking up, VPN Tracker would also no longer be able to log off correctly from the remote peer.

        VPN Tracker would also not be directly aware of some of these events, as applications do not receive network events while the system is asleep and would therefore have to compare all network configurations after waking up with those before sleeping and decide whether the connection could still work or not, because with some VPN protocols there is no way to actively test this, with others only if certain options are used (e.g. DPD). A misjudgement leads to a tunnel being kept up that can actually no longer work and the user would then have to restart it manually before it works again.

      2. NAT gateways remember in a table how they map private IP addresses to public ones and how they rewrite ports for a limited time only. Depending on the protocol, this time span can be in the range of seconds or minutes (some gateways only remember this for 20 seconds with UDP). If such a table entry is lost, this does not result in an error, but a new entry is created for the next packet, which often results in a different mapping, which the remote station cannot cope with, because it now looks to them as if someone else is trying to hijack the connection, as the packets are suddenly coming from a different sender. VPN Tracker cannot know or check when it wakes up whether the previous table entry still exists or has already been lost and will not receive an error from the NAT gateway in the latter case, but the connection will still no longer work, which leads to the same problems as in the first case. It does not matter whether a local NAT gateway is used (as in most home routers or modems) or a carrier grade NAT gateway, which is located at the ISP and via which several customers can share a single public IPv4 address. The latter is increasingly the case, as there are no longer any free IPv4 addresses and therefore not every customer can get an own one.

      3. VPN protocols that use some form of Dead Peer Detection (DPD) expect regular data traffic from the other side. If this fails to occur, they send DPD packets and expect these DPD requests to be answered. If they are not answered, the other side considers the connection to be dead and deletes it. VPN Tracker is also unaware of this while the computer is asleep and cannot respond to these requests. After waking up, the connection would again no longer be functional, but even with DPD in use, this would often only be noticed after about a minute and until then the system would try to continue using this connection without the slightest chance of success, so that various applications would run into errors or disconnects.

      4. If a VPN connection is disconnected without the client logging off from the VPN gateway and without the gateway being aware of this, the client may not be able to re-establish this connection immediately or a connection error may occur the first time it is established. In the worst case, the client may even be locked out for a few minutes. This can occur in the first two cases if the network settings have changed after the sleep phase or if a NAT table entry has been lost.

      To prevent all these problems, VPN Tracker immediately terminates all VPN connections as soon as the system reports that it wants to go to sleep, and also logs off correctly from the remote peer. As soon as the system wakes up and reports that the network is fully operational again, VPN Tracker immediately re-establishes all these connections. This avoids all the problems mentioned above and normal applications have no network access while the system is asleep and are also used to the fact that no network is available for a short time after waking up, because this is also the case without VPN, especially if something has changed on the network.

      Some banks may have trouble processing credit card renewals which can cause your card to be denied.

      Generally, this can be resolved by a quick phone call to your bank. This should be your first port of call.

      Alternatively, you could also try the following:
      - Please try updating your card directly on our store page
      - Try a card issued by another bank (our store supports Mastercard, Visa and American Express)
      - Use PayPal (tip: often a problematic credit card will work when added to PayPal)

      You can manage your payment methods under http://store.equinux.com/storefront/subscriptions/.
      VPN Tracker is now available on iPhone and iPad!

      Connect to your VPN on the go on your iPhone or iPad using the new VPN Tracker for iOS app.

      • Multiprotocol VPN support
      • High speed connections
      • Zero-config VPN - thanks to TeamCloud & Personal Safe technology

      Test VPN Tracker for iPhone and iPad.
      To configure a VPN connection on macOS, you will need the following:
      1. VPN Tracker 365: Download here
      2. An internet connection
      3. A VPN Router/Gateway


      Create a new connection


      In VPN Tracker 365, try the following:
      ‣ Click on the plus symbol in the bottom left corner:
      {S_1234}
      ‣ Choose: "New Company Connection"


      Choose your VPN Router


      ‣ In the list of VPN Gateway vendors, choose the manufacturer and model of your VPN router. In case your VPN router does not appear in the list, try the following:
      ‣ Choose "Use custom device profile."
      ‣ Click on "Create" to add your VPN connection.
      {S_1236}

      Your configuration guide


      Our engineers have tested a large number of VPN gateways with VPN Tracker. For many of these, detailed configuration guides are available. In the newly created connection, you will be able to find the router specific configuration guide:

      {S_1238}

      Alternatively you will be able to find the configuration guides on our website at http://vpntracker.com/interop


      Further details for creating your VPN connection on Mac OS X can be found in the configuration guide or in the VPN Tracker handbook.
      There are a couple of restrictions in the demo version of VPN Tracker 365. Please keep in mind the following:

      • A demo license is only valid for 30 days.
      • A demo license allows you to use all the Pro Edition features except the export feature.
      • A demo license restricts tunnel traffic up to 500 kb in either direction.
      • Once the 500 kb limit has been reached, a demo license allows you to stay connected for another 3 minutes.

      VPN Tracker 365 TeamCloud has been designed from the ground up to offer highly secure cloud storage for your team's VPN connections.

      TeamCloud - Key Security Architecture


      • Built using end-to-end encryption - our servers have no access to your connection data
      • Securely encrypted with user-specific encryption keys for additional security
      • Encryption runs locally in your browser

      Managing connections on the web


      my.vpntracker uses sophisticated WebAssembly technology to securely decrypt and encrypt your sensitive connection details locally within your browser - without sending any unencrypted data through the VPN Tracker servers.

      This allows Team Managers to edit connection files and add additional Team Members to TeamCloud on the web, without needing a Mac or VPN Tracker 365 running locally.

      Purchasing through our online store is perfectly safe. All transferred information is encrypted via HTTPS - so it is secured against any potential threats.

      Our goal with the new licensing model was to facilitate the selection of an appropriate license. Instead of a variety of other factors, we now primarily limit licenses based on the number of connections a user has. We have developed the Basic license specifically for individual users who only need access to one VPN connection.

      The license options we offer are as follows:
      • VPN Tracker for Mac BASIC - 1 Connection
      • VPN Tracker for Mac PERSONAL - 10 Connections
      • VPN Tracker Mac & iOS EXECUTIVE - 15 Connections
      • VPN Tracker Mac & iOS PRO - 50 Connections
      • VPN Tracker Mac & iOS VIP - 100 Connections
      • VPN Tracker Mac & iOS CONSULTANT - 400 Connections


      To upgrade your existing licenses, please go to the subscriptions tab in your my.vpntracker.com account and press the "Upgrade" Button. You can then choose a a suitable license from the dropdown link under "New Plan".

      We hope that this licensing model will make the licensing more clear moving forward.

      We use analytics in VPN Tracker 365 to help us improve the app and your overall VPN experience. All measurements are completely anonymous and we never evaluate any personal information or any data going through your connection.

      What is measured

      • Generic connection settings (e.g. what type of connection it is, which options are being used etc.)
      • Which features are used (e.g. is auto-connect enabled, are any actions configured etc.)
      • How many connections you have

      Your data, your privacy

      • Your authentication details and credentials are never read, captured or transmitted
      • Your VPN traffic is never analyzed, captured or accessible

      You’re in control

      If you’d prefer not to share any anonymous usage information with equinux, you can deactivate this option at any time in VPN Tracker’s preferences by unchecking 'Share diagnostics data'.

      You'll need to be signed in with a user account first in order to start VPN Tracker. You can configure your user account to start VPN Tracker directly after logging into your account.
      From macOS Big Sur onwards, apps with a System Extension must be installed in your Mac's /Applications folder.

      Please make sure you have the latest version of VPN Tracker for Mac and place it in your Applications folder (under Macintosh HD/Applications).
      VPN Tracker for iOS is now available!

      Find out more
      OpenVPN Layer 2 (TAP) connections are not supported by VPN Tracker. TAP interface support in macOS is deprecated and will be removed in a future macOS release. We suggest that you activate Layer 3 (TUN) connection support on your router/gateway in order to use OpenVPN with VPN Tracker. If this is not an option for you, we're interested in learning why you cannot use TUN connections, so please don't hesitate to give us feedback on this topic.
      To add additional licenses for your team, please follow these steps:

      • Log in to your account at my.vpntracker.com
      • In the Team overview, go to "Licenses". Here you can see all your existing plans
      • Then, click on “Add plans” {S_1145}
      • On the following page enter the number of licenses you would like to add and select the edition. Then click on "Add to plan"
        {S_1146}
      • Under Checkout you will see your new plan. Your new plan will start from today’s date and will run for one year.
        {S_1147}
      • The "Yearly total" is the total price for one year
      • If applicable (i.e. if you have merged your plans), the "Prorating Discount" is the remaining value of your existing licenses which gets deducted from the yearly total to make the "Amount due now".
      • Check the Terms and Conditions and click "Pay now"
      • You can now assign your licenses to your team members

      VPN Tracker 365 offers support for countless VPN protocols and gateways, including support for the SonicWALL TZ series.

      Our detailed step-by-step guide shows you exactly how to set up a VPN connection on your SonicWALL device using VPN Tracker 365.

      VPN Tracker is generally compatible with Dortania's OCLP project. However, some users report that you have to set the "AMFI" setting to "disable" in order for VPN Tracker to start correctly:
      • Get the latest version of the OCLP:
        OpenCore Legacy Patcher Releases
         
      • Start and click Settings: {S_1341}
      • Check "Disable AMFI": {S_1342}
      • Then select "Post-Install Root Patch" in the main menu and restart the device.
      The downside of disabling AMFI is that some 3rd party applications may no longer be able to access the system camera or microphone. Should you experience such an issue, you can re-enable AMFI after you've started VPN Tracker once and VPN Tracker will continue to work. The AMFI fix seems permanent; at least until you update macOS, in which case you may have to repeat those steps.
      Please go to VPN Tracker > Preferences and check if you have activated pre-release testing. If you have installed a Nightly or Beta build, it is possible you may encounter some connectivity issues, as these versions are still in the development stages.

      {S_1316}

      I am having issues with a pre-release version. What can I do?
      Having issues? You can easily get back to the last stable release by visiting our version history overview and downloading the last full VPN Tracker version.

      If you decide you want to deactivate pre-release testing for the future, you can do this in the app preferences.

      Please note that pre-release testing is generally not advised for production systems or users who require critical access to their VPN.

      Need further support?
      If you need help with a certain connection issue, feel free to contact the support team. Remember to also send a TSR (technical support report.)
      We have a new function in early beta that allows exchanging an existing license for a promo code with the same value as your existing duration. You can then apply the credit received to a new license purchased on your main account.

      In order to move ahead with the consolidation, please follow these steps:
      • Visit the license transfer page and log into the account which holds the license you would like credit for
      • Select the license you would like to exchange and confirm the license conversion. Your promo code for the remaining durations will be sent to your account’s email address.
        Go to my.vpntracker.com portal and log in with the account you would like to add the license to.
      • Click on “Buy additional licenses or upgrades” and add an additional license. Additional information on adding licenses can be found here: {FQ1803}
      • Apply the promo code to your order at the bottom of the page, check the Terms and Conditions and click "Pay now"


      Note that you can only do one promocode per order, but with the pro-rating you can simply place multiple orders, one for each license you need to add and promocode you wish to redeem.
      Please be aware that License Transfer Codes expire after 14 days and must be redeemed before expiration.
      VPN Tracker offers a convenient self-service quote tool. Here’s how to get started:
      • Go to the VPN Tracker Store
      • Add the requested licenses to your shopping cart by clicking the Plus Symbol.
      • Be sure to select: “Purchase as new plan”. The quote tool does not currently support the “Add to an existing plan” feature.
      • Once you have added the licenses to your cart click on the blue “Save as quote” button on the right side of the page
        {S_1242}
      • Your product selection and price will be saved into a quote which will remain valid for seven days after it has been generated.
      • Be sure to log in to your account to see your final price.
      • You can share your quote with others by sending them the URL of your quote.
      • Alternatively, you can export the quote as a PDF or print it.
      • Once you are ready to purchase, just click the “Purchase Now” button and all items from your quote will be directly put back into your shopping cart and you can proceed with your purchase.

      VPN Tracker is a 100% 64 bit application and runs great on 64 bit systems.

      VPN Tracker supports X.509 certificates (RSA Signatures) and smart cards using X.509 certificates (PKI tokens) for authentication.

      For more information, see the VPN Tracker manual.

      Sure! Just send us a quick message and we'll be happy to adjust your plans for you.
      We publish the SHA-256 checksum of each VPN Tracker download, allowing you to verify the integrity of your download before installing it.

      How to verify the checksum

      • Download the VPN Tracker.zip file
      • Open Terminal and run the following command:
      • shasum -a 256 ~/Downloads/VPN\ Tracker \ 365.zip
        (note the exact path may differ, depending on which version of VPN Tracker you’ve downloaded
      • Compare the calculated checksum to the checksum published on the Version History page.

      Note: Safari automatically unzips files it downloads, so you’ll need to ensure you’re comparing the checksum of the zip file, not the unzipped app.


      VPN Tracker supports two-factor authentication (2FA) for your equinux ID account, as well as for your VPN connection login.

      2FA for your equinux ID
      You can configure 2FA for your equinux ID to add additional security for your VPN connections. Learn more…

      2FA for your VPN connections
      VPN Tracker offers support for two-factor authentication (2FA) for certain VPN setups. Depending on your VPN gateway and protocol, you may be able to use 2FA based on OTP codes, X.509 certificates, smart cards or PKI tokens, as well as authenticator tokens such as RSA SecurID, CryptoCard, FortiToken etc.

      When you connect to your VPN, VPN Tracker will automatically ask you for your 2-factor code after signing in with your user credentials.

      The Remote Connection Wipe functionality is available for all VPN Tracker 365 plans.
      Please note that you will need a VPN Tracker 365 Pro plan to export a VPN connection.

      In our white paper you will find all information to set up Remote Connection Wipe:

      http://equinux.com/goto/vpnt365/whitepaper

      VPN Tracker for Mac includes support for the latest versions of macOS, including macOS 13 Ventura and the new macOS 15 Sequoia.
      For the latest news and information on compatibility, including current known issues, please visit our release notes page.

      If you used an earlier VPN Tracker 365 beta, you may run into a Connection Safe sync issue with the following error message:

      Connection could not be downloaded. The operation couldn’'t be completed.
      VPNTHQ.HQConnectionSyncKeyError error 0


      To fix this problem
      • Sign out of VPN Tracker 365
      • Quit VPN Tracker 365
      • Open Applications > Utilities > Keychain Access
      • Search in the top right for VPN Tracker entries mentioning "master key", "sync master key", or "connection safe"
      • Delete these entries (Edit > Delete
      • Launch VPN Tracker
      • Sign in again and wait for your Connection Safe to sync (check under VPN Tracker > Preferences > Connection Safe)
      Launch VPN Tracker 365.

      If a new version is available, you will see an update notification right away. Click it to install the update.

      If you don't see an update notification when you start the app, go to "VPN Tracker 365" > "Check for updates..." in the menu.

      Tip: If you're unable to update, you can also download VPN Tracker 365 from the Version History page.
      For the protection of our customers, all payments in our store are processed with 3D Secure technology. 3D Secure is an additional security mechanism that works with 2-factor authorization. After entering the card details, the transaction is passed on to the credit card company and must be explicitly approved by the customer. The approval is usually done via SMS, app or email. With the explicit approval before the transaction, we can help prevent credit card fraud.

      In order to use your card with 3D Secure, it needs to be actived for your card. Please contact your bank for this. Registration is often possible on the bank's website or via your banking app. Please see the links below for more details:

      With the 3D Secure procedure, authentication communication takes place directly between your computer and your bank. We have no influence on this. If you have any problems, please contact your bank or try to pay with another card or PayPal.
      Luckily, this is an incorrect report.

      The XCSSET malware is a trojan that replicates project files via Xcode; it targets mostly developers. To get it, you would need to download an infected Xcode project and build it. It creates fake apps and also downloads and installs payload (adware and similar things). So it does not infect existing apps.

      An interesting property of XCSSET is that it's mostly implemented in AppleScript. The generated fake apps contain a folder "Contents/Resources/Scripts" in which those AppleScript files reside. You can right-click on VPN Tracker 365 or Mail Designer 365 in Finder, then click on "Show Package Contents" to check whether this Scripts folder or any AppleScript files (*.scpt) can be found; VPN Tracker 365 and Mail Designer 365 do not contain AppleScript files.

      The Blowfish and CAST-128 encryption algorithms have been removed in OS X 10.8 Mountain Lion. They continue to be available when VPN Tracker is running on OS X 10.7 Lion and earlier.

      Apple Family sharing is not activated for our products.
      To change the name of your VPN Tracker Team follow these steps:
      • Log in to your my.vpntracker.com account
      • Select your team in the top left corner
      • On the left side choose "Team Cloud"
      • Scroll down to the section "Rename your team"
      • Enter your new Team Name and press "Rename" {S_1320}
      If you are experiencing problems with your FortiSSL connection, it might be related to the “Strict Host Check.” You can try disabling this setting on the gateway.

      Follow these steps:

      To disable the host check on the FortiSSL server side, you can turn off the “Host Check” in the SSL-VPN settings.

      Steps:

      1. Log in to the FortiGate CLI or GUI (Command Line Interface or Graphical User Interface).
      2. Enter the following command in the CLI to disable the host check:

      config vpn ssl settings
      set host-check disable
      end

      This will disable the strict host check for SSL-VPN clients.
      In the following overview, you'll find the end of support dates for older VPN Tracker products with legacy licensing.

      VPN Tracker 10
      Support for VPN Tracker 10 ends on March 31st 2021. VPN Tracker 10 will not receive any updates/support after this date.

      VPN Tracker 9
      Support for VPN Tracker 9 ends on March 31st 2020.
      After March 31st 2020, VPN Tracker 9 will not receive any updates/support after this date.

      VPN Tracker versions 1-8
      These legacy versions are no longer supported.

      How to get support & updates
      If you are still using a older VPN Tracker version, we strongly recommend you move to a modern VPN Tracker 365 plan, which includes ongoing updates and support.

      What happens to unsupported products?
      As they are no longer being updated, they may stop working due to changes on your VPN gateway, server or other technical requirements.
      VPN Tracker uses public key pinning for maximum data protection of your Personal Safe. As a consequence only the original certificate as sent by our servers is accepted by VPN Tracker.
      Some firewalls interfere in the exchange of TLS traffic.
      If that cert is replaced by a firewall or an anti-virus software in an attempt to decrypt the TLS traffic, then the replacement cert is negleceted by the system, even if it otherwise correctly validates.

      If you login on a Mac and you do not see your connections update from your Personal Safe, then check
      - if your firewall or anti-virus software is interfering the the TLS traffic to your Mac.
      - ask your administrator if there is any TLS traffic interfering
      Does your existing VPN product not support the latest macOS release? Not to worry: VPN Tracker supports all major VPN protocols and includes ready-to-go profiles for over 300+ VPN gateways.

      And with full support for macOS Sequoia, you're all set even with the latest releases.

      Start your free VPN Tracker trial today.

      Learn more

      If you're not able to access your team's VPN connection via TeamCloud, please check the following:

      • Make sure you have the latest version of VPN Tracker 365.
      • You'll need to be a member of your company's VPN Tracker Team – contact your IT person if you haven't been added.
      • If you have just been added to your Team, your Team manager will need to launch VPN Tracker or go to my.vpntracker.com to complete your TeamCloud setup.
      • If you see some, but not all of your Team's TeamCloud connections, you may need to upgrade your license to access them all.

      If your question isn't answered above, please get in touch.

      Your account details such as address and email can be edited in the account management using the following link:
      Edit equinux ID
      Don't worry if you accidentally deleted VPN Tracker 365! We understand that these things happen and we've got your back.

      To reinstall VPN Tracker 365, go to our website and click on the "Download" link. Once the app has downloaded onto your Mac, you can log in with your equinux ID and password. When you log back in, you will find all of your preferences saved alongside your secure connections.
      Some VPN vendors offer "SSL VPN" as an alternative to IPsec VPN. SSL VPN isn't a single standard, instead each vendor has their own specific kind of "SSL VPN".

      VPN Tracker 365 offers complete support for SonicWALL SSL connections only, but we do plan on supporting some of the other popular SSL VPN variants in future.

      If you have a SSL VPN connection you would like to see support for, please let us know.
      If you're working from home and need to connect to your company VPN, your admin invite you to a VPN Tracker team to assign you and your other colleagues a VPN Tracker 365 plan.

      {S_1170}

      A VPN Tracker 365 plan allows you to connect to your company's VPN from home and securely access the internal services you need.

      Here's how it works:

      • Click the link in the email to accept the invitation.
      • Create an equinux ID with the email address you received the invitation on.
      • Now, download the VPN Tracker 365 app and sign in with your equinux ID. Your admin will assign you a plan.


      You can now get started with importing a connection and connecting to your company VPN.

      Watch this quick video tutorial to learn more about joining a team:


      If you are using an older copy of VPN Tracker 9 and a supported macOS version, please update to the last release.

      If you are using a current macOS release, or plan to soon, we recommend moving to VPN Tracker 365. It offers support for new macOS releases, improved security, Connection Safe backup and sync and more.


      → Get VPN Tracker 365

      Licenses purchased at different times may have different prices. To check the renewal price for a specific plan, check your products overview in my.vpntracker.com.

      To keep any pricing benefits, please ensure that you have automatic renewals turned on. If you forget to renew your license and it expires, you will lose legacy pricing benefits.


      Safari may ask for confirmation the first time you download a file from a website. So when you download an app from our website, choose "Allow" when prompted to start the download.

      {S_1231}

      Note: All of our apps are digitally signed and verified for security, so you can download with confidence.

      TeamCloud Groups let you use TeamCloud features with just part of your team, e.g. to share a certain VPN connection with just your IT admins.

      To create and edit Groups, you need

      • Team Manager or Organizer status
      • A VPN Tracker VIP or Consultant plan

      To receive a connection from a TeamCloud Group, you need

      • To be a member of the team
      • A VPN Tracker Executive, VIP, or Consultant plan

      Whenever a security problem with certificates is discovered, the rules for certificates are adjusted and tightened accordingly. However, the new rules do not apply retroactively, i.e. they only apply to certificates that were created after the new rules have already come into force. Certificates that are older must still be accepted as valid, even if they were created according to older rules.

      The longer an old certificate remains in circulation, the more likely that someone with the appropriate knowledge and skills will come across it and then exploit its security problem. Therefore, you don't want to have long terms, because if a certificate has to be renewed, it must always be renewed in accordance with the current applicable rules and this happens sooner, the shorter its term is. In the past, the runtimes were too long, but this had led to problems several times when RSA was cracked with 768 bits or when a method was found to create SHA-1 collision, which means that signatures based on SHA-1 all at once could be forged. Back then, it took far too long until insecure certificates were no longer in circulation, which resulted in various avoidable attacks.

      By the way, renewing only affects the gateway certificate. User certificates do not need to be renewed if you exchange the certificate at the gateway. Users also do not need a new configuration. In fact, users don't even notice such an exchange. On web servers today, this usually happens automatically and even more often, as web certificates are often only valid for a maximum of 90 days.
      To share a connection using TeamCloud {S_1267_50%}
      A note on new users

      The person receiving the connection needs to be a member of your VPN Tracker team and has to have set up their TeamCloud encryption keys.
      This happens automatically when they open VPN Tracker and other Team members are online. If another team member is not available, their TeamCloud setup can also be confirmed by a Team manager under my.vpntracker.com.

      To add a new team member to your VPN Tracker Team follow these steps:
      • Log in to your my.vpntracker.com account
      • Select your team in the top left corner
      • On the left side choose "Team Cloud"
      • In the Invite section at the top, enter your new Team Member's name and company email address, then click "Send invitation". {S_1324}
      • The invited team member will then receive an automatic email invitation with a personalised link to click on and join your team.
      • Tip: Each VPN Tracker 365 user needs their own, personal equinux ID. After the user receives a team invitation from you and clicks the invite link, they can either create a new equinux ID or log in using their existing account.
      • In case the user does not receive the invitation email, you can access the invitation link by clicking on "Details" next to the user name
        {S_1386}
        {S_1387_50%}
      • Once a team member has accepted your email invitation, you will be notified via email
        {S_1325}

      You can see all devices connected to your account in your my.vpntracker.com portal

      To remove a device you can either:
      • Log out of your account in the VPN Tracker App
      • Follow this link and press: "Remove all devices"
      If you are having trouble accessing your equinux ID account with 2FA, please read on. For support with 2FA for your VPN connection itself, please reach out to your VPN admin who can assist you with resetting your 2FA setup.

      Reset 2FA for your equinux ID

      If you no longer have access to your 2FA device, you can reset 2FA using your recovery codes. Visit the 2FA guide for details.

      I don’t have recovery codes

      If you no longer have your recovery codes, 2FA can be reset by the equinux support team. Please note that for security reasons, manual 2FA reset will take up to 72h to process, to reduce the risk to accounts.

      To proceed, please contact equinux support with your equinux ID and our team will let you know which additional data is required to reset your 2FA setup.

      The majority of VPN users use their Mac out and about on the go. If a MacBook ever gets lost or stolen, there’s a risk that remote access to your network could fall into the wrong hands. With VPN Tracker, you can prevent unauthorized VPN access by remotely revoking access to the connection.

      With one of the more recent firmware updates Secure Computing changed their implementation of the VPN related standards. These changes break VPN Tracker's ability to successfully establish a phase 2.

      The problem has been resolved by Secure Computing in firmware 7.0.0.07. (epatch 7.0.0.06.E35)

      When you add licenses through the my.vpntracker.com portal, your new licenses, as well as your exisiting licenses will start with the day of purchase and run for one year. This means effectively your existing plan is canceled and the remainig value is credited towards your new plan. Your new plan, including your new licenses and your existing licenses will renew on the same date, preventing the hassle of multiple billing dates throughout the year.

      Example
      You have 2 licenses with a renewal date of December 4th.
      On July 16th, you add 1 additional license.

      You will receive a credit for the remaining durations of the 2 licenses.
      Your new subscription will have 3 licenses and all will have July 16 as their renewal date. The price will be that of 3 licenses minus the credit for your remaining durations.
      VPN Tracker for iOS is compatible from iOS 15, including iOS 16.

      Test VPN Tracker for iOS here.

      We don’t offer partial refunds. All of our 365 plans are valid for one year and you can cancel up to 10 days before the end of your term; however, if you do cancel, you will be able to continue using the software the expiration date of your plan.


      The software we sell on our website and the version sold on the App Store offer the same design features and purchase options.

      There are only two differences:

      1. The equinux Online Store will always provide you with a proper purchase invoice, which can be useful for you if claiming the purchase against your taxes.

      2. You can access the beta version when you purchase from the equinux Online Store. When you purchase through the Mac App store, you will not have access to the beta version.
      SonicWall's SonicOS 6.5.4.15-116n update breaks SSL-VPN connections with SonicWall Mobile Connect and VPN Tracker 365.
      In VPN Tracker's log, you can also see the error message:
      LCP: PPP peer accepted proposal but also modified it which isn't allowed.

      Please update your Sonicwall to at least SonicOS 6.5.4.15-117n to fix this problem. For more information, please visit: https://www.sonicwall.com/support/knowledge-base/mobile-connect-breaks-after-upgrade-to-sonicos-6-5-4-15/240903132324983
      VPN Tracker World Connect allows you to work anywhere in the world, while protecting your corporate data from hackers. With VPN Tracker World Connect, you can stay secure and protect all of your online activities even when you are on business trips. Whenever you are using the wifi at the airport, coffee shop, mall, and other public places, your data is open to anyone else on the wifi network. VPN Tracker World Connect will encrypt your data, which means that you are still protected while using public wifi. Also, VPN Tracker World Connect helps you keep your critical data safe, whether you are accessing documents in the cloud or checking your email. You have the option of choosing "Secure Connection," which will automatically find the closest server to you and secure your connection for you when you activate it.

      You can even use VPN Tracker World Connect to encrypt your internet traffic through a VPN connection via different countries. Here is a list of countries you can connect to with VPN Tracker World Connect: {FQ1308}

      PPTP VPN, or Point-to-Point Tunneling Protocol Virtual Private Network, is a widely used protocol for implementing virtual private networks. It enables secure data transfer over the internet by creating a private, encrypted tunnel between your device and a VPN server. Here's a breakdown of key aspects:
      1. Protocol Explanation:
        • Point-to-Point Tunneling Protocol (PPTP): PPTP is a protocol that facilitates the secure transfer of data between a user's device and a VPN server. It creates a tunnel through which data is encapsulated, providing a secure connection.
      2. Encryption and Security:
        • Encryption: PPTP employs various encryption methods to secure the data transmitted through the tunnel, making it difficult for unauthorized parties to intercept or decipher.
      3. Ease of Setup:
        • User-Friendly Setup: PPTP is known for its simplicity and ease of setup. It's often the preferred choice for users who prioritize a straightforward configuration process.
      4. Compatibility:
        • Widespread Compatibility: PPTP is compatible with a wide range of devices and operating systems, including Windows, macOS, Linux, iOS, and Android, making it accessible for users across different platforms.
      5. Speed and Performance:
        • Performance Considerations: PPTP is recognized for its relatively fast connection speeds, making it suitable for activities like streaming and online gaming.
      6. Considerations for Security-Conscious Users:
        • Security Concerns: While PPTP offers a convenient solution for many users, it's important to note that some security experts have raised concerns about its vulnerability to certain types of attacks. Users with high-security requirements may want to explore alternative VPN protocols like OpenVPN or L2TP/IPsec.
      7. Choosing the Right VPN Protocol:
        • Consider Your Needs: When selecting a VPN protocol, it's essential to consider your specific requirements, including the balance between ease of use and the level of security needed for your online activities.

      In summary, PPTP VPN is a widely accessible and user-friendly protocol suitable for various devices. However, users should be mindful of their specific security needs and consider alternative protocols if stronger encryption is a priority.

      Did you know? VPN Tracker is the only VPN Client for Mac for PPTP VPN under macOS Sonoma and macOS Sequoia.
      There can be some problems with the setup in the Fortigate web interface, possibly with certain browsers like Safari. Here are some tips:

      • Check if there is a firmware update for the Fortigate device: Firmware Updates
      • First, set up the new connection in the Fortigate web UI, and then review all fields again by selecting ‘Edit’. This can help, as not all fields may have been visible during the initial setup
      "Connection refused", means that VPN Tracker tried to open a PPTP connection and the server replied "I am not a PPTP server so I refuse your connection".
      This means that either this IP address is not correct, the PPTP server is simply down at the moment, or the traffic is already blocked by some firewall (which sends this reply on behalf of the real server) and thus won't even allow it to reach its real destination.
      Yes, you can set up a PCI DSS-compliant connection with VPN Tracker. The PCI DSS Logical Security Requirements (version 2.0) require that connections use the following:
      • Two-factor (2FA) or multi-factor authentication (MFA)
      • Certificate-based authentication
      For IPsec VPN-connections, the additional requirements must also be met:
      • Main Mode exchange
      • 3DES or AES encryption
      • Perfect-Forward-Secrecy needs to be used
      For SSL-based VPN-connections:
      • SSL and TLS 1.0 are probihibited
      You will also need to ensure other logging and timeout requirements are met on the VPN gateway. Please see the full PCI documentation for details.
      When your IPsec connection is often able to establish a connection, but sometimes times out because there was no response to the first packet, the problem might be due to host name resolution. This is often the case in IPv6-based networks such as cellular connection, e.g. also when using the Personal Hotspot function on the iPhone.

      Some host names can resolve to both IPv4 and IPv6 addresses, but depending on your current network location and VPN gateway it's possible that only IPv4 addresses work correctly.

      You can enforce resolving to IPv4 addresses only for your connection:

      • Edit your connection.
      • Navigate to the “Advanced Options” section.
      • In “Additional Settings”, change the setting “Connect using IPv4 or IPv6” to “Use IPv4”.
      • Save your connection and start your connection.


      Another way to completely disable IPv6 for Wi-Fi on macOS:

      1. Open the Terminal app from the Utilities folder.
      2. Enter the following command:
      sudo networksetup -setv6off Wi-Fi


      Note: If your Wi-Fi interface has a different name (e.g., `en0`), replace "Wi-Fi" with the correct name. You can check the name of the interface using this command:
      networksetup -listallnetworkservices


      3. After entering the command, you'll be prompted to enter your admin password.

      This will completely disable IPv6 for your Wi-Fi connection.
      The import password is the password with that an exported connection is encrypted on disk. You need to provide it otherwise VPN Tracker won't be able to read the encrypted file. The intention of that password is to prevent that unauthorized users will be able to import or use that connection.

      The unlock password is a password that locks the exported connection from being edited. This password can be set in the export settings of your connection. If no password is entered, the exported connection will be locked for all users and can never be edited. The intention of this password is to prevent unauthorized users from modifying a connection.

      Please see this FAQ for further details: {FQ647}

      {S_694}


      If you have received this error message, please carry out the following steps to fix the problem:
      1. Log out of VPN Tracker
      2. Quit and restart the app
      3. Ensure you have an internet connection
      4. Log into VPN Tracker again
      5. Retry downloading the connection

      You should now be able to access your files again.
      If you are a Team Manager with a VPN Tracker VIP or Consultant license, you can set up Corporate Branding for your team.

      With this in place, team members with an Enterprise, VIP, or Consultant license will see your logo in the app sidebar. This is not only great for adding your corporate identity to VPN Tracker, but also helps consultants distinguish teams and connections.

      How to set up Corporate Branding:
      1. Open VPN Tracker or log in to your my.vpntracker account on the web
      2. In the sidebar, go to Manage Team and scroll down to the Settings area
      3. Under Team Logos, you will see the option to upload a light and a dark version of your team's logo. Select your logo files and click Save to sync the changes for your team

      {S_1293}

      Want to unlock Corporate Branding and additional VIP featues? View all plan options here.
      If you get asked by VPN Tracker's support to send the log files, this is how you can get them. Please note that the connection log files are encrypted since they may contain sensitive data.


      • Open Finder and use the menu “Go > Go to Folder…”.
      • A dialog opens. Into this dialog, please copy & paste the following path without quotation marks: “/Library/Application Support/VPN Tracker 365/var” and press Enter.
      • You should see a folder named log. Please drag it to your Desktop, which will copy its content.
      • On your Desktop, right-click (or click while holding down the Control key) on the log folder and select the Compress “log” menu entry.
      • Please send the resulting log.zip file to our support.

      If you are trying to connect to VPN Tracker and you are getting a "Peer Hangup" error, here is what you need to know:

      "Peer Hangup" or "Peer Hang Up" means that the other side you are connecting to closed the connection and stopped talking to your VPN Tracker in the middle of negotiation. Unfortunately, it's impossible to tell the reason for such a behavior from your side of the connection. The reason can only be found in the log of the device you are trying to connect to by the VPN Protocol (like PPTP or L2TP). There are a number of reasons for this error. For instance, it could potentially be that it is unhappy with some configuration. For those using PPTP, it could be due to the GRE protocol it uses, which requires routers special handling. There could be a router between you (the VPN Tracker user) and the gateway that does not support GRE, causing the connection to time-out.

      Each side (i.e. server and client) sets its own rules as to when the connection key must be renegotiated. If connections are frequently lost, it may help to extend the time required to renegotiate the connection key.

      If no lifetime is set in VPN Tracker, VPN Tracker takes one hour (3600 seconds). The connection can be edited in VPN Tracker and this value can be increased. To keep the key valid for 24 hours, you would have to set the value to 86400 seconds.

      The same should be stored on the server side.

      On rare occasions, the VPN Tracker support team might ask you to record the network traffic between your VPN gateway and your Mac. Here's how to do that:

      First, you need to know the hostname or IP address of your VPN gateway. You can see it in the status page of your connection (the hostname is in the third column), or by editing your connection.

      Then, follow these steps:

      • Open Terminal.app, which you can find via Finder in Applications > Utilities.
      • Enter the following command, and replace [hostname] with the hostname or IP adress of your VPN gateway:
        sudo tcpdump -i any host [hostname] -w ~/Desktop/traffic.pcap
      • You will be asked for a password: this is the password of your Mac user account. You get asked for it because recording network traffic requires elevated privileges.
      • After entering the password, the command appears to hang. It is now recording traffic until you press Ctrl+C (but please don't press that yet).
      • If you see the command prompt again you have likely entered the wrong password. Please run the command again (Tip: press the arrow-up key to recall the command).
      • Go back to VPN Tracker and start the connection you might experience trouble with.
      • After you have reproduced the problem (for example, after the connection failed to connect), go back the Terminal.app window in which tcpdump is running.
      • Press Ctrl+C to stop the recording.
      • On you desktop, there's now a file traffic.pcap. Please send this file to equinux support.

        The current, streamlined VPN Tracker lineup offers a simpler set of options. If you previously purchased a different edition, here's the right edition to order going forward:

        Old edition Current edition
        VPN Tracker for Mac / VPN Tracker 365      → VPN Tracker Personal
        VPN Tracker Pro for Mac    → VPN Tracker Pro for Mac & iOS
        VPN Tracker VIP for Mac    → VPN Tracker VIP for Mac & iOS
        VPN Tracker Team Member → VPN Tracker Personal
        VPN Tracker Team Member Plus → VPN Tracker Executive for Mac & iOS
        VPN Tracker Consultant → VPN Tracker Consultant for Mac & iOS
        VPN Tracker + → VPN Tracker Executive for Mac & iOS
        VPN Tracker Pro+ → VPN Tracker Pro for Mac & iOS
        VPN Tracker VIP+ → VPN Tracker VIP for Mac & iOS
        VPN Tracker Consultant+ → VPN Tracker Consultant for Mac & iOS

        You can purchase upgrades for your existing licenses on your my.vpntracker upgrade page, or order new plans through the VPN Tracker Online Store

        We offer a free trial for VPN Tracker which can be used to test all functionality of the app, helping users identify the best fit for their needs. After this trial period, all sales are final upon subscription, in accordance with our Terms and conditions.
         
        Please be aware that we cannot process refunds in the following scenarios:
        • Non-usage of the app or service
        • Failure to cancel your account within the cancelation period
        • Lack of features or functionality on your subscribed plan
        • Purchases made in error
        • Exceptional circumstances beyond our control
        • Violations to our Terms of Use
        VPN Tracker 365 for Mac can also be installed using brew. This is practical if, for example, you only have SSH available when maintaining a computer. The following steps are necessary for this:
        1. Brew must be installed on the computer: https://brew.sh
        2. Enter in the terminal:
          brew install --cask vpn-tracker-365

        The latest release version of VPN Tracker will then be installed.
        This usually has one of two main causes:
        1. If your VPN connection is configured to be Host to Everywhere, all non-local network traffic is sent over the VPN tunnel once the connection has been established. All non-local traffic includes traffic to public Internet services, as those are non-local, too. Those services will only be reachable if your VPN gateway has been configured to forward Internet traffic sent over VPN to the public Internet and to forward replies back over VPN, otherwise Internet access will stop working.

          A possible workaround is to configure a Host to Network connection instead, where only traffic to configured remote networks will be sent over VPN, whereas all other traffic is sent out like it is when there is no VPN tunnel established at all. In case the remote network are automatically provisioned by the VPN gateway, this has to be configured on the VPN gateway, automatic provisioning has to be disable in VPN Tracker (not possible for all VPN protocols), or the Traffic Control setting has to be used to override the network configuration as provided by the gateway (Traffic Control is currently not available on iOS).

          A Host to Everywhere setup may be desirable for reasons of anonymity or to pretend to be in a different physical location (e.g. a different country), since all your requests will arrive at their final destination with the public IP address of the VPN gateway instead of your own one. Also that way you can benefit from any maleware filters or ad blockers running on the VPN gateway, yet it also means that the gateway can filter what services you have access to in the first place. If Host to Everywhere is desired but not working, this has to be fixed on at the remote site, since what happens to public Internet traffic after being sent over the VPN is beyond VPN Tracker's control.

        2. If the connection is configured to use remote DNS servers without any restrictions, all your DNS queries will be sent over the VPN. Before any Internet service can be contacted, its DNS name must be resolved to an IP address first and if that isn't possible, as the remote DNS server is not working correctly or unable to resolve public Internet domains, the resolving process will fail and this quite often has the same effect in software as if the Internet service is unreachable.

          A possible workaround is to either disable remote DNS altogether, if not required for VPN usage, or to configure it manually, in which case it can be limited to specific domains only ("Search Domains"). By entering a search domain of example.com, only DNS names ending with example.com (such as www.example.com) would be resolved by the remote DNS servers, for all other domains the standard DNS servers will be used as configured in the system network preferences.

          Using a remote DNS server may be desirable to filter out malicious domains, to circumvent DNS blocking of an Internet provider, to hide DNS queries from local DNS operators (since DNS is typically unencrypted), or to allow access to internal remote domains that a public DNS server cannot resolve, as they are not public. For the last case, configuring the internal domains as search domains is sufficient. For all other cases, the issue must be fixed at the remote site, since what happens to DNS queries after being sent over the VPN is beyond VPN Tracker's control.

        When you start a trail license (e.g. 7 days), we authorize your card for the annual amount of the corresponding license as soon as you start the test (similar to a hotel or rental car deposit).
        If you cancel the trial license within the specified period, your account will not be charged. The pre-authorization then no longer applies.
        VPN Tracker offers support for countless VPN protocols and gateways, including support for VPN on the NETGEAR Nighthawk router.

        Our detailed step-by-step guide shows you exactly how to set up a secure VPN connection to your NETGEAR Nighthawk device using VPN Tracker.

        VPN Tracker 365 offers support for countless VPN protocols and gateways, including support for Amazon's AWS VPC Mac VPN client.

        Our detailed step-by-step guide shows you exactly how to set up a secure site-to-site VPN connection using AWS Virtual Private Cloud and VPN Tracker 365.

        Any data you upload to your Personal Safe is strongly encrypted. Nobody, not even us, will be able to access your data.

        Connections and Shortcuts which have been stored in your Personal Safe may be deleted in two different ways:

        1. In the VPN Tracker for Mac App


        In order to delete connections or Shortcuts from your Personal Safe, please follow the following steps:
        ‣ Go to "VPN Tracker" > "Preferences"
        ‣ Select "Personal Safe"
        ‣ Uncheck the connections and/or shortcuts you would like to delete from the list
        ‣ Press update
        ‣ This will delete all connection info from our servers.


        2. In a browser at my.vpntracker.com


        In order to delete connections from your Personal Safe, please follow the following steps:

        ‣ Open my.vpntracker.com  and log in with your equinux ID and password
        ‣ Select "Personal Safe" in the sidebar
        ‣ Here you will see all connections and Shortcuts which are saved in your Personal Safe.
        ‣ When you press the delete button next to any connection, this will instantly be deleted from your Personal Safe

        When it comes to choosing a VPN client, there are several key questions you need to consider in order to determine which option is the most reliable, and which option will keep your sensitive company data protected.

        Does the Mac VPN client always support the latest operating system updates?
        Following the final release of a new operating system, many Mac VPN client manufacturers take several months to provide their customers with a solution. Do you really want to be locked out of your VPN access because your software vendor can’t get their updates ready in time?
        Why choose VPN Tracker?
        VPN Tracker is always first when it comes to new operating systems. VPN Tracker is usually compatible with new macOS systems with the first Developer release of an new operating system.

        How good are the team management features for using the Mac VPN client in a larger setting with many users?
        Effective Team Management is a huge part of using a Mac VPN client in a professional setting. Do you really want to be put at risk, by an ex-employee, or would you rather choose the secure solution?
        Why choose VPN Tracker?
        VPN Tracker offers a professional team management interface, allowing you to add new users and delete old ones easily. You even have the option of removing your company connections from the user’s computer.

        Does the Mac VPN client vendor have sufficient experience in the field?
        Corporate data is a highly sensitive area, and it's very important that your company's data is kept in safe hands. Choosing a vendor with a questionable background in the field could mean you're handing your corporate confidential data to an unknown organization with barely any experience, or even to someone who could possibly sell your data at a later point in time to refinance their efforts.
        Why choose VPN Tracker?
        VPN Tracker is offered by equinux, one of the most experienced software developers for Mac and iOS. VPN Tracker has earned the trust of Mac admins around the world and always treats your confidential data with the utmost security. Through years of experience, we can confidently say “Your data is safe with us!”

        Does the software contain unlicensed code or suffer from poor security architecture?
        Nowadays, many software developers bundle unlicensed third party code and leave your system open to attacks with unsigned network components. This is a risk you really don't want to take when it comes to your data security.
        Why choose VPN Tracker?
        VPN Tracker ONLY contains officially licensed code and has a securely designed security architecture that ensures your VPN connection is protected at all times.

        Is the software code 100% Mac native?
        The effectiveness of any Mac application can only truly be guaranteed if the code that the software is written in is 100% Mac native. A lot of the time, Mac VPN clients tend to use unsigned network components which can open up unwanted vulnerabilities and leave your system open to attacks.
        Why choose VPN Tracker?
        The code used to create VPN Tracker is 100% Mac native. Every line of code was written with the highest security standards in mind, meaning the app is highly effective and the most reliable choice for protecting your sensitive company data.

        Is the VPN implementation secure and are the Mac VPN client components tamper proof
        A VPN client is a highly specialized piece of software. It must possess a 100% tamper-proof security architecture. Many VPN clients force insecure set ups and will require poor security settings in order to work. Your company's information is valuable, don’t put your data at risk by making the wrong choice.
        Why choose VPN Tracker?
        VPN Tracker does exactly what is required of a reliable Mac VPN client and its components are all 100% tamper-proof.

        Does the manufacturer offer professional technical support?
        Even among the most experienced of IT professionals, VPNs can be a difficult topic and sometimes it's understandable that you need advice or a second opinion. In an ideal world, your VPN client should provide you with this, unfortunately, this is not always the case. Many manufacturers rely on support through forums. This means posting your sensitive VPN data on public forums and hoping someone will reply. Since VPN is the front door to your office, this is essentially the same as leaving your house key underneath the front mat. Not a good idea.
        Why choose VPN Tracker?
        The technical support VPN Tracker offers is one of the best in the industry. Your technical inquiries will be handled by customer support professionals on a one-on-one basis. The VPN Tracker support team works hard to quickly provide helpful answers and productive solutions to all inquiries, no matter how big or small.

        We are proud to say that VPN Tracker is the market leading VPN client for the Mac and guarantees you complete security for your confidential company data at all times. Download the free trial today to find out why VPN Tracker is the best and most reliable choice for your business.

        Convert Your Products into Store Credit

        If you wish to change the number of your licenses, you have the option to convert your existing license into store credit. You can then use this credit for your next purchase:

        Note: If the remaining value of your old product exceeds the amount for the new product, you will receive an additional promo code for the remaining value.


        VPN Tracker offers support for countless VPN protocols and gateways, including support for VPN connections on the TP Link SafeStream router.

        Our detailed step-by-step guide shows you exactly how to set up a secure VPN connection to your TP-Link SafeStream router and connect on your Mac, iPhone or iPad in VPN Tracker.

        Especially so-called "clean up tools" that also scan for malware can report false-positives. If you suspect VPN Tracker 365 or Mail Designer 365 to be infected, we recommend to upload your copy of the app to www.virustotal.com which is a free service that scans your uploaded files using several reputable virus scanners. If any of the virus scanners on this site flags the app, please contact us.

        How can I verify that my copy of VPN Tracker 365 or Mail Designer has not been modified?


        All our apps are properly code-signed by Apple, so macOS can verify that the app has not been tampered with. You can check the integrity by opening Terminal.app and entering the following command:
        spctl --assess "/Applications/VPN Tracker 365.app"

        Please note that double quotes around the path are required because the path contains spaces. If your copy is in a different location, please replace "/Applications/VPN Tracker 365.app" with the proper path to the app.
        The output may look like this:
        /Applications/VPN Tracker 365.app: accepted
        source=Notarized Developer ID

        If the app has been modified, an error message like this is printed:
        Mail Designer 365.app: invalid signature (code or signature have been modified)

        Please contact us if your copy of VPN Tracker 365 or Mail Designer 365 has an invalid signature.

        How can I verify that my copy of VPN Tracker 365 or Mail Designer 365 was signed by equinux?


        All our apps are properly code-signed by Apple, so macOS can verify that the app has not been tampered with. You can review this signature by opening Terminal.app and entering the following command:
          codesign -d -vv "/Applications/VPN Tracker 365.app" 

        Please note that double quotes around the path are required because the path contains spaces. If your copy is in a different location, please replace "/Applications/VPN Tracker 365.app" with the proper path to the app.
        The output may look like this:
        Executable=/Applications/VPN Tracker 365.app/Contents/MacOS/VPN Tracker 365
        Identifier=com.vpntracker.365mac
        Format=app bundle with Mach-O universal (x86_64 arm64)
        CodeDirectory v=20500 size=81953 flags=0x10000(runtime) hashes=2550+7 location=embedded
        Signature size=9071
        Authority=Developer ID Application: equinux AG (MJMRT6WJ8S)
        Authority=Developer ID Certification Authority
        Authority=Apple Root CA
        Timestamp=1. Jun 2021 at 17:22:51
        Info.plist entries=42
        TeamIdentifier=MJMRT6WJ8S
        Runtime Version=11.1.0
        Sealed Resources version=2 rules=13 files=684
        Internal requirements count=1 size=216

        The important parts to look out for here are the lines starting with "Authority": They list the chain of trust. The last entry must always be "Apple Root CA", the entry above must either be "Developer ID Certification Authority" or "Apple Worldwide Developer Relations Certification Authority" for App Store versions. The first entry must either be "Developer ID Application: equinux AG" (VPN Tracker 365), "Developer ID Application: Tower One GmbH" (Mail Designer 365 non-App Store), or "Apple Mac OS Application Signing" (Mail Designer 365 App Store).
        Again, if you see a different entry, please contact us.
        VPN Tracker 7 and 8 can be installed on the same Mac. Please note that it is not possible to run them both simultaneously, but once you quit one version of VPN Tracker, the other will work just fine.

        For later versions, VPN Tracker 10 and VPN Tracker 365 can also be installed on the same Mac. They store their data and settings in different places. However, you cannot run different versions at the same time.

        Certain SonicWall releases have known issues with DHCP IP assignment for clients, which can result in duplicate IP address assignments. To troubleshoot this, try the following:

        1. Connect to the VPN with the computer experiencing the connection problem.
        2. Note its assigned client IP address.
        3. Ping this IP address from within your LAN.
        4. Disconnect the VPN on the problematic computer. You will likely observe that the ping continues, indicating that another device is using this IP address.

        Troubleshooting Steps:

        1. Identify the computer that is using the duplicate IP address. Often, a computer within the LAN is already using an IP address that falls within the DHCP range of the SonicWall.
        2. If step 1 does not resolve the issue, restart the SonicWall.
        Load more entries